This tutorial aims to explain how to migrate Medium blog to your own self hosted blog. Here I will talk about a handy method to migrate Medium blog to a self hosted blog. Here I will use Netlify for hosting and files will be stored in a GitHub repository. With the help of a command line tool, we will convert the Medium blog to a static Gatsby blog and will host it for free. However, the whole process of doing that needs some technical knowledge. Also, you will need some knowledge of markdown in order to create new posts.
Medium is a good place for writers but nowadays there are other ways to host your blog and for free. Netlify provides you static site hosting that you can use to host almost anything. And here we will use it to host our own blog and will import posts from Medium account. The tool I have mentioned below will get the Medium archive and will parse all the posts and then convert the blog to Gatsby. Gatsby uses markdown syntax for posts and you will have to use that for creating new posts.
There are various reasons to choose Netlify for static hosting. The biggest reason for using Netlify is that it is free of charge for websites driving low traffic. The second advantage is that you won’t be charged for hosting as you are using GitHub to store the site data. Next advantage is that you can use your own domain here if you have a registered one. And lastly, it automatically updates the site when it detects changes in the GitHub repository. You will have to do a little bit of hard work in the beginning and then you will able manage your blog easily.
How to Migrate Medium Blog to your own Self Hosted Blog?
If you have blog on Medium but want to migrate to other destinations for some reasons then this is the right place for you. I have split the process of migrating Medium blog to own hosting in two easy parts. In the first part, we will get the posts and other content from Medium and in the second part. we will configure the hosting. In the end, I will also tell you about how to create new posts once you have set up the self hosted blog. So, let’s just get started.
Part 1: Obtaining Medium Archive Containing Posts, media, and Profile Information
Just like social media and other sites, you can demand an archive from Medium as well. Medium gives you a ZIP file which contains all your Medium data including posts, profile information, media, interests, highlights, claps, bookmarks, blocks, followers, and some other assets. So, the first thing we will have to do is get the archive from Medium For that, go to “Settings >Download your information” section. You can use this link as well and scroll down to this option.
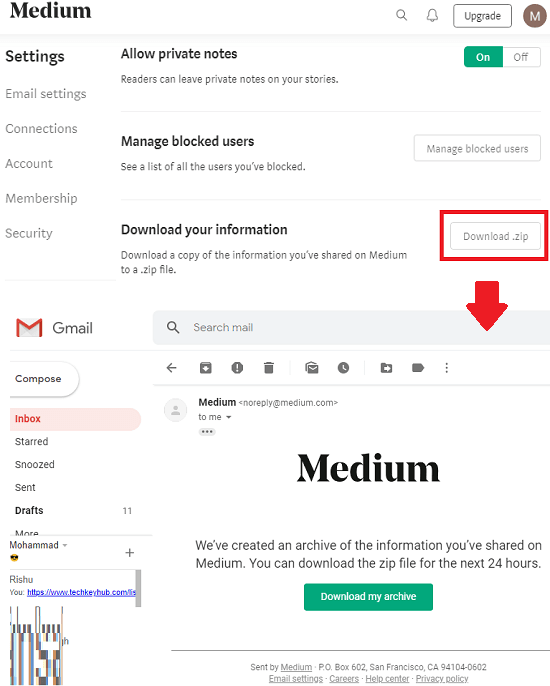
Now, simply hit the “Download .zip” option and it will email you link to the archive. You can see the screenshot above. So, download the archive and place it somewhere where you can remember the path because we will need that later. When you have successfully obtained the archive, move to the second part.
Part 2: Parse Medium Posts from Archive, Create Static Website, and Host the Blog
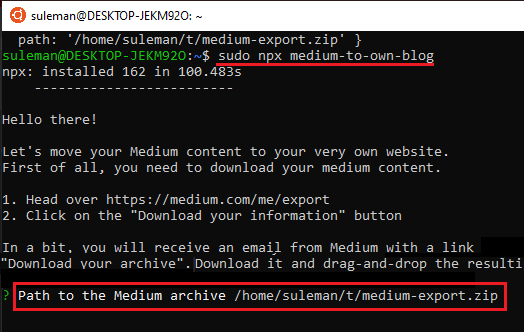
This is the core part of this whole process. Here we will use a command line tool called, Medium to own Blog. This command line tool is written in Node.js and you can easily execute it from command line or terminal. If you have Node.js installed then you can proceed without any problem. Otherwise, install Node first on your PC or WSL and you can see the process here(use PPA method).
Step 1: Now, open terminal and then execute the following command. Do note that, you have to get the ZIP file ready that we have already downloaded from Medium. We will need the path to the ZIP file when the below command is about to finish its work. When the dependencies have downloaded, it will ask you to enter the path to the Medium archive as you can see in below image.
npx medium-to-own-blog
Step 2: Now, it will ask you to provide URL to the GitHub repository to save the data. Create a new GitHub repository by logging in your account and then give it name and make it public. When the repository has been created, simply enter its URL in the terminal. It will parse posts and other required data and will upload the files in the newly created repository. If you are not signed in then it will ask for your GitHub credentials.

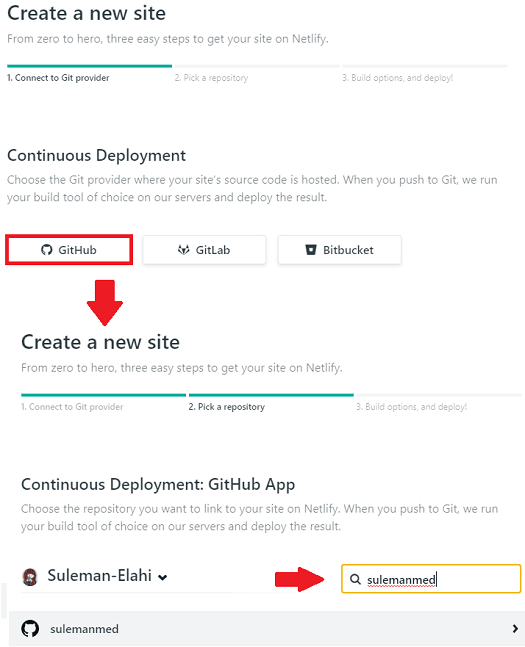
Step 3: After uploading the site data, its time to configure hosting. Log in to your Netlify account and create a site with Git. If you don’t have a Netlify account then create one and I will recommended you to use GitHub account to sign up.
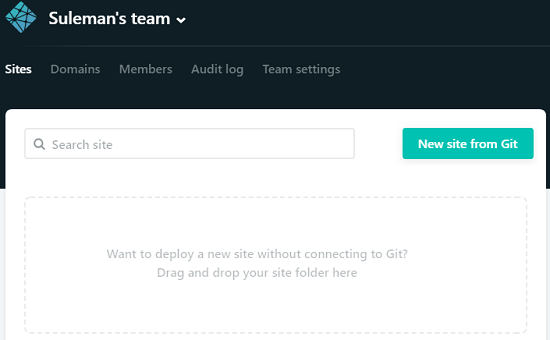
Step 4: Now choose GitHub option from there and then select GitHub repository from your account where you have saved the site data. If you don’t see the repository there then you can use the search box to find it.
Step 5: After selecting the repository it will ask you to specify the build settings. But you don’t have to touch that. Let the build settings as default and then deploy the site. It will take a few minutes for the site to go online. It will show its homepage URL on the dashboard which is changeable from site settings.
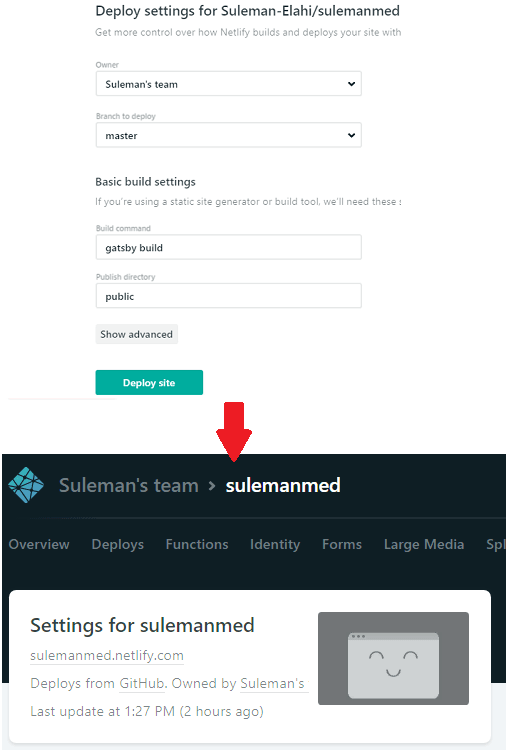
Now, your site is up and online and you can share its URL with anyone you want. The theme is lite and best suited for the static site. By default there will be the content from your Medium account. And you can easily create new posts. You only need some idea of markdown syntax and other things will be easy to handle.
Adding New Posts in Newly Created Blog:
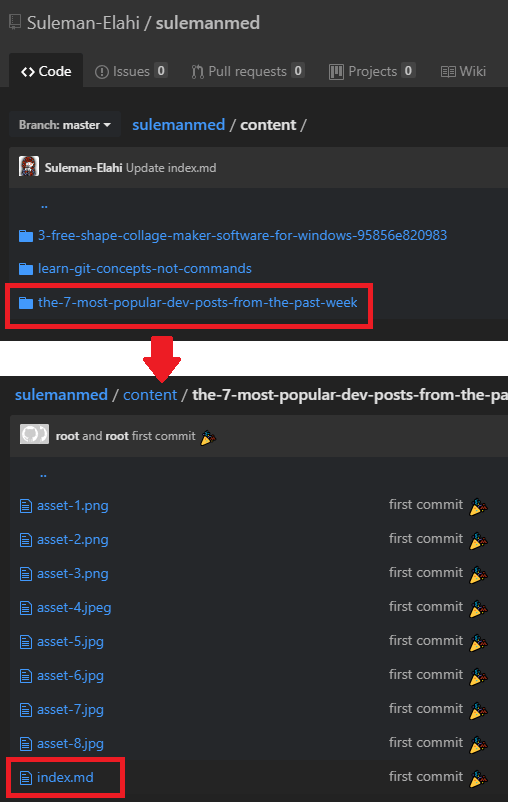
There is no CMS or pretty UI to add new posts in your site. Which is why, you will have to create posts manually. But, good thing is that it will automatically update the post you create. This is the feature of Netlify that it automatically detects new commit in main or other branch and then updates the site accordingly.
To create a new post, you go to the content folder in the GitHub repository. Give this folder any name but use hyphens in place of spaces. The name of the folder will be treated as the URL of the post. Next, in the folder, you add all the images that you want to use and create main markdown file. The basic metadata you have to define in the beginning and you can see the template below.
---

title: 'Title of Post'

description: 'A description that will appearance on front page of blog and in Google SERP'

date: 'date of the publication, can be left empty'

categories:

- tag

- of

- the

- article

published: `true` or `false` (if false, you can access the article using its link but it won't appear on front page)

---
You can create a post in this way and then commit changes to the master branch. Netlify will automatically pick up the changes and will update the site accordingly. This way, you can create posts and then publish them with ease. If you want then you can take help of markdown editors out there to write new blog posts.
Wrap up…
If you want to take out your Medium blog and host it on a different place then this post will help you. If you have some technical knowledge and know how to work with git and command line stuff then it will be easy for you. Also, even if you are not so techie person, I am sure using the guide I have mentioned above, you will be able to migrate your blog from Medium. So, if you are planning to migrate your blog and want to host that for free use the process mentioned here.