Here are best free software to set default printers for different networks. Using any of these free software, you will be able to automatically switch between multiple printers based on which network you are connected to.
Let’s say you have two different Printers; one at the office and another at home. And you want to automatically set the home printer as a default printer when you are at home and office printer as default printer when you are connected to the office network. Manually changing the default printers is a wastage of time. That’s where these free software come in handy.
Let’s see, what it takes to change default printers for different networks.
Best Free Software To Set Default Printers For Different Networks
Quick Config
Quick Config is a free software to set default printers for different networks. Basically, the main function of this software is to create and apply various configurations based on your network. Using Quick Config, you can easily specify some preferences, such as default browser, network drives, IP address, DNS server, and of course default printer. Apart from all these features you can set up multiple profiles that you can create and apply. After that, it will start running as a background process; you can see it in the system tray. Additionally, you can export a specific profile so that you can run that profile on other computers also. For further details about Quick Config, you can see its review here.
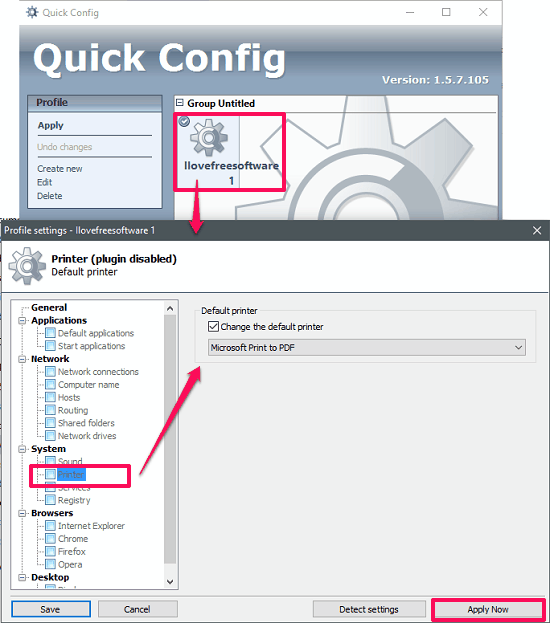
It’s pretty easy to use this freeware to change default printer for different networks. Quick Config also comes as a portable version, so you can use this software without actually installing it on your PC. You can launch it after downloading it from the above link. From the left side of its interface you can create a new profile and configure various options in it. After creating a profile, Profile settings window will pop up in which you can use various options to manage in your network profile.
From the left side of the profile settings window, navigate to the System node and expand it. Find Printer sub node from it and click on it. After that, a Default printer section will appear on the right side of the interface. You can then enable Change the default printer option and assign a default printer by choosing it from the drop down list. After that, hit Apply Now button and your profile has been configured now. To run a profile, simply right click on it and choose Apply option from the context menu.
So, in this way you can easily set default printer for different networks using Quick Config. And I really like the fact that it has included many options that you can configure while switching between various networks.
Argon Network Switcher
Argon Network Switcher is another free software to set default printer for different networks. This free software is mainly used to change the IP address of a PC when it connects to a different network. You can create multiple profiles in it for different networks and run them whenever the network changes. Using Argon network switcher, you can specify IP address, default printer, some service, programs, network drives, and many others.
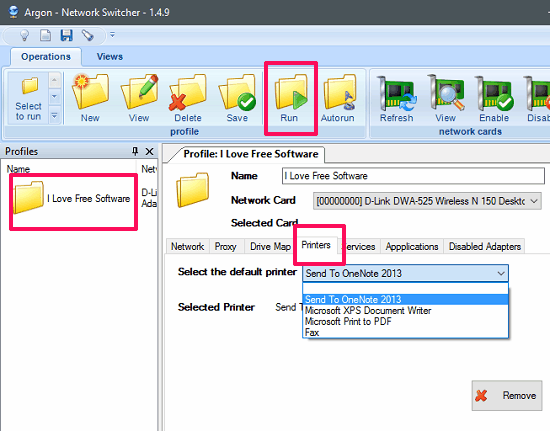
Getting started with Argon Network Switcher is pretty simple. Just download and install it using the above link. After that, open it up and you will see its interface. Simply create some profiles in it for different networks and when done, save them. There are various options given in the various tabs of the software. Use the Printer tab to configure default printer for the current profile. There is a drop down given to choose from the list of available printers. After selecting the default printer, simply hit the Save button.
To run a specific profile, simply right-click on it and then select Run Profile option from the top to apply the network configuration to your PC.
That was the case with the Argon Network Switcher to change default printer for different networks. It’s quite a powerful software to do that and offers many features that you can easily configure and apply them in your profile and run it.
NetSetMan
NetSetMan is another powerful software to set default printer for different networks. Using this free tool you can easily do that in just a few seconds. Using NetSetMan, you can easily configure various options to apply them on the currently connected network. You can set the IP address, DNS server, and of course default printer. Also, you can specify any one preference in a it. So for changing a default printer, you don’t really have to opt for an IP address or any other option. NetSetMan is only free for personal use so it is advisable not to use this software for any commercial use.
The process of getting started with NetSetMan is pretty similar to what I have already explained for the above software. You simply start by creating a profile for a network and opt for certain options. To set a default printer, first enable the Printer checkbox and the drop down next to it will be enabled. After that, choose the desired printer from the list and hit the Activate button from the top right side of the interface. It will then configure your PC according the choices that you have made. It keeps running in the system tray as a background process, so you can configure it again if you want, by accessing it from its tray icon.

So, that was the case with the NetSetMan to set default printer for different networks. If you are looking for a software to do the same for personal use, then NetSetMan is a very good option.
Set Default Printer for Different Networks in Windows 7
If you are using Windows 7, then you would be happy to know that Windows 7 comes with a built-in feature to set default Printers for different networks. And the best part is that, it doesn’t require any other third party software to do it. You can do this configuration from the Windows Control Panel itself.
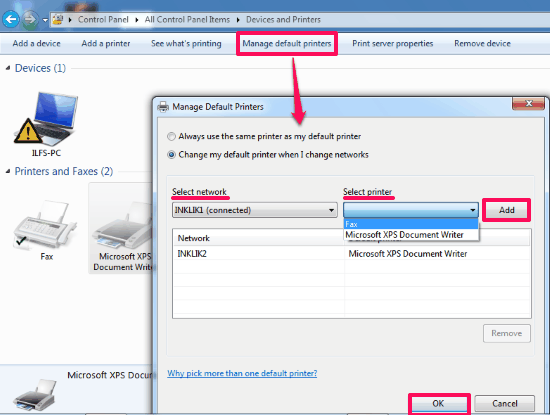
In the Control Panel go to printer and devices and then move down to the Printers section. You will see available printers. Click on any one of them and on the top bar Manage default Printers option will appear. Click on this and a window will pop up. From the Mange Default Printers Window, check the option Change my default printer when I change networks. After that, use the Select network drop down and choose a network from the list. Next, move to the Select printer drop down and specify any printer that you want to assign to the corresponding network. You can specify as many networks and printers as you want. And when you have assigned default printers, simply hit the OK button and changes will be saved there.
So, if you are a Windows 7 user, then you can set default printers for different networks very easily. However, I wish this feature should have been available in Windows 10 as well.
Final Words
These were some best free software to set default Printer for different networks. In the article above I have listed various software that can do that in a convenient way. Also, I have listed a native method for Windows 7. So, if you are looking for ways to set default printer for different networks, then this list will surely come in handy.