Coolify is a free self-hosted alternative to Heroku and Netlify. This is kind of an open-source PaaS platform that you can use to host and manage services, websites, databases, APIs, and custom applications. It supports multiple build systems and can integrate with popular Git platforms such as GitHub, GitLab, and Bitbucket.
If you want to have your own platform to host your own web applications then Coolify can help. You just need to have the necessary tools such as a VPS, domain, and hosting to easily install and configure it. Below is the list of services that can be hosted using Coolify in a few clicks.
- WordPress
- Ghost
- Plausible Analytics
- NocoDB
- VSCode Server
- MinIO
- VaultWarden
- LanguageTool
- n8n
- Uptime Kuma
You can create and host as many instances of the above services and terminate them. It uses the FQDN format for the domains so you can host as many services as you want given that your host server can handle that. It automatically issues HTTPS certificates for the web apps and you can stop them temporarily as well.
The process of hosting different web apps on Coolify is much the same as Netlify/Heroku. You connect a GitHub repository, import the code for your app or static site, specify build instructions and then deploy it. This is as simple as that. It shows and keeps build logs as well as the application logs. So, if there happens any error, you will know it.
Main Features of Coolify:
- Multiple Application Support: You can host both kinds of application; serverless as well as serverless.
- Host SQL and NO SQL Databases: With Coolify, you can host SQL based as well as NO-SQL databases such as MongoDB and use them in your applications with ease. The databases that you host here can be exposed to the internet if you want to.
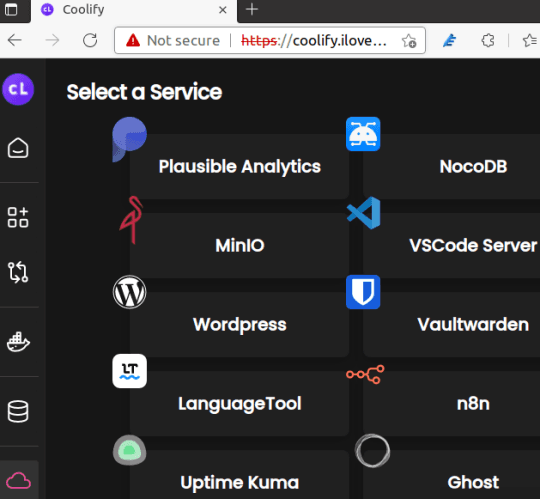
- Host Services: Coolify comes with a set of most commonly used services. It actually supports hosting popular open-source projects such as WordPress, a password manager, VS Code online, and more. I have listed all the supported services above and in the future updates, there may be more of them.
- Multiple Destinations: Whatever you want to host, you can deploy it anywhere such as on a local Docker engine, remote Docker engine or Kubernetes. You can always create new destinations in Coolify.
- Commit / Pull Request Deployments: It can automagically detect new commits and pull requests and initiate deployments of the app. So, you will always have updated apps. The new code changes are reflected back very quickly.
- Team Members: You can create teams. If you have multiple members that you usually work with then you can create a team and invite them, and then collaborate on the different applications. This is as simple as that.
Build Systems Supported by Coolify:
As I already mentioned in the beginning that it supports different build systems, here is the complete list. If your application is based on one of these technologies then you can always host it in a few clicks.
- Static sites.
- NodeJS based apps.
- PHP
- Svelte
- VueJS
- NuxtJS
- Gatsby
- Astro
- Eleventy
- React
- Preact
- NextJS
- NestJS
- Rust
- Docker
As soon as you connect a git repository containing the application file, it will detect the build system. Even if it doesn’t then you can always select it from the available options. Next, you proceed with the app installation and configuration.
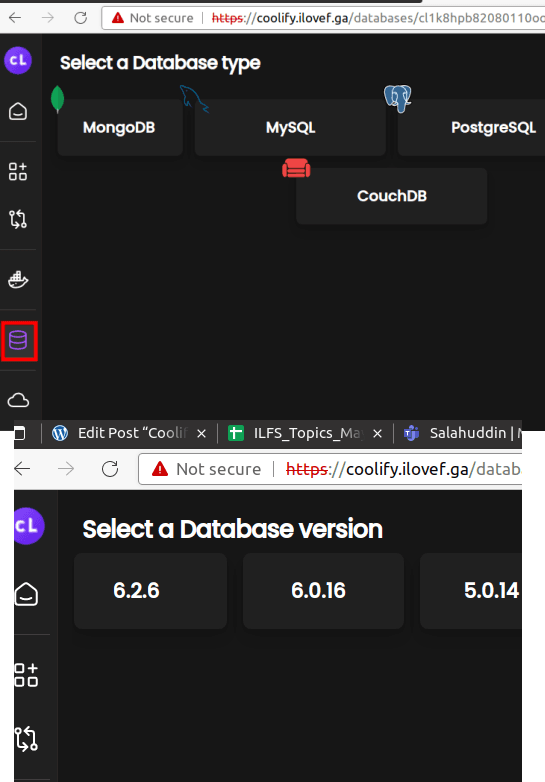
Database Systems Supported by Coolify:
Coolify supports independent database systems. The following are supported database types and you can configure them for your applications hosted on Coolify or you can use them as remote databases for some other desktop or mobile applications.
- MongoDB
- MySQL
- PostgreSQL
- Redis
- CouchDB
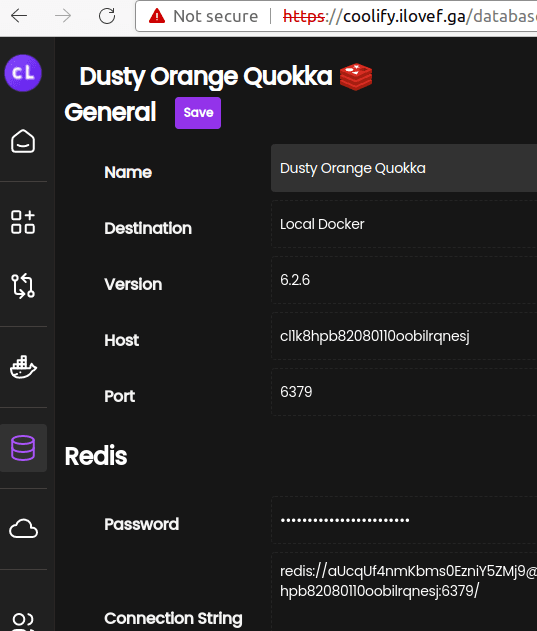
There is a dedicated databases section in Coolify. From there, you can select a database and deploy it. Coolify lets you deploy multiple instances of the databases. Not only that but if you want to use a specific version of a database then you can do that. However, it doesn’t have any database client in it to check the data tables. After getting the connection parameters, you will have to test that manually.
Installing Coolify on a VPS:
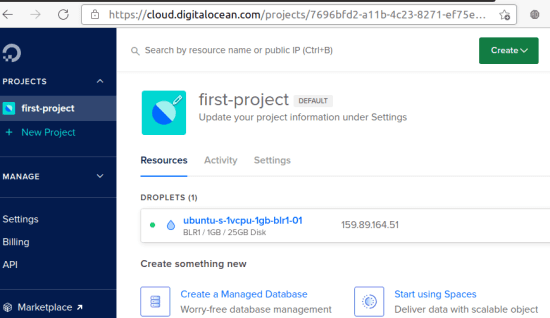
Even though you can install it locally, I will not recommend it. Get a cheap or a nice VPS to host it. For this post, I will be using a basic Ubuntu droplet hosted on DigitalOcean. So, if you also want to use DigitalOcean then create an account there and after adding a payment method create a new project.
In your project, you create a droplet and specify a root password. If you want, then you can also opt for SSH key authentication if that’s what you use usually. Finally, deploy the droplet and then wait for it to go live.
Start an SSH session on the terminal and connect to the droplet that you just created. Run the update and upgrade commands and then, in the root shell, type the command below to begin installing Coolify. While it is installing the backend, you just sit back and relax.
/bin/bash -c "$(curl -fsSL https://get.coollabs.io/coolify/install.sh)"
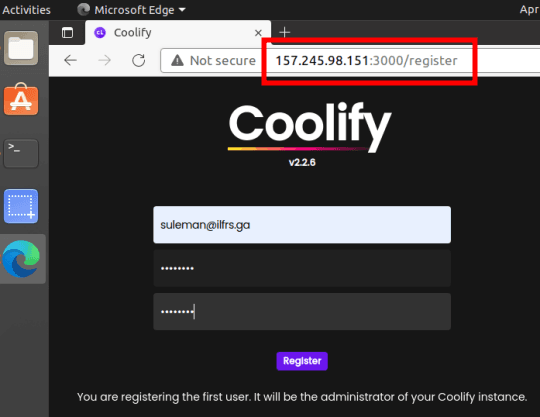
After it has been installed successfully, it will show you the URL of the app. Initially, it is a socket address with IP of your server and port number. You can see the output on the command above.
Now, copy-paste the socket address in the browser and then you will see the login/registration page which looks like this.
Now, at this point, you have successfully installed Coolify. It will keep running as long as you want it to be. Next thing you have to do is add a domain to the UI and for that, follow the next section.
Assigning Domain to your Coolify Instance:
I am assuming that you already have a domain with your and access to its DNS. So, quickly go to the Coolify settings by clicking on the gear icon from the bottom left. After that, on the top, you will see the option to add a domain. So, you just enter a domain that you want to assign.
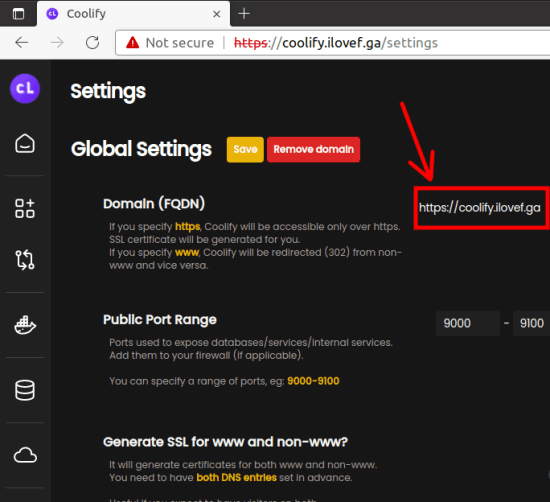
The domain should be entered in FQDN format such as coolify.xyz.com or dasboard.suleman.com, etc. Also, you can enter HTTPS protocol to run Coolify with SSL and it will generate the certificate automatically.
Save the changes and log in to your registrar’s domain portal and then configure the domain. Create an “A” record and point it to your server or VPS or DigitalOcean droplet Use the same IP address that you got in the beginning. In the domain field, specify a name that you want to use as a subdomain. For example, if you have a domain xyz.com and want to host Coolify on coolify,xyz.com, then enter coolify in the domain field.
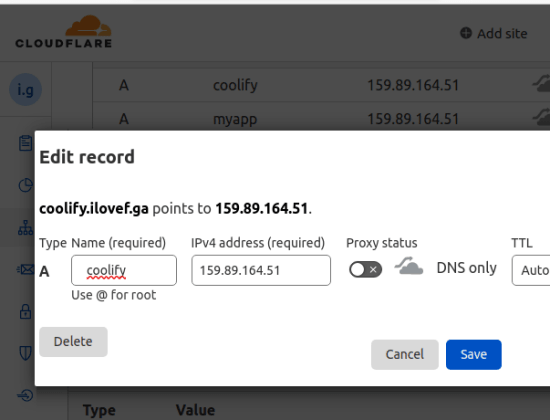
Now, save the changes in your DNS and wait for them to reflect. This can take up to 5 minutes to 24 hours.
To check if your domain is working, just type it in the address bar and hit enter. If it takes you to the login page of Coolify then it means, it is working.
In this way, you can add a domain to your Coolify instance.
Using Coolify to Host Applications and Static Websites:
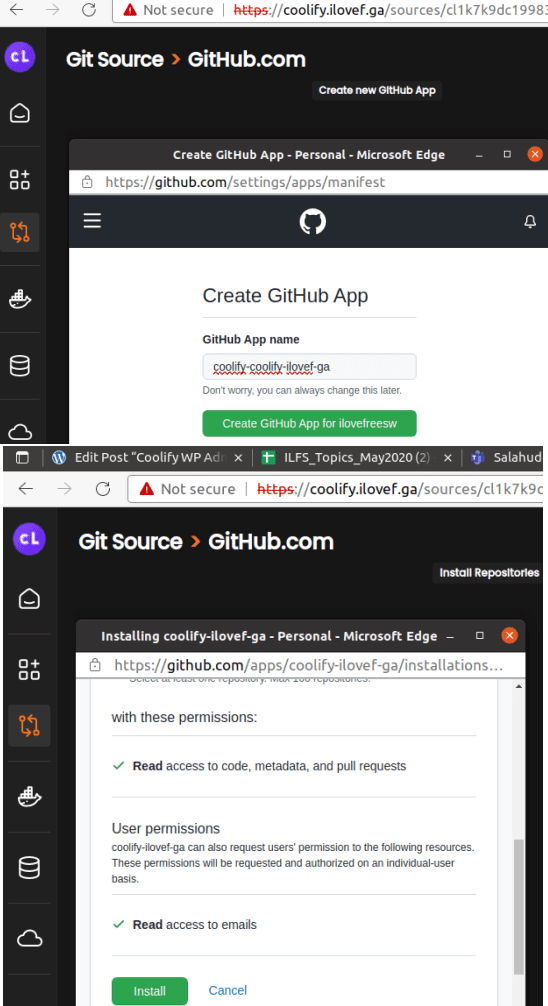
The very first thing that you can do on Coolify is host static websites. It supports a lot of build systems for that and you can just get started with it quickly after adding a Git source. So, in the Applications section, click on the “+” icon and then add a git source. I have already mentioned that it supports GitHub, GitLab, and BitBucket.

Now, you proceed with the authentication. I am using GitHub, so allow it to access your GitHub profile to pull repositories. It will create a GitHub app, so you proceed with that.
Now, when GitHub is added a source, you select the repository that you want to host. Select a repo and a corresponding branch that you want to pull. It will then download the code and will scan it to suggest a build system for it automatically. You can see that in the screenshot below.
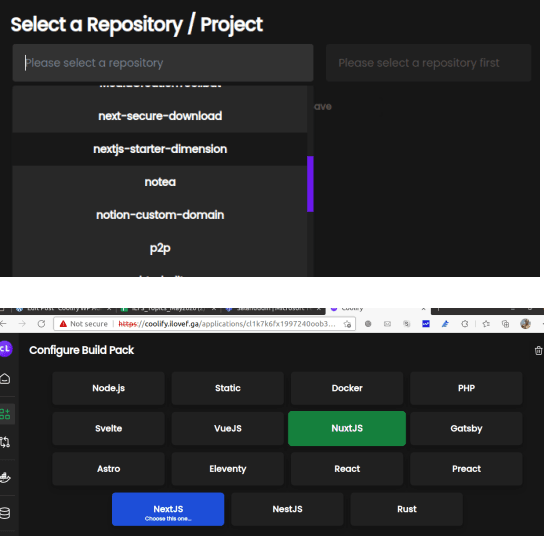
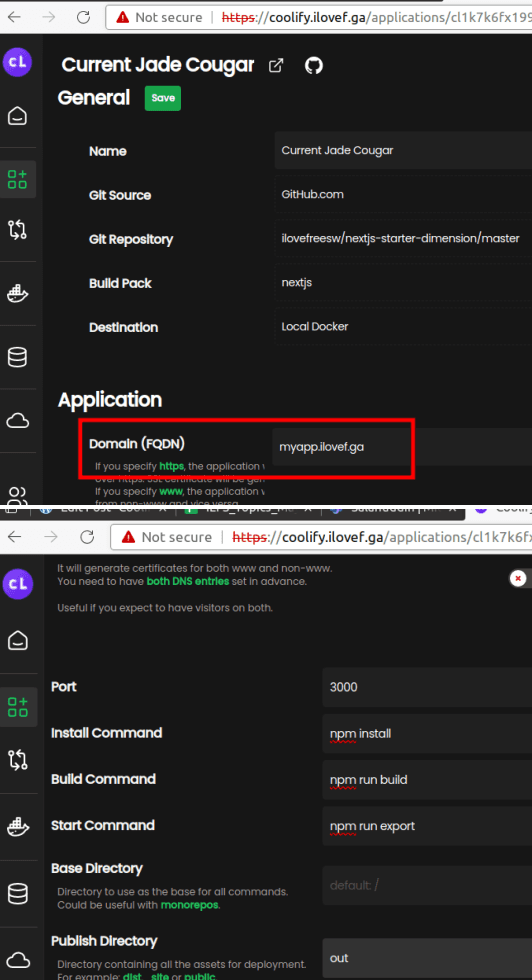
Configure the domain and build instructions. If it is a static website then you have to specify a publish directory in the end. If you don’t do that, then your site will not be accessible. So go through the git instructions and see what directory name repo is using to store the static website assets.
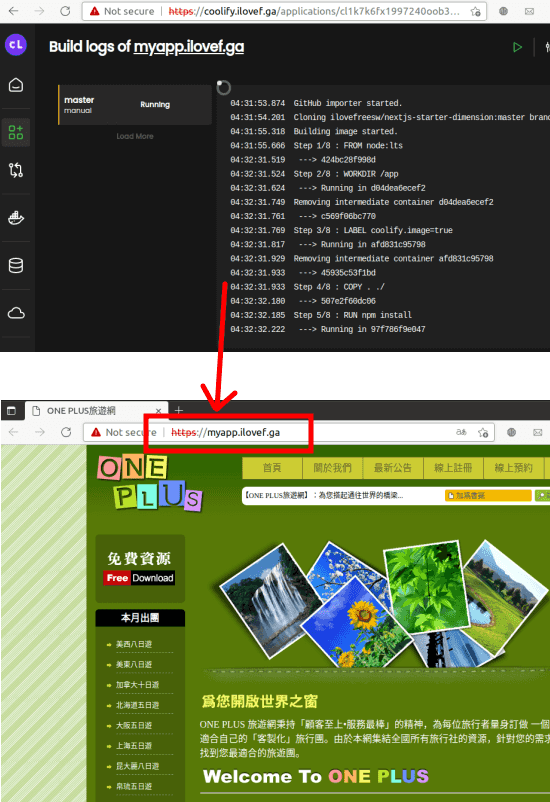
Now, you hit the play button and it will start the build process. First time, it will be slow but it will be much faster the next time. Just wait for it to finish and then after it is done, you can access your app on the URL that it displays.
In this way, you can use Coolify to host web apps and static websites. The process is simple and you just need a little bit of knowledge of git. You can also use the same process to run and host custom JavaScript based apps as well.
Using Coolify to Host Databases and Services:
In the above section, I have shown how to use Coolify to host web apps and static websites. And in a similar way, you can now host databases and other services that it supports.
To host a database, just go to the Database section and then select the one you want to host. Next, you select the version and then proceed to specify the configuration.
In configuration, you only have to specify the destination and whether you want to expose it to the internet. It will automatically generate the database credentials for you and you can copy them to connect to the database. Finally, you hist the play button from the top to start the database server.
In the same way, you can host services. I have already mentioned the list of services that it supports which you can host. Go to the Services section and then select the one you want to host. Next, you select the version.
After selecting the destination, it will ask you to specify a domain. So, again specify the domain in FQDN format and then save the changes. Hit the play button from the top and then it will install the service for you.
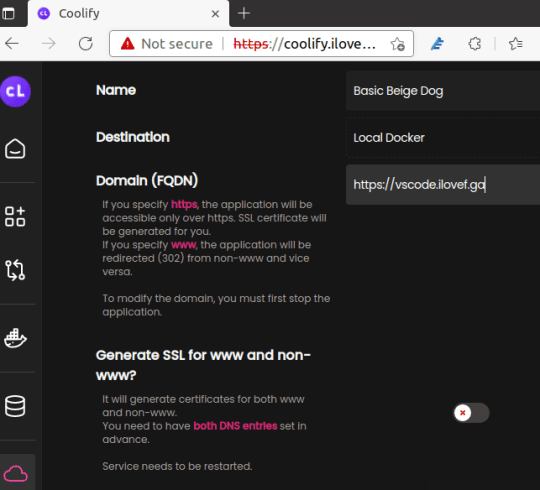
When the service is ready, you can access it on the domain that you specified. Also, you may need to enter the password to access certain services such as VS Code instance.

In this way, you can use Coolify to host services and databases with ease. If you have a domain with you then you can do it in just a few clicks. Also, when you no longer need a service, just go to its setting and stop it if you want to revoke access to it temporarily. And there is a delete button too which you can use to remove it permanently.
Wrapping things up…
Whether you are a software developer or programmer, I am very sure that you will like Coolify for its simplicity and powerful functionality. The best part remains that it is open source. And what I liked most about it is that it lives up to its tagline that it is a great alternative to Netlify/Heroku. Also, not to forget that it supports a lot of build systems so getting your applications up and running will only take a few clicks. And since it is in active development, you can hope to see more features in the coming updates.