Here are some online tools to create shoppable images by adding clickable tags for blogs. In the free plan, they let you create one collection with some main products that you want. You can add some clickable points on the images and link products. Also, the products you add here can have separate external links. In the free plan, you can add limited images in your collections but that is good for small websites and blogs. With their easy to use interface, you can quickly tag images and get the embed code or the equivalent HTML code.
Adding clickable images on websites is kind of trend these days. Especially for the e-commerce websites and blogs who are selling some items, shoppable images can really come in handy. You can easily tag certain items in a photo and then simply publish that on your site. People can interact with those images by simply clicking on the items that are there. And in this way, you can redirect them from a single image to different landing pages. Similar thing you can do with image maps but they don’t really make the source image interactive.
One I covered some tool to add a shoppable Instagram feed plugins for WordPress. And here these tools work in similar way except the fact that here you can use custom images that you want. You will not have to use your Instagram account to fetch images. Just use any image available on your PC, add some tags, and then simply publish them. You can use those images for as long as you want. And you can use them on almost any kind of websites running on any CMS such us WordPress, Woocommerce, Shopify, etc.

Create Shoppable Images by Adding Clickable Tags for Blogs:
Linklay

Linklay is a simple online tool which you can use to quickly create shoppable images and then simply add them to your website. Basically, here you have to upload and tag images on its interface and it gives an HTML code which you have to add-on your site. Simple as that. In the free plan of Linklay, you can only create one gallery which can receive 10,000 monthly views but there is no limit on number of images you add in your gallery. There are multiple types of tags available that you can place anywhere on the image and specify the corresponding link as well.
It offers you an intuitive interface where you can create your image clickable and get the code. There are a lot of customization options you can choose. For each hotspot that you add to the image, you can add an external link to that. Also, it even lets you customize the shape of the hotspots that you add. And the best part is the analytics section of this service. It shows you the engagement stats of the image that you have published. You can see details like click-through rate, engagement rate, views in a simple format.
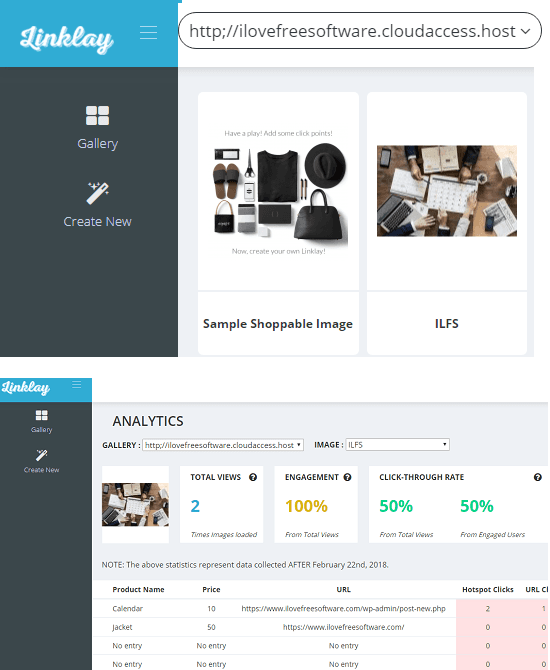
Using this online tool to create clickable images is very simple. You just sign up for a free account and then simply start creating the clickable images. It offers you a simple interface where you can simply upload images from your PC and then add hotspots on them. Using a few options in the sidebar, you can customize the hot spots and then simply add them. Give your image a name and save the changes, When you save it it will give you the HTMl code that you can add anywhere in the HTMl code of your website.
Tag
Tag is a simple tool that lets you create clickable product images. Here this tool first lets you select a principal image and then lets you connect different product images in that. In the free plan of Tag, you can create 1 collection only. And after linking all the products and images via clickable hotspots, it gives you a script and button code that you have to use on your website. Not only that, it gives you a separate landing page URL as well that you can share on social media sites too. However, here you will not the analytic section to track the views and other stats like there are in the other tools.
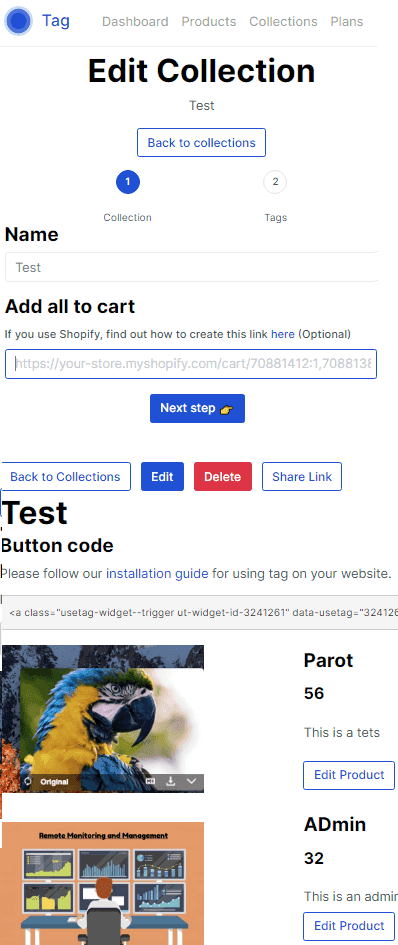
Reach the homepage of this tool and simply create a free account. After that, start creating products and then move to the collections section. In the collection, you upload your main image and then add the hotspots to make some parts clickable. You can link products that you have already added in your account. Save the changes and then it will give you a code that you can use on your websites. If you are running or your blog on WordPress then you can use some external plugins to make the work easier.
Final thoughts
These are the only free tools I could find to create clickable images for blogs and other type of websites. You just get the code it gives you and then simply add that on you site whatever platforms it is running on. The free plan of these services is kinda limited but suitable for small websites and blogs. So, if you are looking for some free clickable images creator then you can use these. Also, if you know some other tools to do the same then you can tell me.