This tutorial explains how to host WordPress website on Cloudflare. With the Cloudflare’s Workers Sites feature this can be done in a few minutes. Here I will mention complete steps that you have to follow in order to do that without any problems. This works with every WordPress site but has some limitations as well that I will also mention later in this tutorial. The Cloudflare Workers Sites feature also supports other static site generators as well such as Hugo, Gatsby, etc. But in this post we will do it for WordPress. First we will export the WordPress site as static and then host that on Cloudflare by running few commands in the command prompt or terminal.
These days people are opting for hosting static sites. There can be numerous reasons for that but the biggest one is the speed. Static sites are fast as they are deployed on a serverless backend. They are in plain Javascript, HTML and CSS. In case of WordPress, an advantage is that they are lighter than its dynamic counterpart. If you want to keep a static version of your WordPress website then this post will show you how. However, this process doesn’t free as it does not rely on the free plan of Cloudflare Workers. The Workers Sites feature is in included in the unlimited plan of Cloudflare Workers which around $5 a month.
How to Host WordPress Website on Cloudflare?
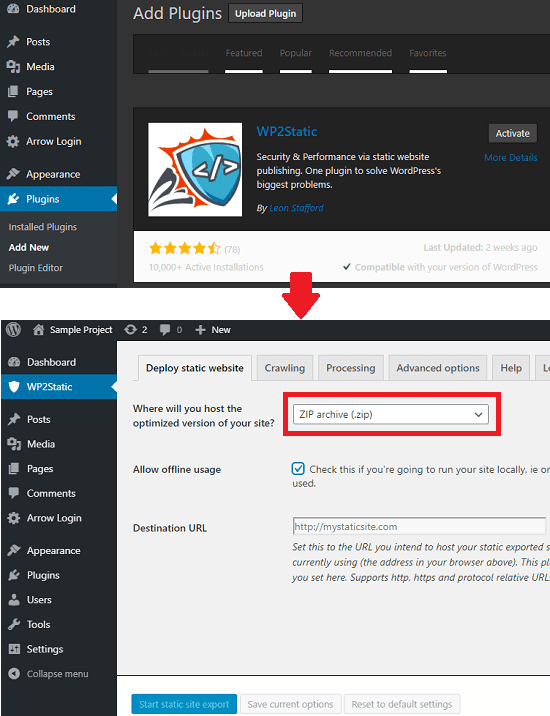
The very first thing that you have to do is export the WordPress site by converting its content to static. For that, you can use a WordPress plugin called WP2Static. You can search for this plugin in the WP plugins directory and then install it. Next, you just activate it and go to he plugin’s interface to start the export process. Choose ZIP archive as the final format and then you can simply prepare the site to download it. It will take some time for the plugin to get ready your website. When it is done, you can download that ZIP file on your PC and keep it safe, we will need it later.
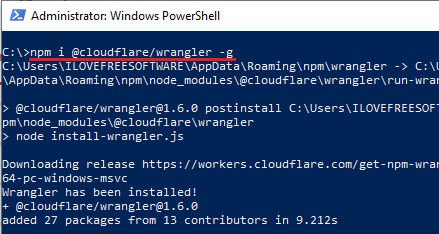
In order to prepare the WordPress site to be hosted as static, you will need Wrangler. This is because Wrangler is the official CLI to manage Cloudflare Workers. There are few Wrangler commands that you have to run in order to setup the static WordPress site and host it. To install it, you will need Node.js installed on your PC. The installation command of Wrangler is:
npm i @cloudflare/wrangler -g
Now, when you have to installed Wrangler, it’s time to configure it. Here you have to login with your Cloudflare account in order to push changes. Also, without authentication, you will not be able to preview your final site. Create an API token in your Cloudflare account from a template given there. Copy the API token from there and then run the following command in the terminal or command prompt.
wrangler configure

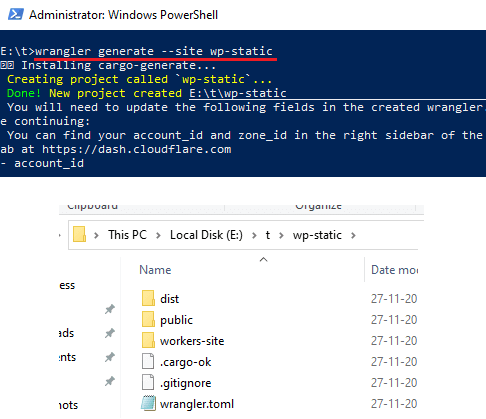
Paste the API token there and then you will be authenticated. After this, you can run the following command to create a static site template in any directory. You can give it name, in my case, I am giving it name “wp-static”. In the screenshot below, you can see how the structure of the generated static site looks.
wrangler generate --site "Name"
Now, the next thing you are going to do is extract the ZIP file that we have downloaded. Extract its contents and copy them all in the “public” folder of the static site(overwrite the conflicts) that we have generated in the previous step. After that, you edit the “config.toml” file and then enter your account id there. You can get your account id by logging in your Cloudflare account and open a zone, it’s given at the bottom right side.
At this time, you are ready to build and upload the website assets. To do that, you simply run the preview command and it will start the upload process. The process will take a few minutes and when it is done, it will open the preview of the website in the browser. If you have multiple browsers installed then you will be promoted to choose a browser in which you want to see the preview. The preview command is given below and it will open the developer view of the website.
wrangler preview

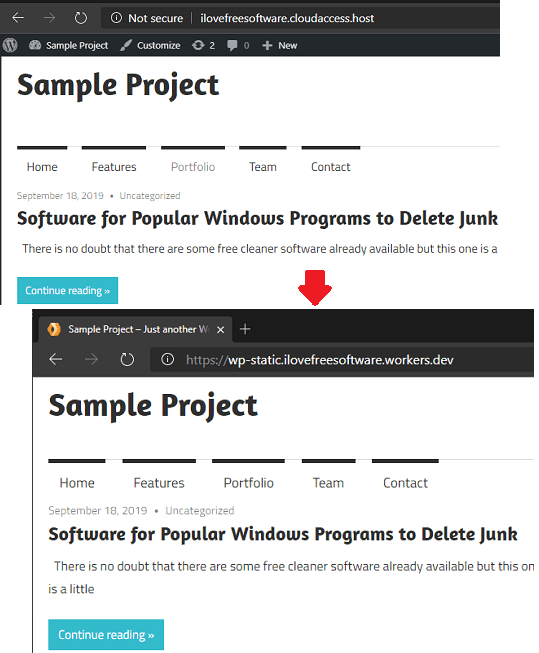
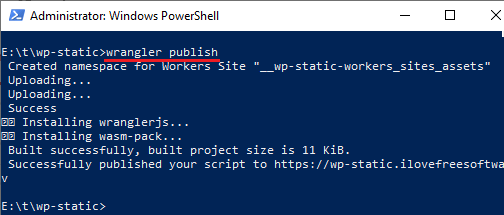
You can test the final website in the preview mode and see if everything is right. After making sure of it, you are all set to deploy the final site. By default, it will publish your site to the DEV domain which is free, fixed, and given to you when you opt for the Cloudflare Workers. If you want to publish site to another domain that you have in your Cloudflare account then you need to see this guide here. Run the publish command as mentioned below and the final website will look like as I have shown in the first screenshot of this tutorial.
wrangler publish
Lmitations:
This is all about hosting static WordPress site on Cloudflare. If you follow the steps mentioned here carefully then in the end, you will end up converting your WordPress site to a static. You will be able to serve the final website right from Cloudflare with ease. However, at this point, it not perfect as there are certain limitations still exist. The following features of WordPress sites are not yet supported in the Cloudflare static site environment:
- WordPress Comments.
- WordPress Forms.
- Any links to /wp-admin or similar “internal” WP routes.
If you are okay with these limitations then you can simply proceed with the process. Or, if your WordPress site doesn’t have these components then it will be much better.
Similar post: How to Host WordPress Site on Netlify
Conslusion:
If you have Cloudflare unlimited Workers plan then you can unleash its full powers by using Workers Sites. I liked the simplicity of the process and I felt that it is kinda simpler than doing same thing on Netlify. There are of course some limitations but nothing is perfect and I believe that in the future updates it will fully support the WordPress sites along with all its components. If you are ready to spend a few bucks on a static WordPress site then you can use the method explained here. Or, for the free alternative you can go with the Netlify method.