BlueStacks app player is a free software for Windows to play Android apps on desktop. It is a free Android simulator to run Android apps on Windows. This Android Simulator, BlueStacks is very easy to download and is easy to use. Also now you don’t always need an Android phone to run Android apps. You can always run Android apps on PC. In addition, you can download different Android apps through your web browser. This Android simulator also gives a “cloud connect” option in addition. With this option you can connect your Android phone through PC and can synchronize your existing phone apps on PC.

Some Key Feature Of BlueStacks To Run Android Apps On Windows:
-
You can run Android apps on windows in an easy way.
-
This Android simulator provides almost all option to control any Android app.
-
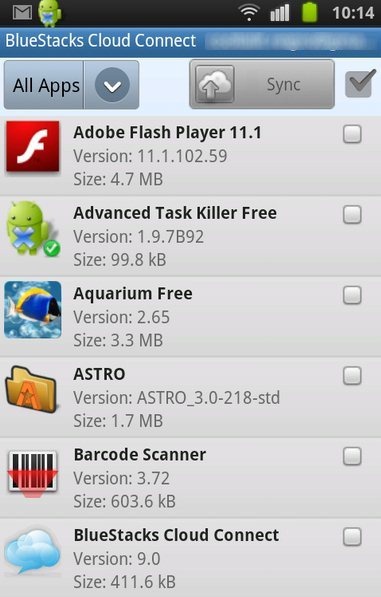
Synchronize your existing Android phone’s app with PC through cloud connect.
-
The app player launches the app in full screen window on PC.
-
This app player provides you different tool tips to help you when needed.
-
This Android simulator has an easy to understand interface and expands all apps in the app player in an easy way.
-
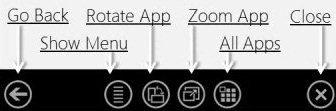
It provides easy options to rotate app, zoom app, all app, go back and many more.
-
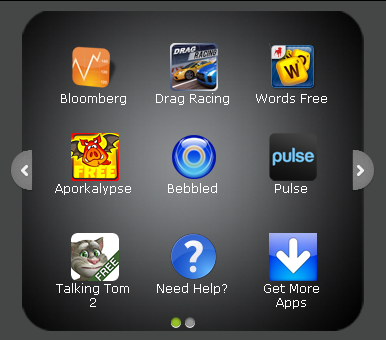
It provides you an option to “Get More App” from where you can download many apps and run Android apps on Windows.
Also check out free iPad simulator for windows reviewed by us.
Working of BlueStacks To Run Android Apps on Windows:
Step 1: Download and install this BlueStacks Android Simulator from BlueStacks.com.
Step 2: A shortcut icon of BlueStacks app player will be created on the desktop.
Step 3: Double click on the shortcut icon created on the desktop and run the app player.
Step 4: Click on “All App” ![]() icon in the app player and you are ready to run Android apps on PC.
icon in the app player and you are ready to run Android apps on PC.
Step 5: For more apps you can click on “Get More Apps” option in the main app player window.
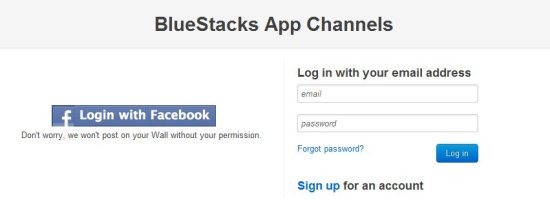
Step 6: Get Sign up with BlueStacks app player account and from there you can download many app from your PC browser.
Step 7: If you want to run your existing phone’s apps then download Cloud Connect app from Android Market on your smart phone.
Step 8: Click on the “Cloud Connect” option running, from the browser which you will find after getting logged in with BlueStacks account.
Step 9: Enter the “Phone Pin” into your Cloud Connect app installed on your smart phone and get connected. You will get the phone pin from the page, when you will get logged in with BlueStacks account.
Step 10: Select the app you want to run from your phone to pc and tab on “Sync” button.
Step 11: The apps will be automatically installed in to your system and then you will be able to run those Android apps on Windows.
How To Download And Install BlueStacks To Run Android Apps on Windows:
-
Visit the website of BlueStacks and click on “Download Now” option on the home page.
-
The setup for BlueStacks app player will be downloaded.
-
Double click on the setup and run the setup.
-
Follow further instructions and BlueStacks Android simulator will be installed.
Now just enjoy this great BlueStacks app player and run Android apps on windows in a very easy way. Make your PC Android app player and play your favorite Android apps without having your smartphone with you. Experience Android on PC.