Mail Merge with Scheduler is a free Google Add-0n which lets you send mail merge using your Gmail account and even schedule them. You can schedule the mail merge for any date and time of your choice. Apart from scheduling, the add-on provides you with a lot of features which will improve your productivity drastically. You can attach separate file for each of the recipients, save any mail merge as draft for sending it later from Gmail, Import Google Contacts and files from Google Drive, write email in HTML or use any of the emails saved in drafts as the template, and many others.
So let’s get started.
Note: You can send emails to up to 50 recipients in one day if you’re using the free version of Mail Merge with Scheduler.
How to Use Mail Merge with Scheduler:
Step 1: Get Mail Merge with Scheduler add-on from here.
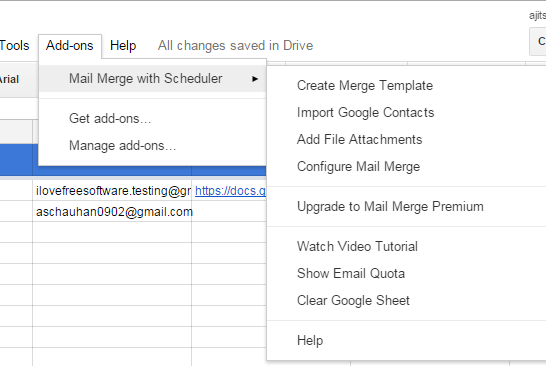
Step 2: Open a new Google Sheet and click on Add-ons->Mail Merge with Scheduler->Create Merge Template.
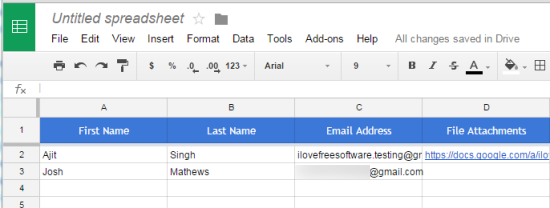
Step 3: It will change the normal Google Sheet to Mail Merge sheet. You can see there are some preset fields like First name, Last name, email address, file attachments, etc.. You can also add your custom fields depending upon the type of mail you want to send. You have to enter the scheduled mail merge date and time in Scheduled Date field. Do remember to enter it in mm/dd/yyyy hh:mm format.
Step 4: As for adding file attachments, you can either enter the file URL from Google Drive manually or simply import it using Add File Attachments options under Mail Merge with Scheduler. Similarly, you can add contacts for sending emails by typing the names manually or by importing from Google Contacts using the option Import Google Contacts.
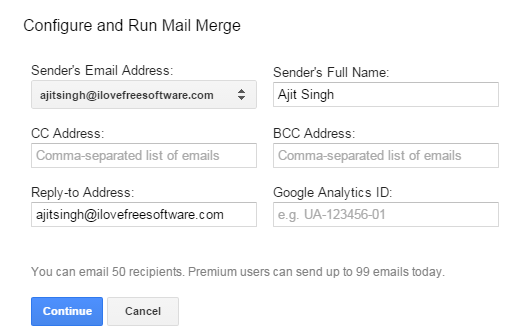
Step 5: When you have made all the changes, click on the Configure Mail Merge option. You will get the pop-up as shown in the screenshot posted below. There are fields to enter the email address using which you want to send emails, sender’s name, cc/Bcc address, email address for receiving replies, and Google Analytics ID for tracking the mail.
Step 6: Now, you have to choose whether you want to use any of the emails saved in the Gmail draft as the template or you want to create a new template. To create a new template, you have to provide the subject line and the content of the mail. It can be either in plain text, HTML or a mix-up of both. Do remember that you’re sending the mail merge, it means there will be fields which you would want to be different for each recipient. Wherever you need to enter those fields, use the name of the field used in the mail merge sheet using the {{}}. For example: When you have to change the first name for each mail, then you will mention it as {{First name}} because First name is the field name for the first names in the mail merge sheet.
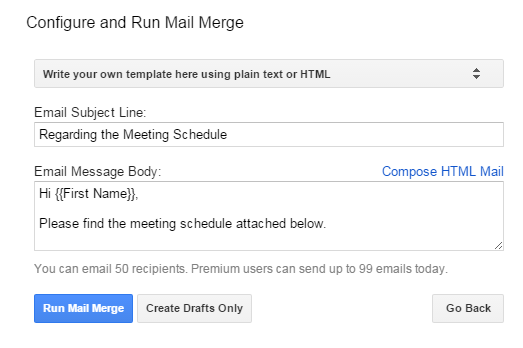
Step 7: To send the mail merge, click on Run Mail Merge option and if you want to save the whole thing to your Gmail draft then click on Create Drafts Only.
This way, you can easily send schedule emails on Mail merge for sending emails via Gmail. It is a very easy and simple to use Google Add-on which will save you from doing a lot of hard work. If you have any questions or doubts, feel free to get in touch using the comments section below.
You may also like: How to Disable Google Form After a Date or Number of Responses.