This tutorial explains how to record screen via Gmail and send screen recordings as email. By default, Gmail doesn’t have any option to record screen and then share the recorded videos as email. But, if you would like to record your desktop screen activities directly via Gmail, then there is a simple method to do that. This can actually be achieved using a free Chrome extension named, “Free Screencast Recording for Gmail“. This extension integrates with Gmail and lets you record your desktop screen with ease.
You can either record your entire desktop, Chrome tabs, or any application window using this Chrome extension. Apart from recording screen activities, it will also allow you to directly send the recordings as email. There are many other screen recorder extensions available for Chrome, but none of them can be integrated with Gmail to record the screen directly via Gmail.
How to Record Screen via Gmail and Send Recordings as Email:
Step 1: To get started, simply install the “Free Screencast Recording for Gmail” extension on your Chrome browser. Once you do that, it will automatically integrate with Gmail and you can start using it right away.
Step 2: Now, to record screen via Gmail, simply login to your Gmail account and click on the “Compose” button on the left. This will open up the email compose window and you will see a “Screen Record” icon adjacent to the “Send” button.

Step 3: Simply, click on the “Screen Record” icon and then it will ask you to sign in to your CloudHQ account. If you don’t have one, then you can create one from here. Once you do that, it will open up a popup window with the options to start screen recording. On the popup window, you will see three different screen recording options named, Your Entire Screen, Application Window, and Chrome Tab.

Selecting the “Your Entire Window” option will allow recording your entire desktop screen. Whereas, selecting the Application Window or Chrome Tab will let you record the screen of any of the currently opened applications or Chrome tabs, respectively.
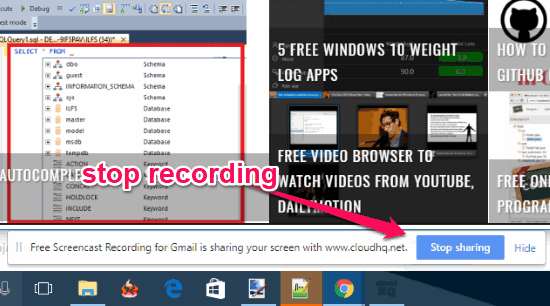
Step 4: Suppose, you have selected the “Your Entire Screen” option, then simply click on the “Share” button at the bottom of the window to start recording. As soon as you do that, the screen recording will start and all the activities which you do on your PC will be recorded as a video. When you’re done recording, you can simply click on the “Stop” button visible at the bottom of your screen.
Step 5: After you stop screen recording, it will automatically process and upload the video to your CloudHQ account and then add it to the email message body. You can then simply send the screen recording to anyone you want via email. This is how you can record screen via Gmail and send the screen recordings as email. The recipients can simply click on the video to watch it online.
Closing Words:
“Free Screencast Recording for Gmail” extension for Chrome makes it very simple and convenient for you to record screen directly via Gmail. Personally, I like it as apart from recording your screen, it also processes the video automatically and makes it ready for sending via email. So, if you have been looking for a way to record and share your screen activities via Gmail, then this tutorial can help.