Here is a short tutorial that explains how to prevent Windows 8 from automatically logging to the last user.
When we boot our Windows 8 PC, it automatically logs into the last user (if you haven’t protected your account with password). Even if you have protected your account with password, then it asks for the password of last user account only. If you have only one user account, then this feature is fine, but for those have multiple user accounts, this might not be the best behaviour.
With this tutorial, you will be easily able to prevent Windows 8 from automatically logging to last user. Instead, you will be directed to the User Accounts Page, from where you can choose the user account in which you want to login.
I will cover three different methods for it. Method 1 is the most complicated one, while Method 3 is the simplest. If you are a daring one, get started with the Method 1 below, otherwise feel free to directly jump to Method 3.
Method 1: How To Prevent Windows 8 From Automatically Logging To Last User:
To prevent Windows 8 from automatically logging to last user, follow the steps below:
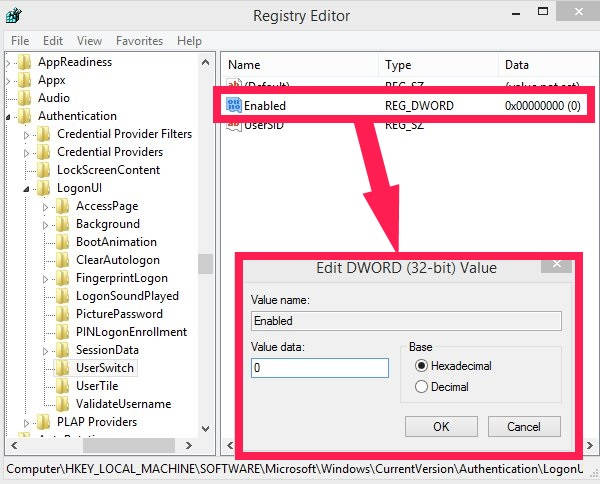
Step 1: The very first thing that you need to do is make relevant changes in the Registry (but before making any change, make sure to backup Windows 8 Registry). To open Registry Editor, open Run (Windows Key + R) and type regedit in Run. It will open Registry Editor.
Step 2: In Registry Editor, navigate to the UserSwitch folder by using the below mentioned path:
HKEY_LOCAL_MACHINE\SOFTWARE\Microsoft\Windows\CurrentVersion\Authentication\LogonUI\UserSwitch

Click on UserSwitch and then double click on the “Enabled” DWORD on the right panel.
Step 3: Change the Value data of Enabled DWORD from “0” to “1”.
If the value is set as 0, then Windows 8 will auto login to last user. If the value is set as 1, then it will display tile of user accounts available.
This change in registry applies only to the immediate next login. After login, the value automatically changes to 0 again. Hence, you need to change the value every time you login. Of course, that is a not a good option. So, I will also tell the secret recipe to stop Windows 8 from doing this.
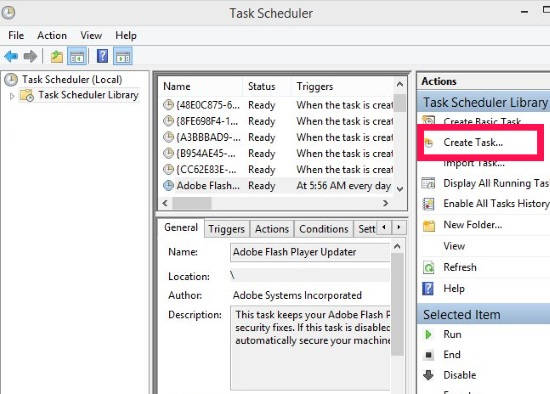
We will create a task using Task Scheduler, which automatically turns the value to 1 every time you sign-in to your Windows 8 PC. So, Windows 8 will change it to zero, and our recipe will change it back to 1 :) Let’s see how.
Creating Task Scheduler To Prevent Windows From Automatically Login To Last User In Windows 8:
Step 1: Open Run, by pressing Windows key+ R. Type taskschd.msc in the run box, and click on OK. It will open “Task Scheduler” in new window.
Step 2: In the right panel, you will find “Create Task” option under Actions category. It will open “Create Task” in new window.
Step 3: In “General” tab of Create Task, you will find different options.
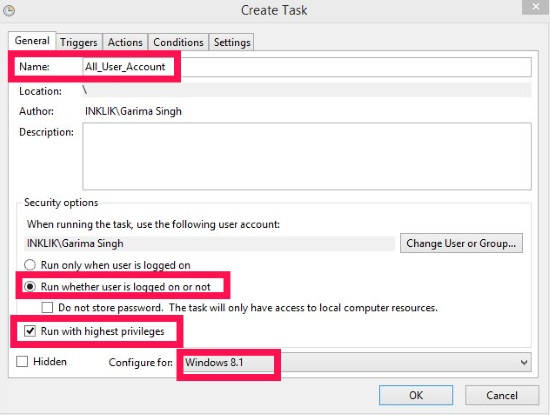
- Name: Give a relevant name to your task. You can give any name as per your choice.
- Click the radio button that says “Run whether user is logged on or not”.
- Check the box that says “Run with highest privileges”.
Step 4: Now click on the “Triggers” tab, and then click on “New” option.

- In Begin the task, select “At log on”, from the drop down list.
- Choose the radio button that says “Any user”.
- Make sure that the Enabled check box is checked.
Click on OK to save it.
Again, click on New within “Triggers” tab only.
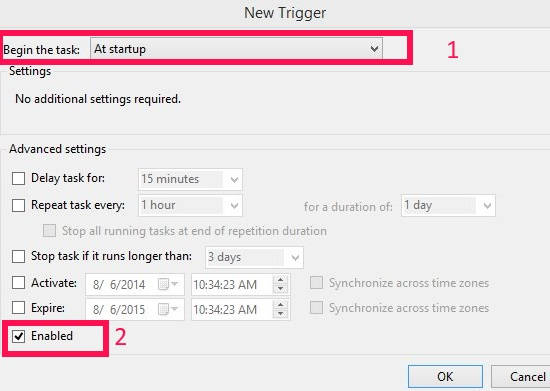
- In Begin the task, select “At startup”, from the drop down list.
- Make sure that the Enabled check box is checked.
Click on OK to save it.
Again, click on New within “Triggers” tab to create third Trigger.
- In Begin the task, select “On Workstation unlocked”, from the drop down list.
- Choose the radio button that says “Any user”.
- Make sure that the Enabled check box is checked.
Click on OK to save it. Now you have created three triggers for the task.
Step 5: Now, click on Actions tab, and then on New button. It will open “New Action in another window”
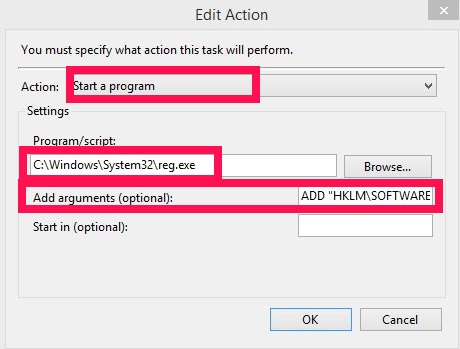
In Action, choose Start a program.
In Program/script, copy and paste the following code:
C:\Windows\System32\reg.exe
In Add arguments, type the below mentioned code:
Add "HKLM\SOFTWARE\Microsoft\Windows\CurrentVersion\Authentication\LogonUI\UserSwitch" /V Enabled /T REG_dWord /D 1 /F
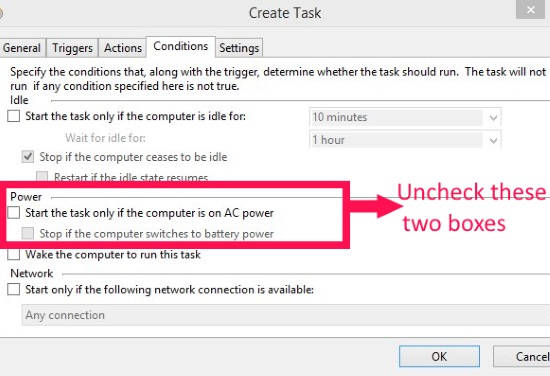
Step 6: When done with Actions tab, click on “Conditions” tab. Navigate to Power row, and uncheck two boxes that say “Start the task only if the computer is on AC power” and “Stop if computer switches to battery power”.
Click on “OK”. It will ask you for password to start the task.

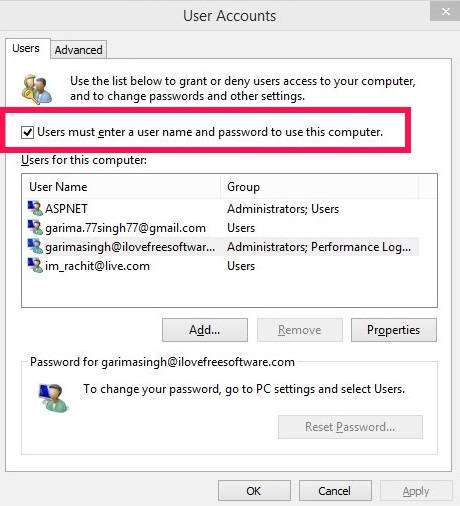
Step 7: Open Run and type netplwiz in the Run box. It will open User Accounts settings in new window. Check the check box that says “Users must enter a user name and password to use this computer”.
Step 8: Now, go to Registry Editor, and make sure that “Enabled” DWORD has a value set as 1 (by following step 1, 2, and 3 mentioned in Method 1).
To check that everything is working as you wanted, restart your PC. You will find Users list instead of last user.
I know, the method above it quite long and tricky. Don’t worry, there are two more methods to accomplish the same.
Method 2: Prevent Windows 8 From Automatically Login To Last User Every time, you Start PC.
Step 1: Go to the Run again and type netplwiz in the Run box. Check the check box that says “Users must enter a user name and password to use this computer”.
Now lets create a script in Local Group Policy, so that whenever you start your Windows 8 PC, you are redirected to the User account page, instead of login into last user.
Step 2: Open Run again, and type gpedit.msc in the Run Box. It will open Local Group Policy Editor.
Step 3: In Local Group Policy Editor, navigate to the Scripts (Logon\Logoff). Double click on Logoff. It will open Logoff properties. Click on Add, to add a new Script.

Step 4: In “Add a Script” window, you will get two boxes: Script Name and Script Parameters.
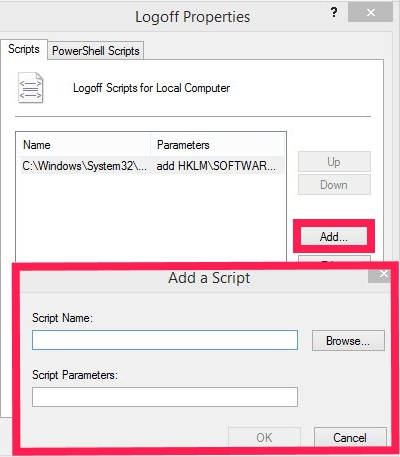
In Script Name, give path of the reg.exe. Usually the path of reg.exe is:
C:\Windows\System32\reg.exe
In Script Parameters, type the following code:
add HKLM\SOFTWARE\Microsoft\Windows\CurrentVersion\Authentication\LogonUI\UserSwitch /v Enabled /t REG_DWORD /d 1 /f
Click on OK. Then apply the changes and click on OK again.
Method 3: Freeware To Prevent Windows 8 From Automatically Login To The Last User:
I told you this is the easiest method. In this, I will use a software called User List Enabler. It is a freeware for Windows 8, which prevents Windows 8 from automatically login to the last user.
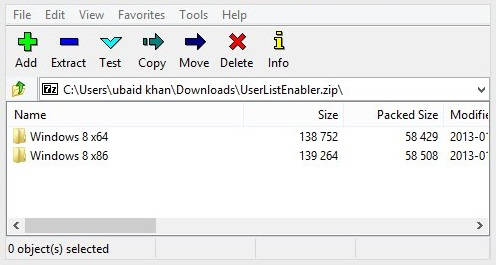
You can download User List Enabler by using the link given at the end of this review. It is downloaded in a Zip file.
You will find that it has two EXE files. One for 64 bit and another for 32 bit. Select one as per your PC configuration to install it.
After launching, you will find an option that says “Enable user list”. Click on it to show User Accounts list at startup.
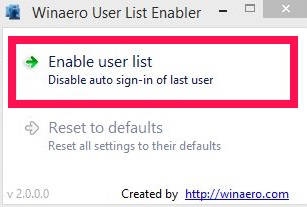
Yep, that’s it. No complicated registry tweaking required :)
From now onwards, whenever you will start your PC, you will be redirected to the Users Account list, instead of login to the last user.