This tutorial talks about how to find differences between two selected text in Word. To do this, I will use a free Office app that acts as a Word add-in that can quickly find differences between two different texts. The add-in is called Compare text for Office and you can compare two different texts based on characters, words, and lines. Not only Word, you can use this add-in in PowerPoint and Excel too.
A perfect use case of this software would be in updating old articles, reports with new text. And while doing that you want to compare the new and the old text for the similarity or dissimilarity. That’s where this add-in for Word can come handy to you.
There are some software available to do the same, but if you want to compare text in Word itself, then you can use this add-in. So, let’s see what it takes to find differences between two selected text in Word.
How To Find Differences Between Two Selected Text In Word?
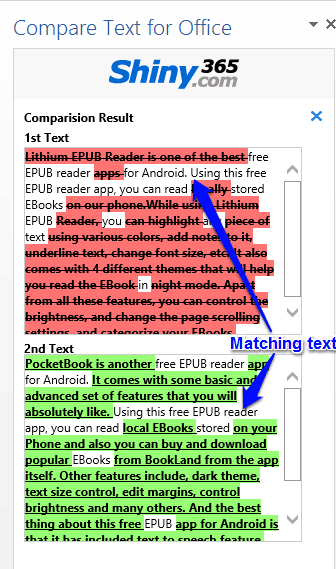
The Compare Text for Office add-in is capable of finding differences between two different text. You can find out differences on the basis of words, characters, and lines. For that you don’t have to copy paste anything to find the differences. When it compares the two texts, it leaves the matching text with no change and strike out the non-matching text.
Follow these simple steps to use this add-in for finding the differences between two texts.
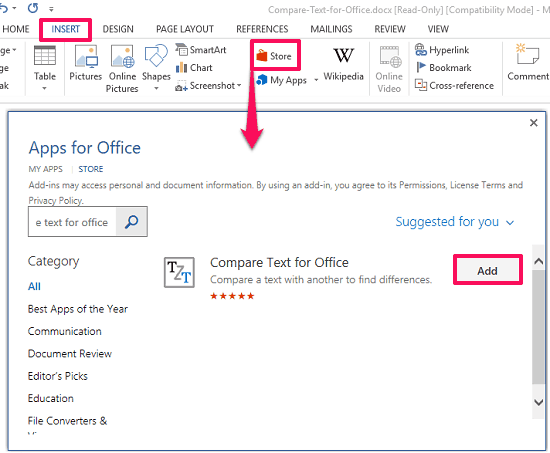
Step 1: Download and add this add-in to the word using this link. Also, you can add it from the Word itself. To do this, navigate to the Inset > Store tab and search for it. After it appears, hit the add button to add it in the Word.
Step 2: On the interface of the add-in you will find options such as:
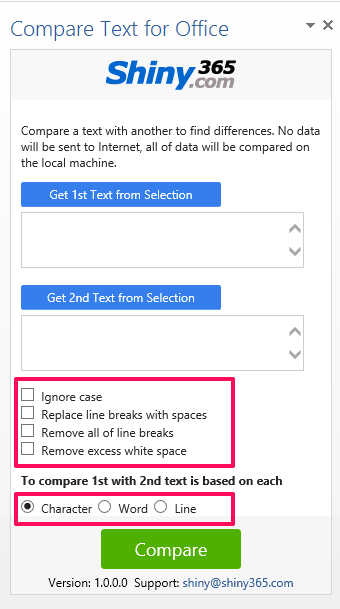
- Ignore case: If you enable this option, then the comparison will be made between the text regardless of the case. Presence of uppercase or lowercase letters will not matter.
- Replace line breaks with spaces: After enabling this option, the line breaks will be replaced with the spaces.
- Remove all of line breaks: To remove the line breaks from the text, enable this option.
- Remove excess white space: If the text contains more than one whitespace, then they will be treated as a single white space. It will remove excess spaces from the text.
Apart from all these options, there are also some other options are available. For the comparison of the text, you can choose the comparison criteria based on character, word or line.
Step 3: Now, select the first piece of text and hit the Get 1st Text from Selection button. After that, select another piece of text that you want to compare and hit the Get 2nd Text from Selection button.
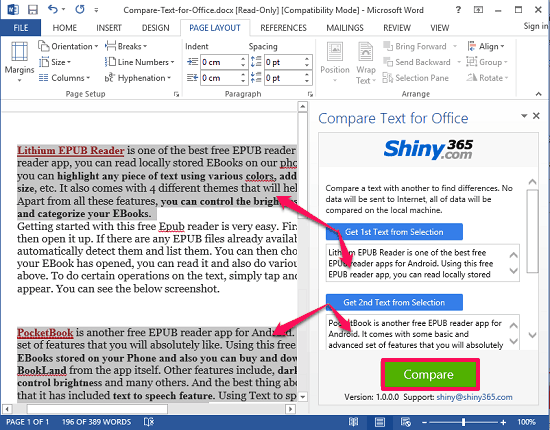
Step 4: To start the comparison, simply hit the Compare button from the bottom of its interface. It will then show you the result. You can see the following screenshot.
So, in this way you can easily find differences between two selected text in Word. And Compare text for Office makes it pretty easy to do that. Also, after finding the differences, you can copy the compared text and paste it anywhere you like.
Conclusion
In the tutorial above, I have demonstrated how to find differences between two selected text in Word. And compare text for Office does it in a very nice way. You just have to select two texts from a document and just a few clicks will bring up the comparison result for you. So, if you are looking for ways to do the same, then this tutorial can come in handy to you.