Here are 5 free websites to create audio transcription online. Using these websites, you will be able to easily transcribe audio to text online as you listen to the audio. While playing the audio, you can slow down or speed up audio to match your typing speed, rewind, forward, pause, etc. to accurately transcribe the audio to text. The best feature of all these audio transcription websites is that they allow you to add timestamp on the transcripts. The timestamps can come in handy to mark any transcript phrase corresponding to a specific audio section.
When you’re done typing the transcript, you can easily copy the text and save it as a TXT or Word file. Some of these websites even allow you to directly export the transcript as TXT, SRT, etc. There are many audio transcription software available for Windows which you can use for audio transcription, but if you’re looking for a way to do the same online, then these websites can help you with that.
Some of these websites don’t actually allow you to play audio files, but instead, you have to play a video containing the audio which you want to transcribe. Do not worry, you can use various software which allow you to easily convert audio to video.
oTranscribe:
oTranscribe is probably one of the best online audio transcription websites using which you can easily transcribe audio to text online. It allows you to upload an audio file of different file formats like MP3, OGG, WAV, etc. depending on your browser. Then you can play the audio online and type the transcript as you listen to it. The text editor is like a simple notepad with only two formatting options “Bold” and “Italic”. But, one of the best features of “oTranscribe” is that it allows you to insert interactive timestamps in the text editor while writing the transcript. It also lets you export the transcript as markdown or text file. Apart from letting you transcribe audio, it also allows you to import video files to this website for transcription.
How to Transcribe Audio Online using oTranscribe:
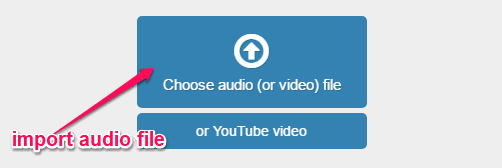
Step 1: To get started, visit the homepage of oTranscribe and there you will see the option to import audio file at the top. Click on the “Choose Audio File” button to import the audio file (MP3, OGG, WebM, or Wav) which you want to transcribe to text.
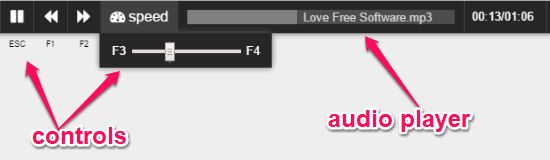
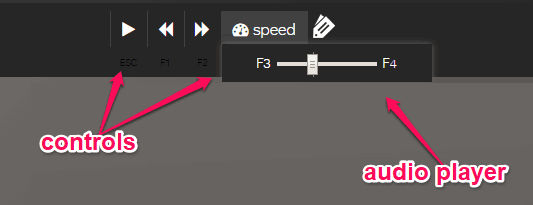
Step 2: Once you do that, the audio file will open up in the built-in audio player at the top. You can click on the “Play” button to start playing the audio. You will also see other controls of the audio player including rewind, forward, and speed change. For each control, you have a predefined shortcut key such as “Esc” key to play/pause audio, “F1” to rewind (1 or 2 seconds), “F2” to forward (1 or 2 seconds), and “F3” and “F4” to change the audio speed.
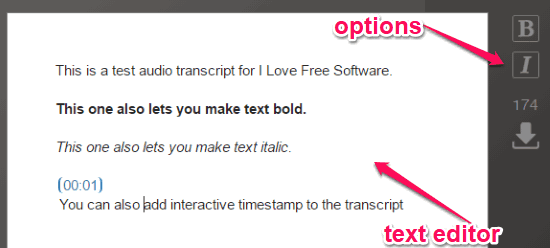
Step 3: At the bottom of the audio player, you will see a simple text editor on which you can write the transcript as you listen to the audio. On the right, you will see different editing options to make text bold, italic, and add interactive timestamps. You can also use shortcut keys for these editing options like “Ctrl + B” for bold, “Ctrl + I” for italic, and “Ctrl + J” for adding a timestamp.

When you add a timestamp on the transcript, it will mark the phrase with the current audio section. As the timestamps are interactive, you can simply click on them to directly jump to the specified audio sections in the audio player. After you’re done with transcribing the audio to text, you can either copy and use the transcript anywhere you want or export it directly as a markdown or text file.
Recordense:
Update 2022: This website no longer exists now. We recommend you to try some other alternative instead.
Recordense is another useful audio transcription website which can help you transcribe audio files online. You can simply upload audio files to this website and play them using the built-in player to write the transcript. It also supports standard audio file formats like WAV, MP3, OGG, etc. To help you type the transcript, it comes with a simple text editor with only Bold and Italic formatting options. Similar to “oTranscribe”, this website also allows you to add interactive timestamps on the transcript, speed up or slow down audio, etc. After transcribing an audio file to text, you can download the transcript either as markdown or text file to your PC.
How to Transcribe Audio to Text with Recordense:
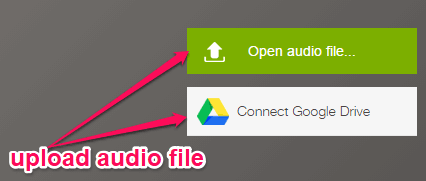
Step 1: First, browse the Recordense homepage and you will see the option to upload audio files on the left. You can either upload an audio file from your PC or select from your Google Drive. You can upload audio files of various formats including MP3, OGG, WAV, etc.
Step 2: When you’re done uploading an audio file, it will automatically open up in the audio player on the website. To start playing the audio file, you can either click on the “Play” button or press the “Esc” key. Similar to “oTranscribe”, you will also see other controls using which you can rewind 5 seconds, forward 5 seconds, and change the speed of the audio. To easily use the controls, you can press the shortcut keys associated with each control. You can press the “Esc” to play/pause audio, “F3” and “F4” for speed change, “F1” for rewind, and “F2” for forward.
Step 3: On the right of the window, you will see the text editor where you can type the transcript while listening to the audio. You will also see the options to make the text bold or italic on the text editor or you can use the shortcut keys to use these formatting options. It also lets you add interactive timestamp on the transcript by pressing “Ctrl + J”.
The timestamps which you add to the transcript will be interactive and when you click them the audio will start playing from the associated time. Apart from that, you will also see a “Download” button on the right of the text editor using which you can download the transcript as markdown or text file.
Subtitle Horse:
Subtitle Horse is actually an online subtitle editor but can also be used to transcribe audio online. Unlike the websites which I have explained above, this one doesn’t actually allow you to import and play an audio file to write a transcript. But, you can import a video file containing the audio which you want to transcribe into text. You can use any audio to video converter to create a blank video with the source audio. It allows you to import videos (like MP4, OGV, WebM, and FLV) using URLs from the web or from YouTube. After importing a video, you can play it using the built-in video player and then write the transcript in the form of a subtitle. You can download the transcript either as TXT, SRT, JSON, etc.
How to Create Audio Transcription using Subtitle Horse:
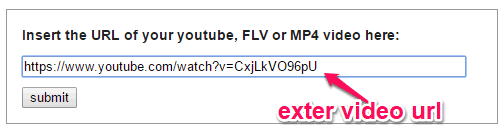
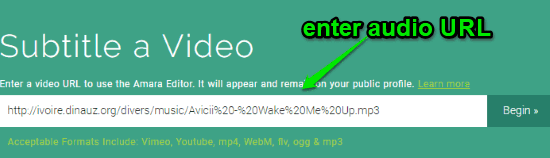
Step 1: After you visit the homepage of Subtitle Horse, you will see an input field where you can enter the video URL. You can copy the URL of any video file from YouTube or web and paste it into the input field. Then click on the “Submit” button to add the video.
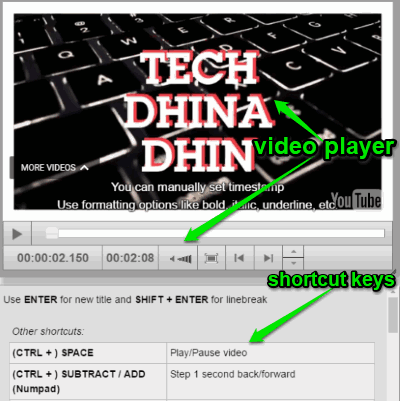
Step 2: As soon as you do that, the video will open up in the built-in video player and you can play it directly on the website. The video player also offers various controls using which you can play/pause, control volume, skip one frame backward, skip one frame forward, and so on. With each control, a shortcut key is associated like “Ctrl + Space” to play/pause, “Ctrl + Minus” to skip one frame backward, etc. You can see all the shortcut keys in a separate section below the video player.
Step 3: On the right of the video player, you will see the canvas where you can add subtitle to the video manually. So, you can use it to write the transcript in the form of a subtitle. To add a transcript, simply click on the “Add at current time” button and a notepad will appear. On the notepad, you will be able to define a timestamp manually by selecting the start and end time. This timestamp will also be interactive which you can use to play any specific section of the video.
![]()
After that, you can start writing the transcript while listening to the audio of the video file. You can also make the text bold, italic, or underline text on the transcript. When you have completed writing the transcript, you can go to the “File” menu and select the “Export” option to download the transcript as TXT, SRT, etc.
Amara:
Amara is also an online subtitle editor which you can use for transcribing audio to text. Unlike “Subtitle Horse”, this website also allows you to import audio files, apart from video files. You can simply import an audio file (MP3 and OGG only) to this website by using the audio URL and then write the transcript while listening to it. It comes with a simple text editor using which you can write the transcript as a subtitle. There are no formatting options on the text editor, but it does come with a timeline using which you can set non-interactive timestamps for the transcript manually. You can easily export the transcript either as TXT, SRT, SBV, etc. to your PC.
How to Create Audio Transcription with Amara:
Step 1: When you open the website, simply create a free account and then click on the “Subtitle a Video” button. After that, you will see an input field in which you would need to enter the URL of the audio file to upload it. You can only upload MP3 and OGG audio files for transcription.
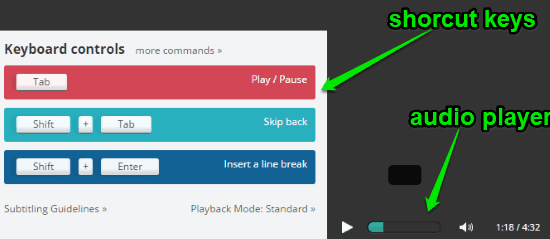
Step 2: Then click on the “Begin” button to open up the subtitle editor. On the subtitle editor, you will see a media player using which you can play the audio file. There are many controls of the media player which you can use with keyboard shortcuts like “Tab” to play/pause, “Shift + Tab” to skip 2 seconds backward, and so on. You can see all the keyword shortcuts by clicking the “More Commands” link on the left of the media player.
Step 3: At the bottom of the built-in media player, you will a simple notepad on which you can type your transcript. The notepad is actually for writing subtitles, but you can also write the entire transcript of the audio file on it. It doesn’t come with any text formatting options, but you will see a timeline at the top of the text editor that can help you add a timestamp.

To add a timestamp, all you got to do is drag the notepad marker on the timeline to any time interval you want. Unfortunately, the timestamps which you can add using Amara are not interactive but still can be helpful in identifying audio sections. Once you’re done writing the transcript, you can save it on your Amara account and also download it as a TXT, SBV, SRT, and more.
Subtitle Edit:
Subtitle Edit is another simple subtitle editor which can be used to create audio transcription online. Similar to Subtitle Horse, this one also allows you to upload videos (MP4 and WebM) only for transcribing the audio of the videos into text. You can import a video using a video URL from anywhere on the web. As per the website, you can also import video files from your PC, but I was unable to do so. After importing a video file, you can use the “Subtitle” option to start writing the transcript. It also allows you to manually add timestamps on the transcript. The built-in video player comes with simple controls like “go back 3 seconds”, “go back 100 milliseconds”, etc.
How to Use Subtitle Edit to Create Audio Transcription Online:
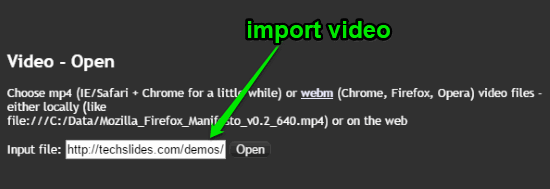
Step 1: To begin, go to the “Subtitle Edit” homepage and then click on the “Video” menu at the top to select the “Open Video” option. After that, a popup dialog will appear with an input field where you can insert the audio URL which you want to upload.
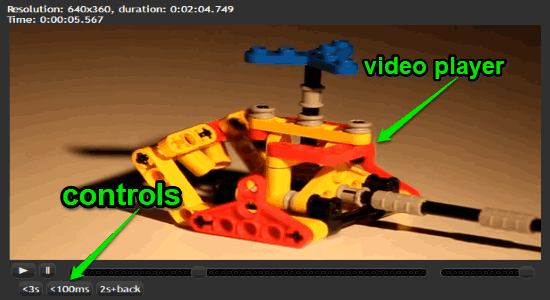
Step 2: When you do that, the video will open up in the built-in video player. You can click on the “Play” button to start playing the video. At the bottom of the video player, you will see three different buttons using which you can go back 3 seconds, go back 100 milliseconds, and play 2 seconds and come back to the current position. Unlike other audio transcription websites in this post, it doesn’t have any shortcut keys for controlling the video player controls.
Step 3: Now, to start writing the audio transcription, the first thing you would need to do is click on the “Subtitle” menu and then select “New”. This will add a subtitle note on the left panel and you will see an input field at the bottom. You can start typing the transcript in the input field while listening to the audio of the video file.
![]()
At the bottom of the input field, you will see a timeline where you can drag the note marker to set a timestamp on the transcript. The timestamp is only for reference and you cannot interact with it. When you’re all set with the audio transcription, you can click on the “Subtitle” menu and choose the “Export” option to save the transcript as a simple text file, SRT, RT, XML, and more.
Closing Words:
These are some of the best websites to create audio transcription online. All the websites are very intuitive and allow you to effectively transcribe audio to text. One of the features which I like most about these websites is that they allow you to play the audio and write transcript on the same window, making it much easier for you to transcribe audio. They also let you download the transcript to your PC for free.
Try them out and let me know which website you liked the most in the comments below.