Geotagging is the process of attaching Metadata carrying geographical identification to various types of media such as photographs, videos, QR codes, websites and more. This type of metadata is known as Geospatial Metadata and primarily comprises of the Latitude and Longitude coordinates. Sometimes it also includes information about the Altitude, Bearing (compass direction), Time stamp etc.
Geospatial Metadata is appended via the EXIF specifications of media files. It defines fields that are meant to record the technical details of the media including Location information that is used in the process Geotagging.
Since camera phones with inbuilt GPS are widely used nowadays, Geotagging is done automatically when you take the photographs, if the option is available and has been enabled in your phone. But if your photographs have not been geotagged, you can manually carry out this process later. This is possible because EXIF specifications define fields for Latitude / Longitude and other location information even if they are left blank when the photograph was taken. These fields can be populated later through the process of manual geotagging.
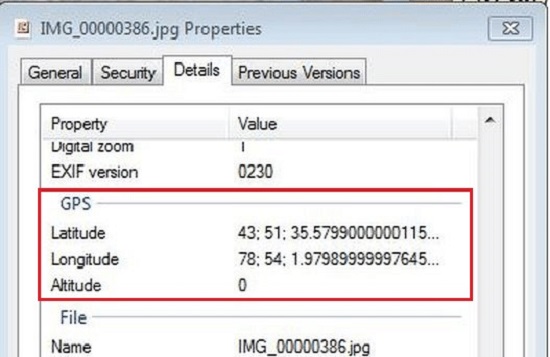
It is very easy to view the EXIF data and including geospatial information of any image in Windows. Just right click on the file and choose ‘Properties’. Next, click on the ‘Details’ tab and scroll up and down on this page to view all kinds of EXIF information stored in the image. The GPS section on this page carried displays the geospatial metadata.
In this article we will be exploring 5 Free Bulk Geotagging applications for Windows.
1. GeoSetter
This is a fine Freeware program for Windows that you can use for Bulk Geotagging of images such as JPG and TIFF as well as raw image file formats like DNG (Adobe), SRF (Sony), ORF (Olympus) etc. the process is fairly simple and straightforward and can be carried out as follows:
- Download and install GeoSetter using the link provided below and run the application.
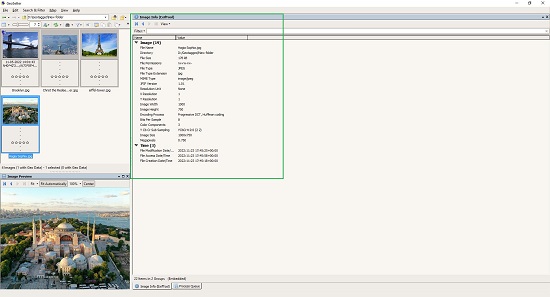
- Select the folder that contains the image files which you want to Geotag by using the folder navigation bar at the top left of the interface. Alternatively, you can use the keyboard shortcut Ctrl + O for this. You will be able to view the thumbnails of the images in the folder in the navigation bar on the left.
- To select any image file, just click on its thumbnail and you will be able to view its complete EXIF data in the right pane. To select multiple files that you want to geotag with the SAME location information, just hold down the Ctrl while clicking on the thumbnails.
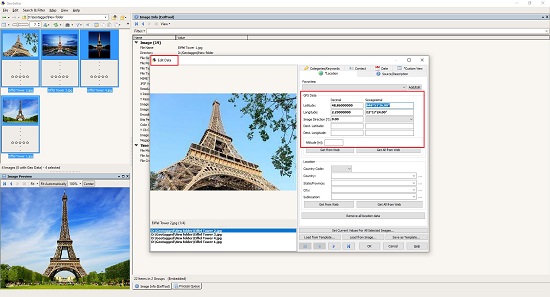
- Right-click on the selection and choose ‘Edit Data’ and select the ‘Location’ tab.
- Type / paste the Latitude & Longitude in decimal or sexagesimal form in the boxes that have been provided. Additionally, you can also input the Altitude, Image direction (from Magnetic / Geographic North) and other location information such as Country, State, City and more.
- Next, click on ‘Set current values for all selected images’, enable all the Geotag checkboxes under the ‘Location’ section whose data values you want to replicate to all the selected images and then click on ‘Ok to close this popup.
- Click on the individual file names at the bottom left of the ‘Edit Data’ popup box to verify if the geotag data has been replicated to all the images in the selection and then click on the ‘Ok’ button.
- Finally, to save the files that you just Geotagged, press Ctrl + S and all of them will be saved under the same original filename. A copy of the earlier file (without Geotags) will be saved with a modified filename extension of jpg_original just in case you wish to access it.
Geosetter has a vast number of other similar features pertaining to Geotagging and viewing the related EXIF data. I used the application to bulk Geotag some images and the process was very smooth and easy.
Click here to download Geosetter.
2. EXIFTool
This is an interesting command line tool for Windows that you can use to easily bulk Geotag images. Just click on the link below to download the zip file of the utility and unzip the contents to a specified folder on your disk.
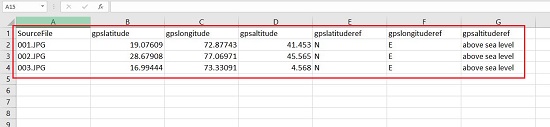
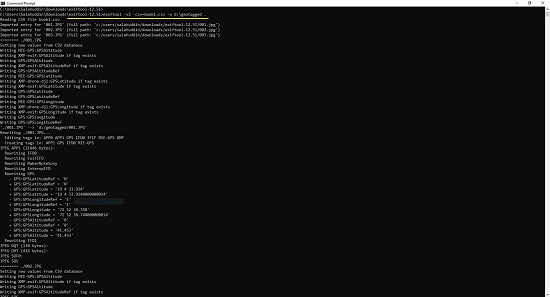
Exiftool makes use of a CSV data file that contains the source image file names and all the location geotags like Latitude, Longitude, Altitude etc. in successive columns. The screenshot of the CSV file is attached below. You must remember to use the same column names and not to leave blank lines between any rows.
Next, copy all the image files that you wish to bulk Geotag to the same folder where you unzipped the contents above and run the following command:
exiftool -v2 -csv=book1.csv -o d:\<destination folder> .
The above command assumes that the CSV file is stored in the same folder where you unzipped the contents. If it is in a different folder, you must type the complete path to the CSV file. Also remember that the destination folder name is followed by a ‘space’ and a ‘dot’ at the end of the command which tells the utility that the source images files are located in the same folder from where it is being executed.
To download EXIFtool, click here
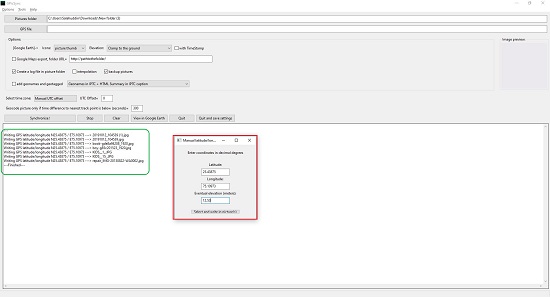
3. GPISync
This is yet another free Bulk Geotagging application for Windows that I tested and works successfully and is very easy-to-use.
Download and install the software using the link that we have provided below. Click on Tools | EXIF writer and feed the values for Latitude, Longitude and Eventual Elevation (Altitude) and then click on the button ‘Select and Write in pictures’. Browse to the folder that contains the image files and choose all the files that you wish to Geotag with the above information and then click on ‘Open’. You will be able to see the status of Geotagging in the lower half of the screen. Once the work is done, check the properties of the image files and verify if they have been correctly geotagged.
GPISync also supports automatic synchronizing of GPS coordinates with multiple images using a GPS File (GPX format) but this feature doesn’t seem to working correctly.
To download GPISync, click here.
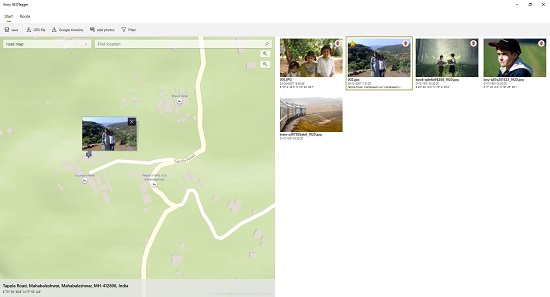
4. Enny Geotagger
This is a very good application for bulk Geotagging of images that you can download from the Microsoft Store. Enny Geotagger uses a high-quality map (Microsoft) in which you can place multiple images at the desired locations to get them Geotagged. It does not require any manual input of coordinates as we have seen in the above applications. The only disadvantage is that it supports JPG images only.
Just download and install the application using the link that we have provided. Launch the application, click on ‘Add photos from your computer’, choose all the images that you wish to Geotag and then click on ‘Open’. The next screen will display a map in the left pane and the added images towards the right of it. Now, drag and drop the images one by one to the desired locations on the map. Use the search bar to directly locate any place for quick navigation. Additionally, use the drop down at the top left of the map to choose the map style such as Aerial map, Terrain map and more.
Once you drop an image at a desired location, you will see a map marker inserted at that place and the exact Address & Coordinates will be visible at the bottom left of the screen. To move the image to another location, click on the marker to view the image and then drag and drop it to the new location. Repeat the above procedure for all the images that you have selected from your computer and finally click on the ‘Save’ button at the top left of the interface to save the EXIF information.
Remember that you can zoom into the map to a very high degree and then place your images at the desired locations for accurate Geotagging.
Click here to download Enny Geotagger from the Microsoft Store.
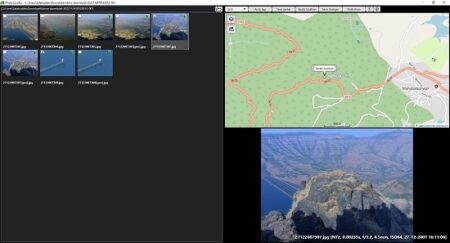
5. PhotoLocator
Let’s move to the final application for bulk Geotagging of images, namely PhotoLocator. Like the previous one, this application too uses a high-quality map (OpenStreet Maps) to Geotag your photos instead of manually feeding the location coordinates. The link for downloading the application has been provided below.
Just launch the application, click on the folder icon at the top of the interface and select the folder which contains the images that you wish to Geotag. The selected images will be displayed in the left pane in the form of thumbnails with the OpenStreet map towards the right. If any images are already Geotagged, they will be marked in the map.
Navigate to the specific location in the map depending upon the coordinates that you wish to Geotag such that the desired location appears in center of the map and then click on the ‘Save center’ button. You can view the exact Latitude and Longitude coordinates at the top of the map as you hover your mouse, and this can help you to choose the precise location.
Now choose all the images that you want to place at the location you saved above by enabling the checkbox at the top left of the thumbnail and then click on ‘Apply Location’ followed by ‘Save changes’. This will Geotag all the selected images and save them with another name in which the suffix ‘geo’ will be added to the primary file name. The original files will be retained in the same folder.
Let me add once again that you can zoom into the map to a very high scale and then place your images at the desired locations for precise Geotagging. You can also click on the ‘Map Layers’ icon to select different overlays provided by OpenStreet maps.
Click here to download PhotoLocator.
Closing Words:
There are a number of free applications available over the world wide web that you can use to Geotag your photos and we have tried to list the best of them above. Try to spend some time with each application and its features to figure out which of them suits your requirements and is easy for you. My choice will be Enny Geotagger as I find it to be the most convenient of all of them due to its ease of use and availability of Microsoft Maps to navigate to the desired locations.