Weje is a free online whiteboard application that enables you to gather content from multiple sources onto a single infinite canvas. It helps you to discard the old method of brainstorming and convert all your ideas and thoughts into a digital form by organizing all your information using a non-linear technique with text cards, embedded sites, mind maps and more.
Weje is very well-suited for the following Use Cases:
Online Whiteboard:
Weje whiteboard allows you to draw, scribble, type, create shapes & connectors, create sticky notes, stack cards and much more in an infinite workspace that is cloud-based. It also supports voice chats that enable you to discuss ideas live and iterate on the sprints together as a team. Any modifications that you make are immediately synchronized between users helping you to share anything with anyone and observe the updates in real time.
Mind Map Maker:
A mind map is a visual method for expressing and exploring ideas. With Weje, anything you want can be turned into a mind map by starting from the central element which forms the main idea and then adding other elements related to it is comprising of images, shapes, team members and much more and then using lines and arrows to connect the elements together. There is really no wrong way to create a mind map with Weje.
Online Sticky Notes:
Using Weje, You can organize your, ideas, viewpoints and more on a stick note board and communicate with your teammates during the planning and development process. You can also create polls using the sticky note boards and share it with your team members and colleagues. Additionally, you can search for the sticky notes online to discover the connections of ideas and actions.
Online Kanban board: Weje can be used to easily design a personal Kanban board or a team task management tool whatever you desire. You can create infinite number of cards and lists on your Kanban boards and arrange the lists in whichever way you like – up, down, left, right, inside out and more. Also, you can group objects in logical clusters and delete or move tasks from ‘in progress’ to done.
Whiteboard for education:
You can make online teaching and learning more exciting and impressive with Weje. Educators can use the tool to quickly build lesson plans and schedule their courses, move their physical classroom whiteboard to an online one and create a web page for it. You can digitally design your entire syllabus using worksheets and thus keep handy and organize your teaching supplies beforehand. In fact, Weje empowers you to generate an entire virtual classroom replete with lesson plans, projects, class pages, agendas, assignments and individual as well as team lesson plans and much more.
Students can use Weje to keep their class notes, to-do’s and reading lists in order and always within easy reach. They can easily prepare a class or group board and organize their weekly agenda, faculty meetings and more.
Team collaboration: You can enjoy real time collaboration through the online cloud edition of Were or download the Android App. You can choose to use a single zone to collaborate and encourage all your team members to participate and share their brilliant ideas with others at all possible levels of the organization. You can use this feature either by yourself or through simultaneous editing with others. Also, you can choose to collaborate remotely or in-office, individually as well as together. You can use the admin tools to assign specific roles and manage access permissions.
Moodboard Maker: You can design amazing moodboards with Weje and present them to the world in just a couple of minutes. A moodboard is a collection of photos, sketches, drawings, backgrounds, icons and more that are grouped together as per their color, ornament or any other criteria as decided by the creator. They are very important for interior, web designers, photographers, and similar creative people. Digital moodboards are far better and accessible as compared to a physical canvas with pinned pictures and photos. Weje also provides templates that you can use to generate and share interior moodboards easily and quickly by uploading sticky notes and images and then using the in-built mind map maker to arrange the uploads in a better and more organized way.
Working:
1. Click on this link to navigate to Weje and register for a free account using your Google credentials.
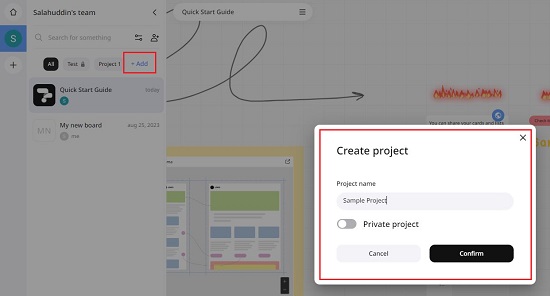
2. To create a new project, click in the ‘Add’ link on the left panel of the Weje interface, assign a name for the project, choose if you wish to keep it private or public and click on ‘Confirm’.
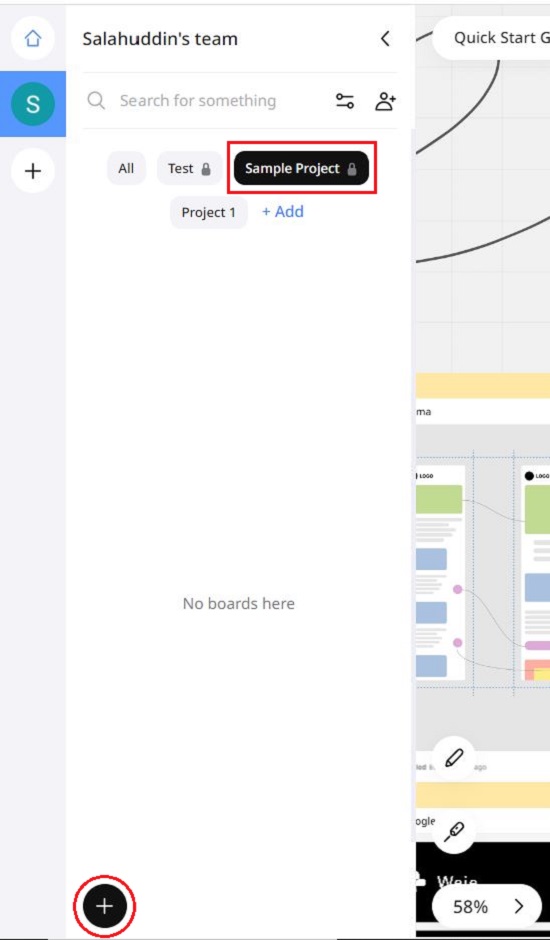
3. Select the project that you just created above by clicking on its link in the left panel and then click on the ‘+’ sign at the bottom of the panel to create a new board.
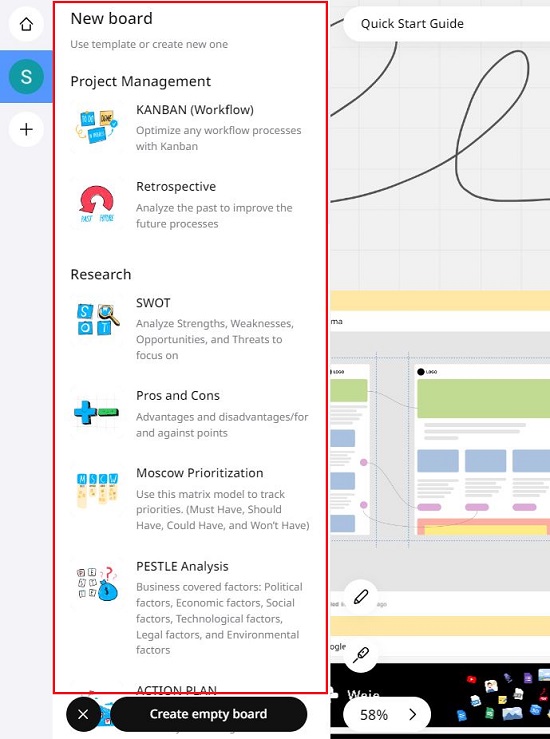
4. Weje allows you to create an empty board from scratch or use the free inbuilt templates to generate one such as Kanban workflow, Action plan, Lesson Plan, Startup Investor report and many more.
5. Once you go ahead and create an empty board or one from the template. You will be allowed to invite others to collaborate on the board by specifying their email address.
6. Observe that you can move around the board ad zoom in / out using the mouse, touchpad, or the regular keyboard buttons. To scroll the board, just click on an empty space and drag in the required direction. To zoom in / out of the canvas, just use the mouse wheel in the required direction. Weje also offers a few handy shortcuts that you can learn by accessing the knowledge base.
7. To create a Card on the whiteboard, simply double click on the board. Alternatively, you can use one of the defined hotkeys such as ‘C’ to create a text card, ‘L’ to create a List, ‘U’ to upload a file and create a data card and more.
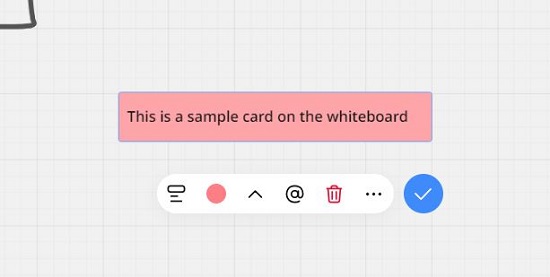
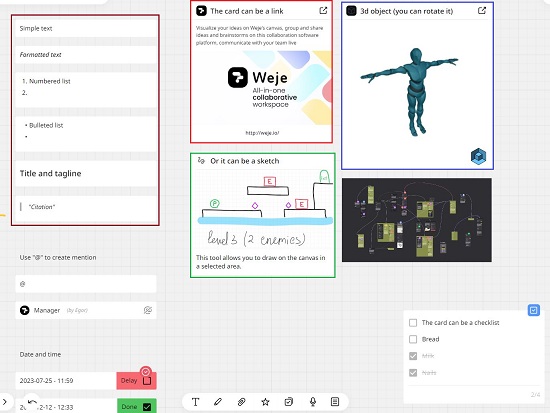
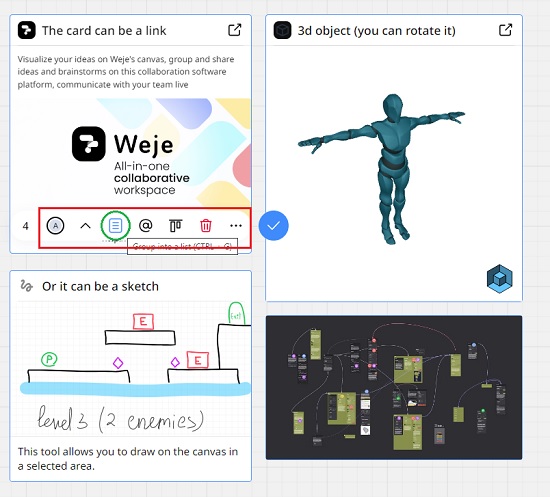
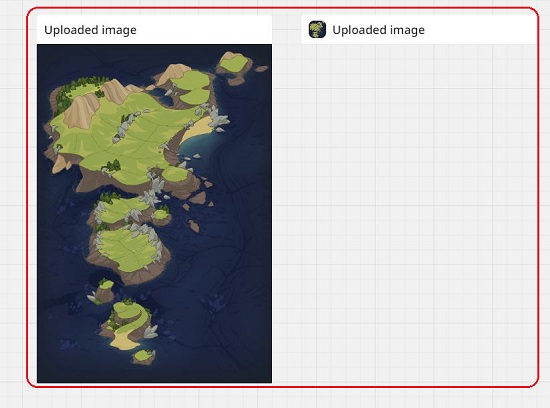
8. You can also copy any document, image, media etc. from the web page or any device to the board. Just copy the elements to the clipboard and paste it at any place that you desire. The data will be quickly uploaded and saved to the board as a data card. You must remember that an empty Weje card can take on several forms based on the type of data that it contains such as simple / formatted text, data & time, mentions, title & tagline, numbered / bulleted lists, links, sketches, voice message, 3D object, visual content, comments and much more.
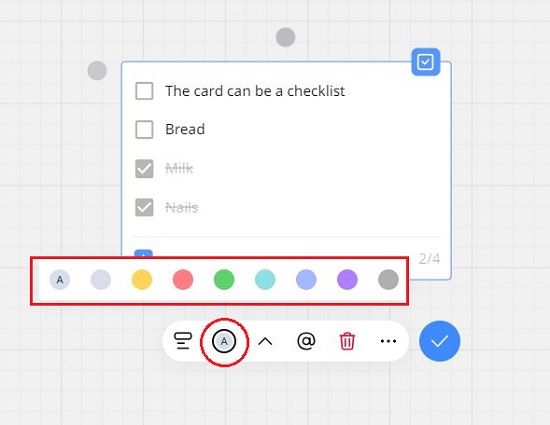
9. You can give a different color to each card so that they can be identified based on their priority, status, severity, workflow step etc. To change the color, just click on the specific card and use the color picker that appears in the context menu.
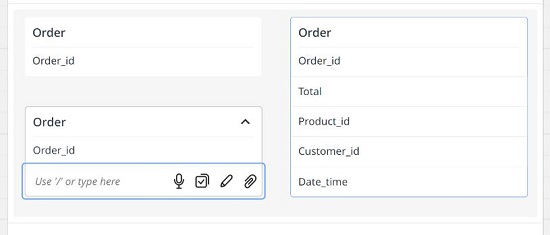
10. You can attach a card to another one on the whiteboard by dragging and hovering over the second card till a blue line appears and then let it go. If you desire to make a stack of nested cards, then press the key combination Shift + Enter and go ahead and add as many cards that you wish.
11. You can easily make a copy of an existing card. Just select the card (or a group of cards), and press and hold the Ctrl button and then drag the card to a new place to duplicate.
12. To connect two objects with a line, select the object and hover the cursor outside the object till a grey dot appears which indicates the location where you can attach the connector. Now click and drag your mouse to start a connecting line, attach it to a connection point of another object and release the mouse button. You will find that the connection has been made. You can then select the connection and change its color, thickness, type, add a label and more using the context menu.
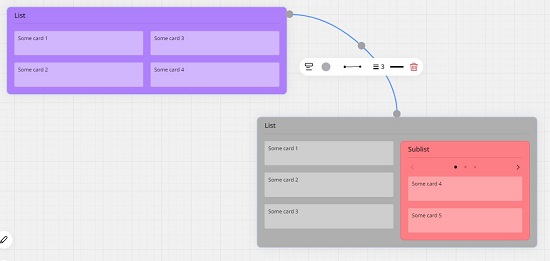
13. Let us now see how to create the basic structure element of Weje which is called a List and is basically a container in which you can place all other objects including cards and other lists. Lists help you effectively organize your content into blocks so that it becomes more visible and readable. To create a List, just press the ‘L’ hotkey or click on the ‘Create List’ icon on the main toolbar at the bottom.
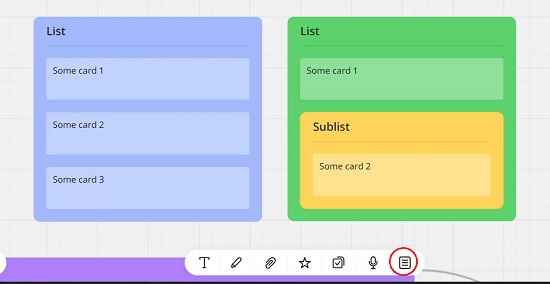
14. To group multiple objects into a List, hold the Shift button, select all the required objects to be grouped and then press Ctrl + G or click on the icon ‘Group into a list’ in the context menu that appears alongside.
15. If you want to collapse (minimize) any object, click the ‘Collapse’ icon in the context menu. Once minimized, only the object title will be displayed. If the title is missing, the first line of text or the name of the object (card, list etc) will be shown.
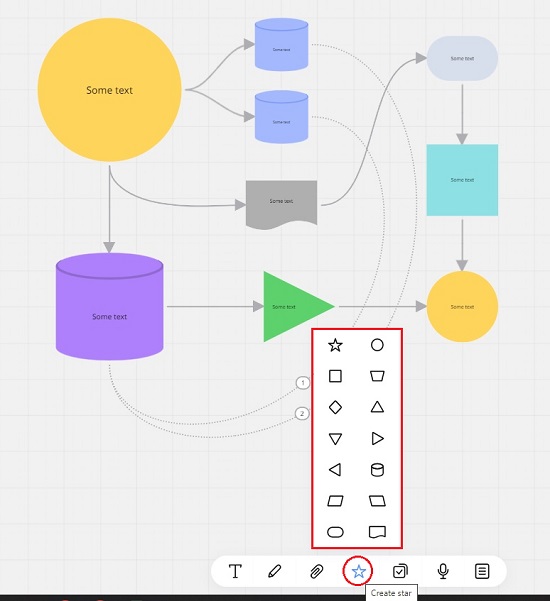
16. You can insert any geometric shapes in your whiteboard by clicking on the ‘Create Star’ icon on the main toolbar. Shapes are very handy when you wish to build flowcharts and mind maps or if you want to create a layout for presentations, publications and more. You can change the color of any shape from its context menu and double-click on it to place any relevant text inside.
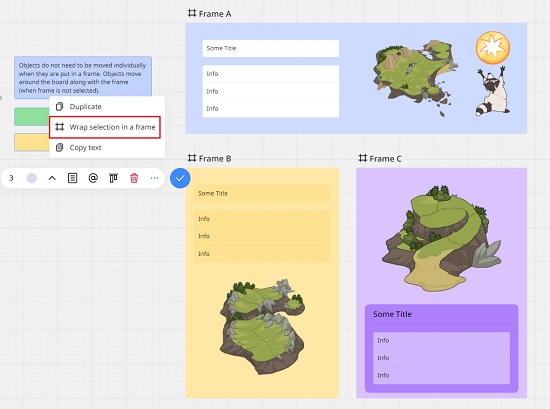
17. If you wish to highlight an area of the board to segment your content, you can wrap the objects in Frames. To do so, just select the object (or objects), click on the three-dots icon in the context menu and choose ‘Wrap selection in a frame’. You can then change the size and color of the Frame. When you move a Frame around the board, all the objects that are wrapped inside it will move as one block.
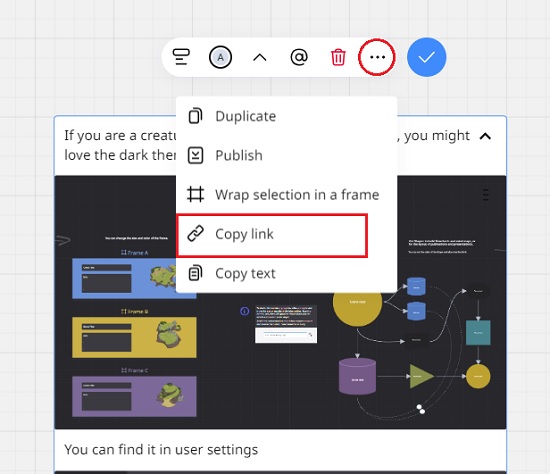
18. Every object on the board has its own unique URL that can be used to share it individually so that users may focus only on the specified object rather than the entire board. To copy the object URL to the clipboard, select the object, click on the three-dots icon in the context menu and then choose ‘Copy Link’. Once you paste this link anywhere on the board as an object, a link button will automatically be created.
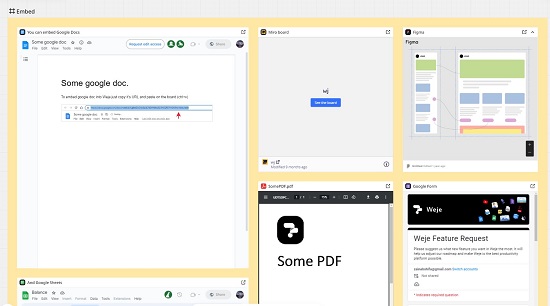
19. You can embed documents from 3rd party cloud services such as Google Docs, Figma and more into Weje boards so that it all your projects can be managed from a single location. To embed any Google Doc, just copy its URL and paste it on the board.
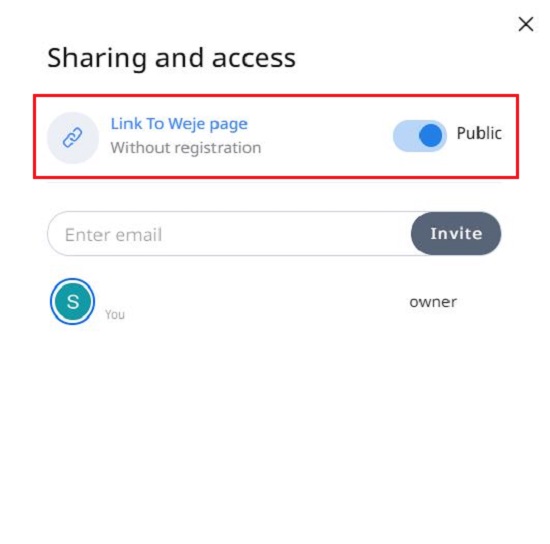
20. You can share your cards and lists with an external user who has no access to the board. For this, just select the items that you wish to share, click the three-dots icon in the context menu and choose ‘Publish’.
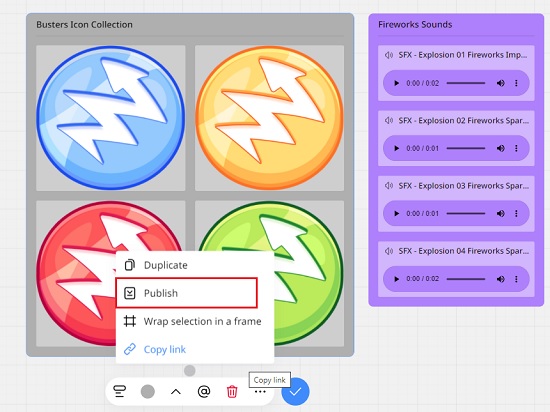
21. Next, enable the ‘Public’ toggle button so that external users too, get access to the object without a registered account, copy the URL of the object and share it with whomever you like. If this toggle button is switched off, only registered accounts will be able to see the publication.
For more information on how you can use Weje for your requirements, you can click on this link to access its knowledge base.
Closing Comments:
Weje is a fantastic hyper-space that enables you organize your ideas, projects, documents and more using a variety of versatile objects like colored cards, mind maps, lists, embedded cloud objects etc. The product is 100% free and well suited for individuals and teams where creativity and flexibility are extremely valued. Since the product is cloud-based, it has a huge advantage over other desktop tools.
Go ahead and put together your thoughts and visually map your complex ideas with ease. Click here to navigate to Weje.