CustomMenu is a free downloadable and easy-to-use application for Windows 10 / 11 that serves as a replacement of the built-in context menu, accessible by right clicking on the Windows desktop. All your favorite programs as well as commonly used applications, files, system functions and more are swiftly and easily accessible at your fingertips – a much better alternative to the cluttered Windows start menu or the default desktop context menu.
When you run CustomMenu.exe it will display an icon in your system tray and a minimal CustomMenu.ini will be created. If you right-click anywhere on your desktop, a single menu item will appear. You can now start building your customized menu as per your requirements.
The CustomMenu must be built using the drag and drop method through its Configuration Window that offers a wide functionality and flexibility. You are allowed to create an unlimited number of menu items along with an unlimited number of submenus. This is a key improvement compared to the standard desktop context menu that offers limited support for submenus with each submenu restricted to a maximum of 16 menu items. Additionally, CustomMenu supports both absolute or relative path to files and folders and this allows you to work with USB drives too. Let us now understand in brief how CustomMenu works.
Working:
1. Click here to download CustomMenu from its GitHub repository in compressed Zip file format (CustomMenu_release_v1_0_1.zip). Unzip the contents to a specified folder and launch the application by double clicking the file CustomMenu.exe.
2. You will observe that an icon will be available in the System Tray and a default CustomMenu.ini file will be created in the same folder where you unzipped the downloaded file.
3. Next, right click anywhere on your desktop to display a single menu item that reads ‘Right-Click me to open config’. Do as instructed and the CustomMenu configuration window will open.

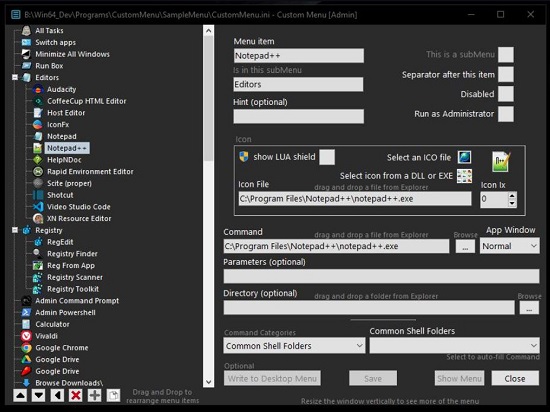
4. Start building the menu by dragging and dropping files / folders / shortcuts onto the menu tree on the left of the configuration window. CustomMenu will automatically create a menu item for each one as well as fill in the details in the edit boxes.
5. Clicking on a folder will open it in Windows Explorer, or any other file explorer software that you may be using. Clicking on a file will launch that file in the same way as if you had done so in your file explorer.
6. You can manually add items to the menu by clicking on the ‘+’ sign at the bottom left of the window. In this case you will have to manually fill in all the details in the configuration boxes.
7. If you want to add a Folder to the menu and wish to browse into the Subfolders within that folder, specify the path of the folder in the Directory box, input the keyword ‘Browse’ in the Command box and, type ‘+folders’ in the Parameters box. CustomMenu will automatically assign an appropriate icon to every folder and file that appears in the submenus.

8. To turn off the provision of browsing into Subfolders, change ‘+folders’ to ‘-folders’. If the Parameters box is empty, then CustomMenu will use ‘-folders’ as default.
9. Likewise, if you wish to display only Folders and Subfolders in the submenus, you can specify ‘+folders -files’.
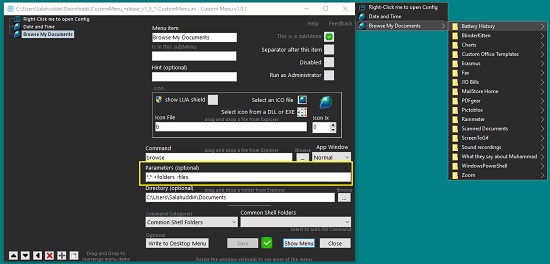
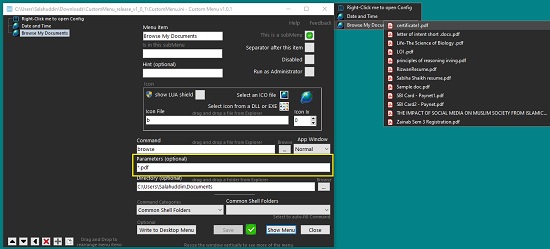
10. Additionally, You can specify a file filter in the Parameters box such as *.pdf. *.zip etc. In that case, only the files permitted by the filter will be displayed in the submenus. You are also allowed to use multiple filters like ‘*.avi *.pdf *.zip *.rar’ If you wish to omit certain files such as .TXT, you can use the string ‘*.* -*.txt’.
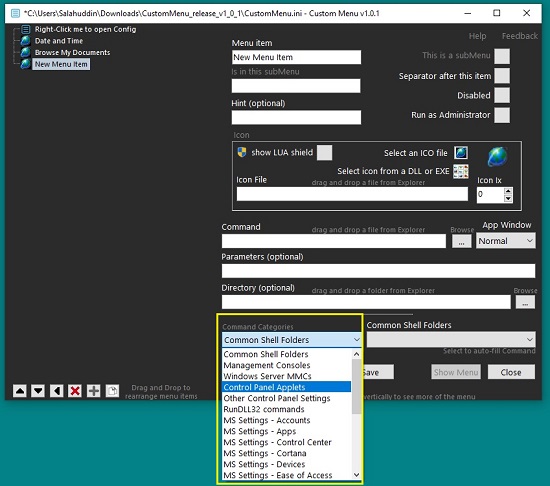
11. You can create menu items for several built-in Windows apps and commands. For this, select the Command Category from the corresponding drop-down list such as Management consoles, Control panel applets, Windows server MMCs, or MS Settings apps like Devices, Accounts, Network & Internet etc. Next, select the required command or applet from the drop-down list ahead of Command Categories and then finally click on the ‘Save’ button to save the menu.

12. If you wish to customize the icons to be used for any item (file / folder / applet etc), you can do so using the Icon section. Just select the item from the menu or submenu and choose ‘Select an ICO file’ or ‘Select icon from DLL or EXE’ as per your requirement. Alternatively, you can also drag and drop an icon file onto the Icon File box.
![]()
13. CustomMenu provides for unlimited number of menu items, submenus, or submenu items. In case a submenu has more than 40 items, scroll buttons will automatically be provided at its bottom. You can hover your mouse over any of these buttons and the submenu will be auto-scrolled. Alternatively, you can also use the mouse wheel button to easily scroll up and down the submenu.
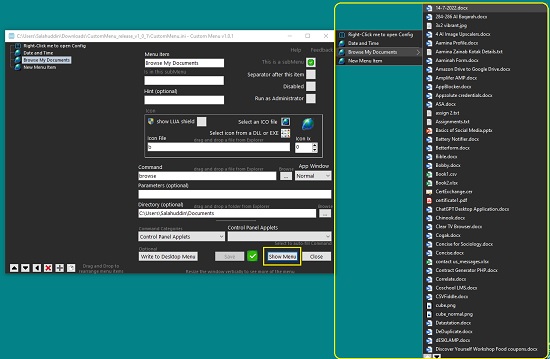
14. After modifying the menu and saving the changes, you can test it directly from the Configuration window by clicking on the button ‘Show Menu’. This will display the fully working menu adjacent to the Config Window.
15. Anytime you wish to get your normal Windows desktop menu, hold down the Ctrl key and right click on the desktop.
For more information and help on how to use CustomMenu, click on this link.
Closing Comments:
CustomMenu is a great tool that enables you to build your own customized Windows Desktop Menu with unlimited menu items along with unlimited submenus. It is a fine alternative to the default Windows desktop menu and provides easy and quick access to all your favorite applications, folders, Windows settings, Windows applets and more at your fingertips by simply right clicking the desktop.
Go ahead and try out the product and do write to us on what you feel about it. Click here to download the CustomMenu installer in Zip format.