Gleek is a Free Online tool that you can use to create UML Diagrams, Flowcharts and more simply by using the keyboard. It empowers development teams to diagram and illustrate processes effortlessly and really fast by using easily understood syntax.
Gleek is quite intuitive, allowing teams to focus on what really matters – how to represent their ideas by way of diagrams, without getting distracted.
Gleek supports the following types of Diagrams in its own unique syntax:
- Flowcharts
- Entity Relationship diagrams
- UML Class diagrams
- UML Object diagrams
- UML Sequence diagrams and more
The Gleek syntax is pretty simple and there are a variety of ‘How to Guides’, Video tutorials and more, available on their website to help you learn, diagram and keep you up to date. Click here to browse through their Tutorials and start from scratch.
The following are the important Features offered by Gleek:
- No Mouse required: Developers who are involved in the brain-storming process can create a meaningful representation of their ideas without using a mouse.
- Collaboration: You can collaborate with your team members to plan and finalize your project ideas.
- Export: You can export and share your diagrams in PNG format.
- Templates: Gleek offers a variety of pre-designed templates for common use cases that will speed up the process of creating diagrams.
- Customization: A good deal of flexibility has been provided to customize your diagrams in order to give them a good look.
Interface:
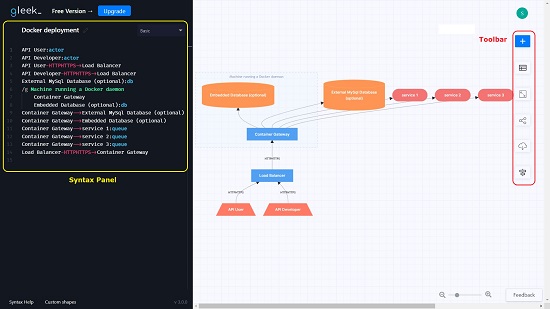
Gleek has a very simple and neat Interface, with a Black Panel at the left where you type your diagram syntax and the View Panel at the right which offers you a real time visualization of the diagram that is taking shape. A vertical tool bar at the right of the workspace enables you to access the Dashboard, Share & Download the diagram, change its orientation etc. Any time during the process of diagramming, you can click on ‘Syntax Help’ at the bottom left to learn more about it.
How it Works:
1. Navigate to Gleek using the link provided at the end of this article and Sign up for a free account using Google. You can use the application without signing in but you will not be able to save your diagrams online.
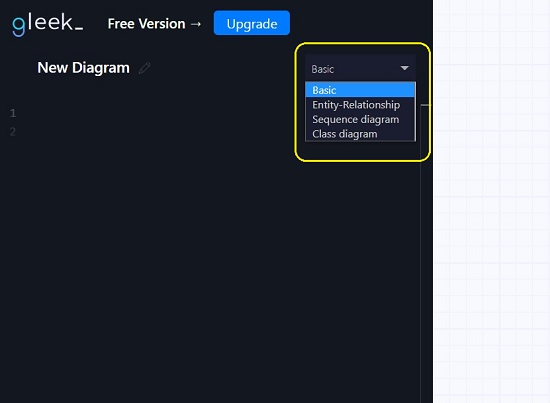
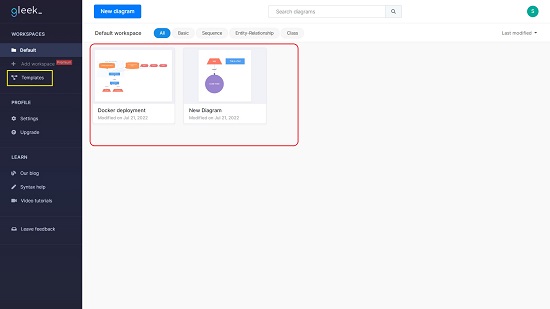
2. Choose to start a New diagram from scratch or use the pre-designed Templates that have been provided. To access the Templates, click on the ‘Dashboard’ icon in the toolbar and then click on ‘Templates’ in the panel at the left. Browse through the various designs and click on the one that you wish to start with. If you are starting New, select the type of Diagram using the drop-down in the syntax panel.
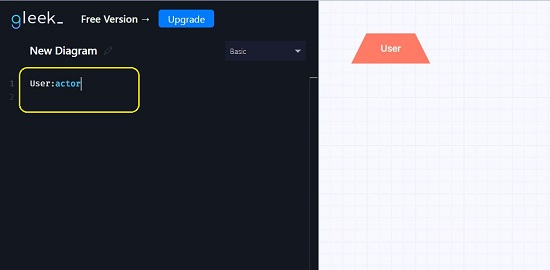
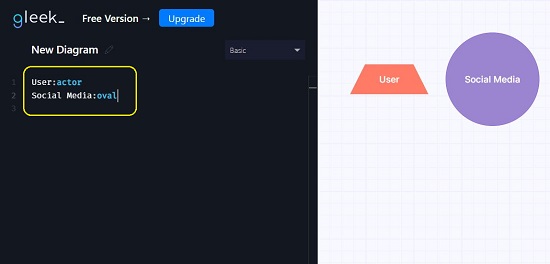
3. Learn the Syntax using the link at the bottom of the panel and start creating your shapes. For example: To create an entity that represents a User, type the word ‘User’ followed by a colon and choose any auto-complete options (shape types) such as actor, class, diamond, rectangle, service and more.
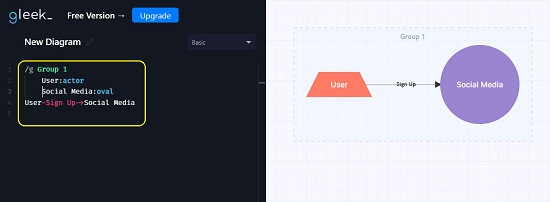
4. Next, let us add some object for the User to use such as a Social Media platform. Type ‘Social Media’ and again choose any auto-complete option. To connect the User to the Social Media object, type ‘User -> Social Media’ on the next line and Gleek will automatically draw the Arrow connecting the two.
5. To define the activity that the User is performing along with the Connection you can modify the previous line and type User-Sign up -> Social Media and the word ‘Sign up’ will appear over the connection arrow depicting the action.

6. If you wish to draw a box to depict a group or collection of elements, use /g <Name> before the object definitions (syntax) and indent all the objects that you want to appear inside the box (see screenshot below)
7. You can click on any object in the diagram to highlight its corresponding syntax and modify it, if required. To change the orientation of the diagram, toggle click the last icon in the toolbar.
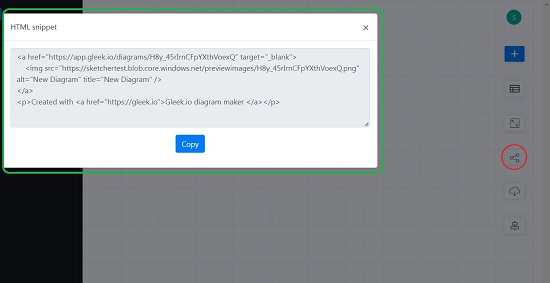
8. To Share your diagram, click on the ‘Share’ icon in the toolbar and select ‘Link’ to copy the URL to the clipboard. In case you require an HTML snippet of your diagram, you can click on ‘HTML’ and copy the code.
9. To Download the diagram, click on the ‘Download’ icon in the toolbar and then click on .png.
Final Comments:
After working with Gleek for some time, I found that it is a good tool to create Process Diagrams by simply using easy-to-learn syntax. It helps you to be focused on your ideas rather than getting distracted by the usual drag and drop elements that are often used in many diagramming applications.
Click here to navigate to Gleek and start by creating your first diagram. Use the Syntax Help available at the bottom of the page for any ideas and help.