Amazon Drive was launched in the first quarter of 2011 as a cloud storage application. It was initially known as Amazon Cloud Drive and offered file / photo backup and sharing services. Using a standard Amazon account, users can transfer files and folders from any devices including mobiles, tablets, computer systems and more, directly from the browser or by using the Amazon Photos app.
But the news that has come in is that after 11 years in use, Amazon will be shutting down the service on December 31st, 2023, when the access to it will be completely cut off. But even before that, uploads to Amazon Drive will be stopped on January 31st, 2023. Users still have more than a year to determine an alternative cloud storage service and get all their files and photos moved to the new destination.
As far as cloud storage is concerned, one of the obvious and preferred alternatives of millions of users, will naturally be Google Drive. In this article we will be explaining the methods that you can deploy to easily transfer your data from Amazon Drive to Google Drive before they finally call it a day.
Using Google Drive Desktop App and Amazon Photos App.
When you install the Google Drive Desktop App, it mounts a virtual drive in Windows Explorer and uses a drive letter for it similar to your physical drives. When you open the Virtual Drive all the files and folders in your Google Drive will be displayed. If you copy files or folders to this virtual drive, they will be automatically synchronized with your Google Drive. In this method, we will be using this feature to transfer data from Amazon Drive to Google Drive.
1. Download and install Google Drive for Desktop and Amazon Photos App.
2. Open your Amazon Photos App, login to your account and click on ‘Download’ in the navigation panel on the left.
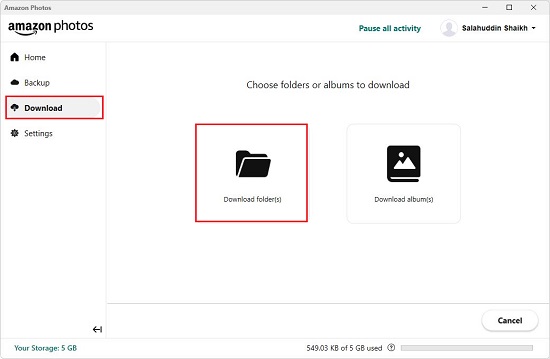
3. Next click on ‘Download Folders’ and select the folder that you wish to download.
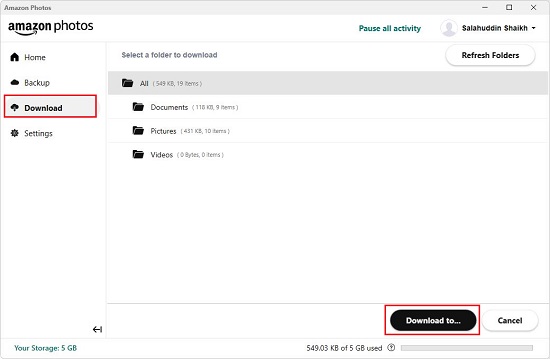
4. Now click on the ‘Download to’ button at the bottom right and select the destination folder in your system where you wish to download all the contents of the chosen Amazon folder.
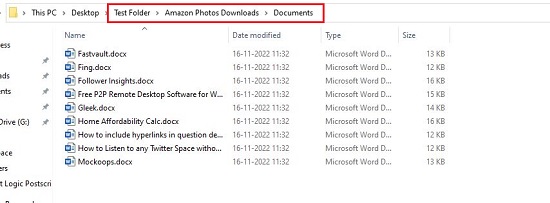
5. The download will start immediately and may take a while depending upon the size of the data to be downloaded. Once the download is completed, the files and folders will be visible in the selected folder in your system under Amazon Photos Downloads/<My Amazon folder>. ‘My Amazon folder’ will be replaced with the name of the folder in your Amazon Drive from where you downloaded the data.
6. Next, copy this folder to the designated location or folder in your Google Drive using its Virtual Drive letter and all the data will be automatically synchronized with your Google Drive.
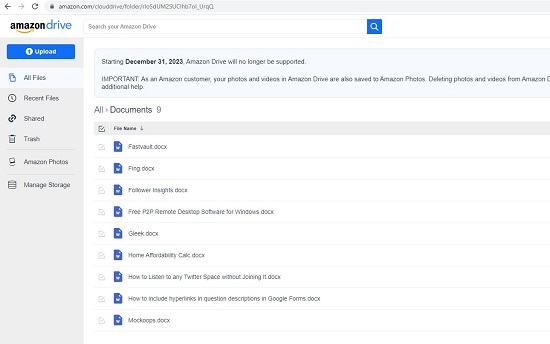
7. Repeat the above process for every folder that you wish to transfer from Amazon Drive to Google Drive. Remember that this method allows you to download the entire folder on your Amazon Drive. You will not be able to select specific files to download. If you wish to do so, you must navigate to the Amazon Drive web application, select and download individual or multiple files and then transfer them to Google Drive via its Virtual Mounted Drive.
Using cloudHQ Sync & Backup
cloudHQ is a software that synchronizes your data (files and folders) between numerous cloud platforms like Amazon Drive, Google Drive, Dropbox, OneDrive and more. No software is required to be installed in this procedure as the entire synchronization process is carried out online.
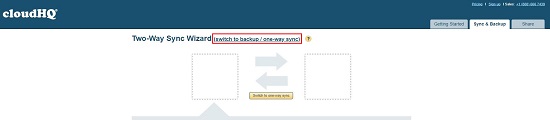
1. Click here to navigate to cloudHQ (Sync & Backup) and click on ‘Switch to backup / one-way sync’.
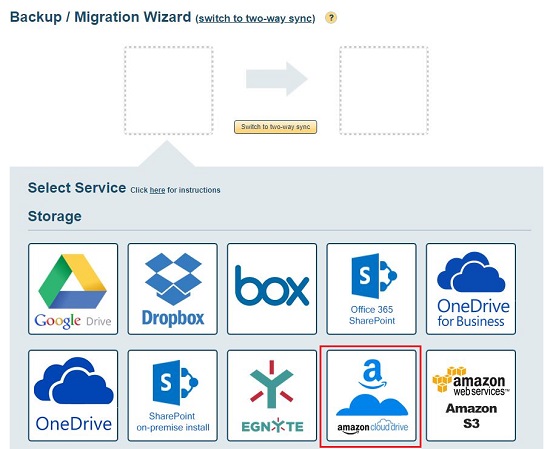
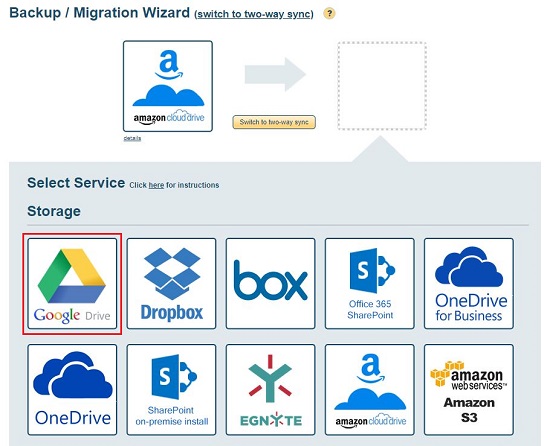
2. Click on Amazon Cloud Drive to select it as the source cloud service from where you will backup the files and folders.
3. cloudHQ will prompt you to sign up for a free account. You can use your Google Account to sign up.
4. Click on the button ‘Add Amazon Cloud Drive’ button and sign in to your Amazon account.

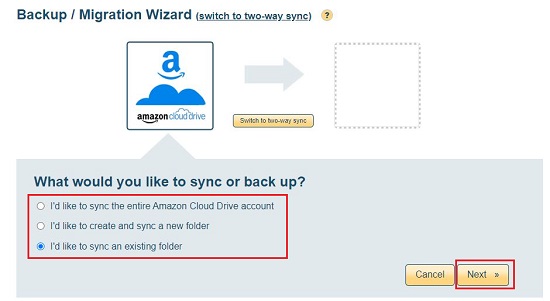
5. Choose whether you wish to back up the entire Amazon Drive account or an existing folder and then click ‘Next’.
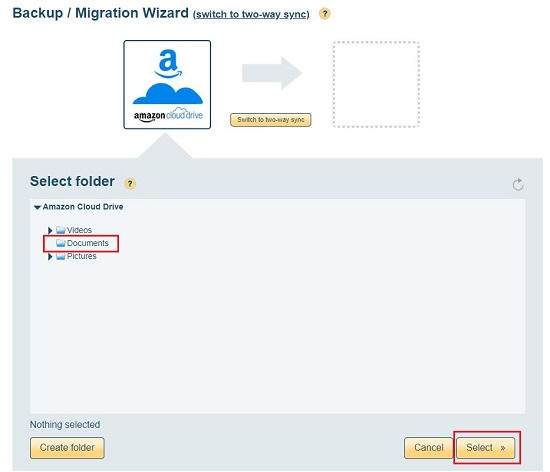
6. If you have chosen to backup an existing folder, the next screen will ask you to select the folder. Just click on the folder name to select it and then click on ‘Next’. You will not be able to select more than one folder. For backing up another folder, you must create another synchronization pair as explained below.
7. In the next screen, select Google Drive as the destination cloud storage. Click on ‘Add Google Drive’ and sign in to its Google Account where you wish to backup your Amazon Drive data.
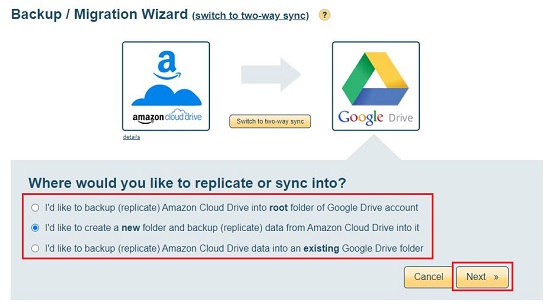
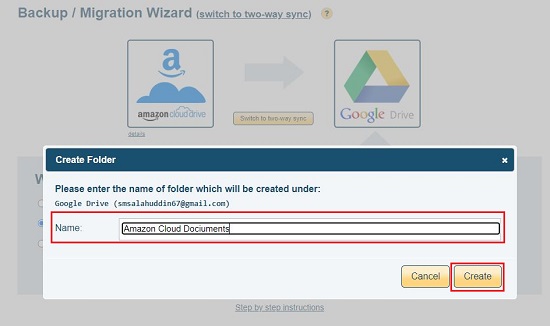
8. You will now be asked to select if you wish to backup the Amazon folder in the root folder of your Google Drive account or an existing folder. You can also create a new folder and replicate the data of Amazon Drive into it. In this example, we will be creating a new folder in Google Drive to backup the data and you must specify the name for it.
9. Double all your selections and choices that will be displayed on the screen and click on ‘Ok’.
10. Click on ‘Start Sync’ to begin the process of backup. If you wish to backup another folder from Amazon Drive, click on ‘Add one more synchronization pair’ and repeat the above process once again.
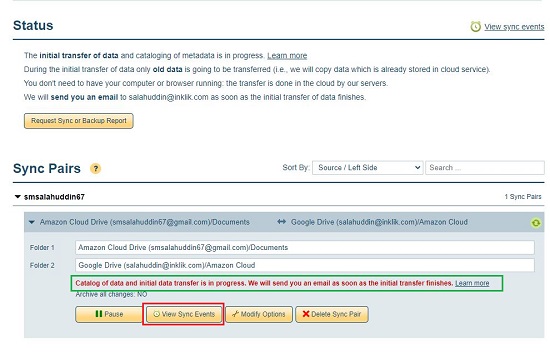
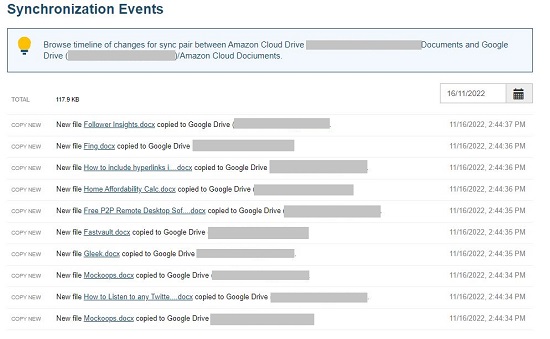
11. The details and status of synchronization will be displayed in the next screen. You can also click on ‘View Sync Events’ to watch the detailed status.
Using odrive Desktop Sync
Odrive is a good cloud management system with a web user interface and a downloadable Desktop Sync application that lets you keep and view your cloud files on your local computer with consumption of your hard drive space unless you choose to sync them.
Odrive doesn’t have any cloud-to-cloud sync capabilities, hence in this method we will be attaching (linking) Amazon Drive and Google Drive storage in odrive and then using the Desktop Sync program to transfer files from the former to the latter. The steps for carrying out this process have been explained below:
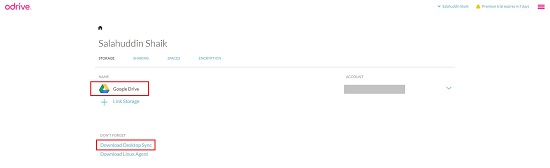
1. Click here to navigate to odrive and sign in for a free version using your Google Account. Make sure that this is the same account (Google Drive) to which you wish to transfer your files and folders from Amazon Drive.
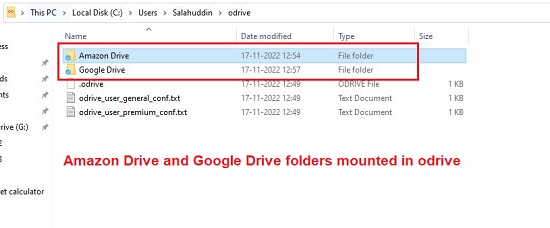
2. You will be taken to the odrive dashboard where you will observe that your Google Drive account (the one that you used to sign in) is already linked as a storage.
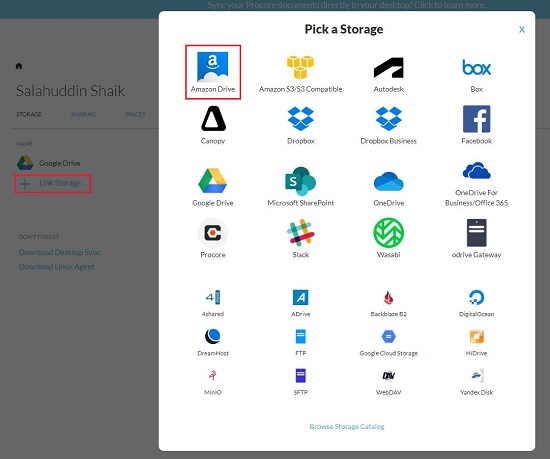
3. The next step will be to link the Amazon Drive account. Click on ‘Link Storage’ and then select ‘Amazon Drive’ in the ‘Pick a Storage’ popup box. Click on ‘Authorize’, provide the credentials of your Amazon account, and then click on ‘Allow’ to complete the process of linking. You will now view that Amazon Drive has also been attached as a storage.
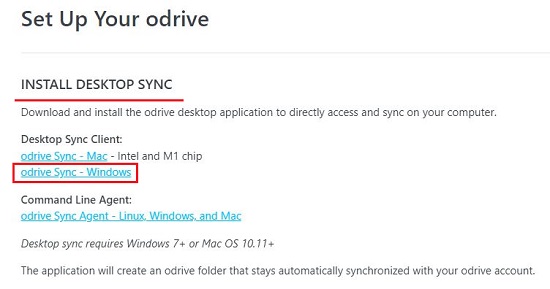
4. Next, click on ‘Desktop Sync’ in the dashboard and download the package odrive Sync – Windows which is the Desktop Sync Client. Once the download is complete, install the package in your system.
5. The application will open automatically after the installation is complete. Click on ‘Get Started’ and sign in to the odrive account (Google) that you used in Step 1 above.
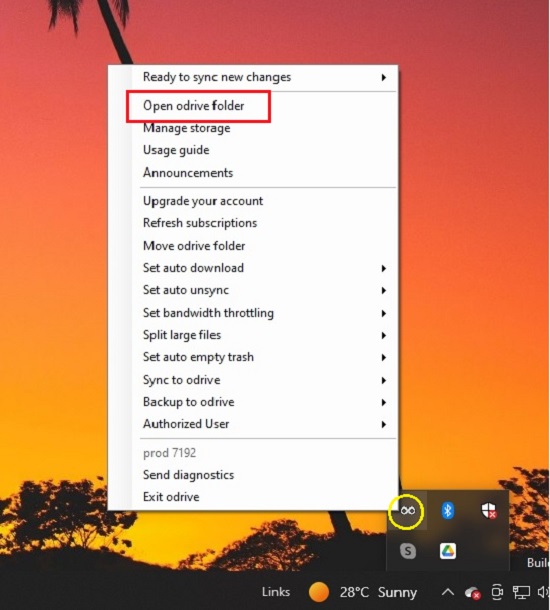
6. Now right-click the odrive icon in the system tray and click on ‘Open odrive folder’. You will be navigated to the odrive virtual folder in Windows Explorer. Verify if you can see the entries for the Amazon Drive and Google Drive storage that you have linked above.
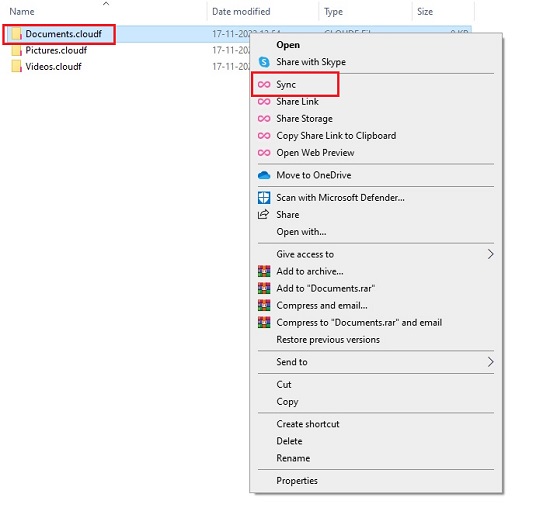
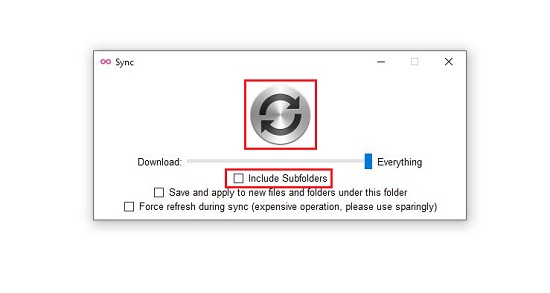
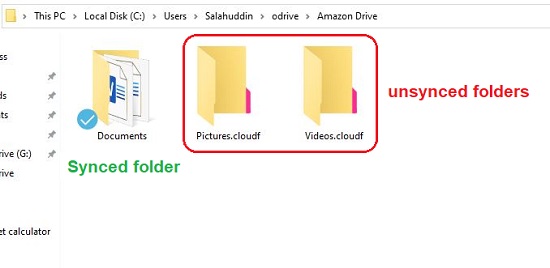
7. Now, double click and open the Amazon Drive cloud folder, right-click the folder that you wish to backup and click on ‘Sync’. Next, enable the checkbox ‘Include Subfolders’ if required and click on the large Sync icon in the popup box. All the files and folders that you have chosen to sync will now be downloaded to your local system and this may take some time depending upon the size of the folder.
8. Once a folder has been synced, you will be able to see a blue tick mark next to its icon and the filename extension ‘.cloudf’ will be removed.
9. Right click on the folder / file name that you have synced above and click on ‘Copy’ to copy them to the clipboard.
10. Next, open the Google Drive folder under odrive, browse to the location where you want to save the files / folders, right-click and then click on ‘Paste’ or use the keyboard shortcut Ctrl + V.

11. Repeat the above process from Steps 7 – 10 for all the files and folders that you wish to transfer from Amazon Drive to Google Drive.
You must remember that the above method involves downloading (syncing) all the files and folders from Amazon Drive to your local system and then uploading them to Google Drive. Hence you must have good internet connectivity and bandwidth for the process to be completed successfully.
You can choose any one of the methods that we have explained above depending upon the scenario and the amount of data that you wish to back up from Amazon Drive.