Passbolt is a free open source password manager for teams. This password manager can be hosted locally in an organization or on a VPS like DigitalOcean, Linode, etc. With this, you can manage all your essential passwords in a secure, private vault and you can also share them with your teammates with ease. It allows you to import passwords from a CSV file or Keepass database. It supports user groups and you share different passwords among them in just few clicks. Here it even comes with a browser extension to provide security and easiness to login on websites.
There are various password managers available for team, but they often come with certain limitations in their free tier. But if you want a fully functional, powerful, and free password manager then you can use Passbolt and host it on your own server. You just need to have some technical knowledge about installation of PHP web apps. After installing, you can start adding users for or you can let them register from the main UI. There are not so many fancy features in it so you will find it very simple to manage and safeguard your essential credentials and password.
Main Features of Passbolt:
- Users and user groups: Passbolt allows you to control the public registrations. And you can manage users from the admin panel where you can invite a user and then create user groups. A group is used to share passwords in subset of a team. With the help of groups, you will not have to share password manually with each person.
- Password sharing modes: While sharing a password from Passbolt, you can give read or write access to a person with whom you are sharing the password. In write access, the other person will be able to modify the passwords.
- Password filters: On the main UI where all the password are listed, you can filter the password lists to find the passwords you are looking. You can search in the passwords list, filter them by favorite, filter the list by the shared passwords, and some others.
- Helper browser extension: Passbolt comes with a helper browser extension that manages the user authentication and protects you against phishing attacks. Not only that but the extension makes sure that only a single account is being used on a browser. In addition, it even helps you autofill the username and password fields on websites.
- Logins and activity tracking: From the admin UI, you can see user’s login time. You can see last log in time of all the users. And if some users modifies a password then you will know that.
- Import/Export passwords: One of the best features that it lets you import passwords from existing password managers. You can import passwords from CSV(1 Passwprd, Lastpass, Keepasx) and Keepass database. You can also export passwords from it in the same formats as well.
- Open security standards: It uses GnuPG like open standard for encryption and signing. This is a strong security aspects of the tool. It even uses the same standards to authenticate users and verify secrets server side.
- Built for teams: It works with email, terminal, and web UI. If you are in DevOps like team then you will find using it from CLI very useful. There are many other misc utilities included in it that you can use to debug and troubleshoot the problems.
Installing and Configuring Passbolt on a Server:
For the sake of this post, I will be installing and configuring Passbolt on my Ubuntu machine. But there are other ways to install it as well such as using Docker and from source code. You can read about other installation options here. So, if you have a Linux machine or a VPS then you can just follow the steps below.
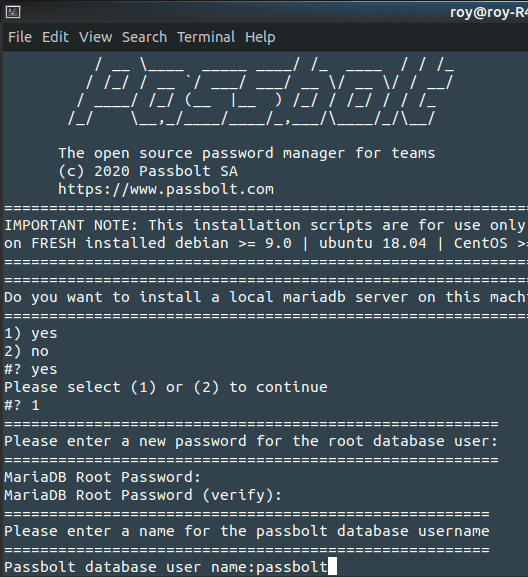
Step 1: Open terminal and make sure that wget is installed. If not, then install it first and then run the following commands one after another. In this step, a script will be downloaded and will be executed to start the installation.
wget -O passbolt-ce-installer-ubuntu-18.04.tar.gz https://www.passbolt.com/ce/download/installers/ubuntu/latest
tar -xzf passbolt-ce-installer-ubuntu-18.04.tar.gz
sudo ./passbolt_ce_ubuntu_installer.sh
Step 2: Now, in the terminal window, you will have to specify some options related to database. The very first option is related to database settings. If you want to use a remote database server then you can skip it. If you don’t have DB server then just select one to install and specify the passwords accordingly.
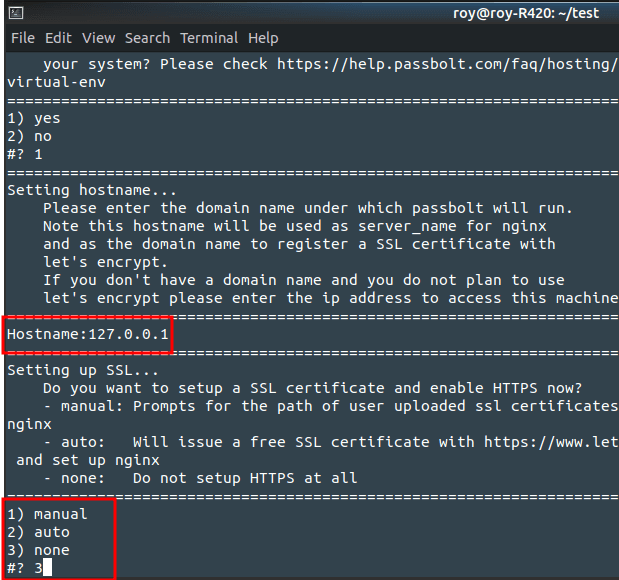
Step 3: Next thing you have to configure is SSL. If you have a domain then it is highly recommended that you enable it. And you can create one SSL certificate here as well from Let’s Encrypt too. Do note the usernames and password for dataset that you provide here you will need them later. If you want to run it locally then specify “127.0.0.1” as IP and do not “none” option for SSL.
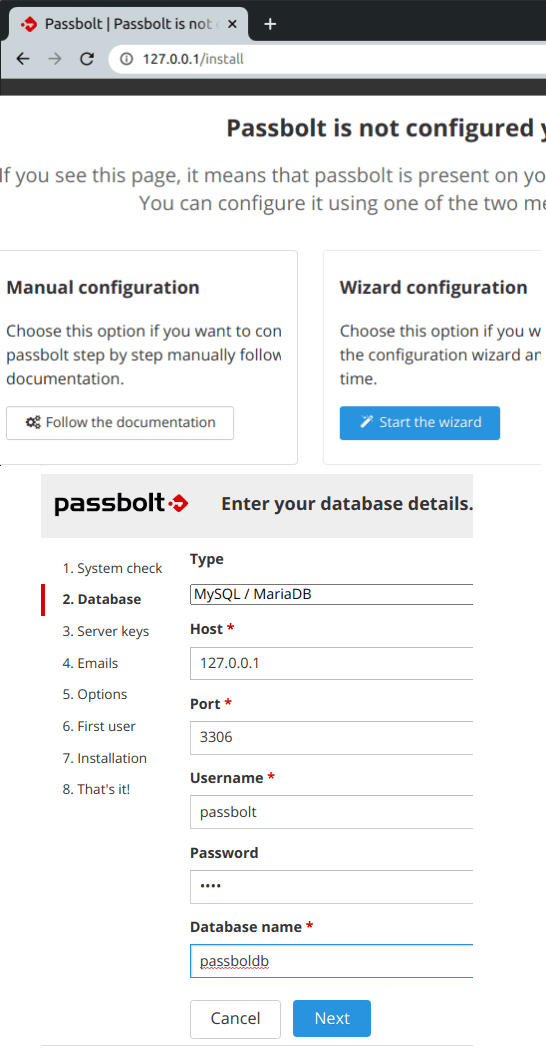
Step 4: After the script runs and installs everything then you will have to configure it. The configuration wizard will open in browser and you just enter the IP or domain you used in the installation to reach there. So start the configuration wizard and then set up the database credentials first that you have noted already.
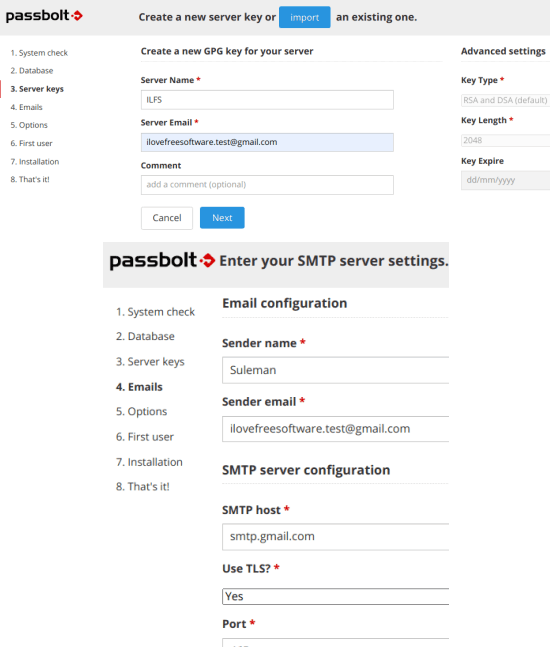
Step 5: Proceed in the configuration and create a GPG key. To do that, you just have to provide your sever name and your email address in the username field. Click Next button and then configure the SMTP settings. Configuring an SMTP server is necessary and without that other users account won’t be created.
Step 6: Now you have to specify the server properties. Specify if you want to use HTTPS or if you want to allow public registrations. After this, you just specify the admin user details.

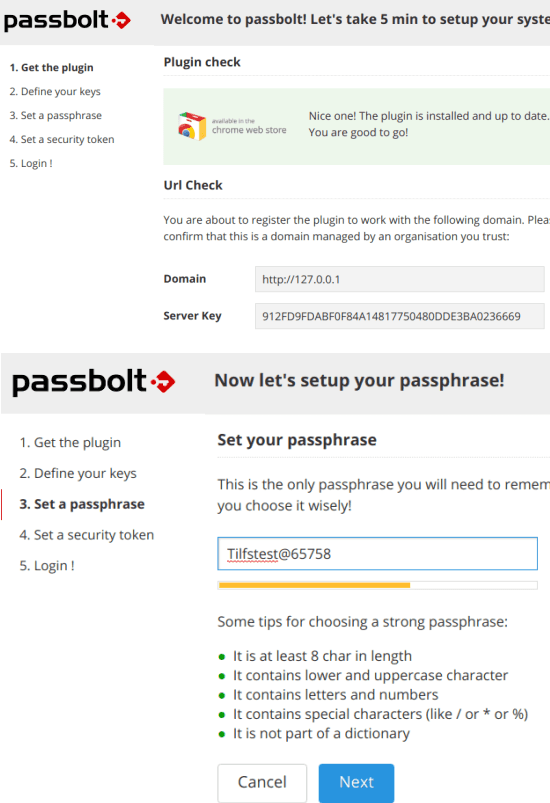
Step 7: For each user, it asks for a key phrase. So specify that and then proceed. Next, you have to download the backup key that it gives you. You will have to keep it somewhere safe and without this, you will never be able to recover your account. Also, never forget your key phrase. Additionally, there is security token is what you will have to set up. In this process, you will have to install the Passbolt Chrome or Firefox extension.
At this point, the user configuration is done and you are ready to use it.
Using Passbolt to Manage and Share Passwords:
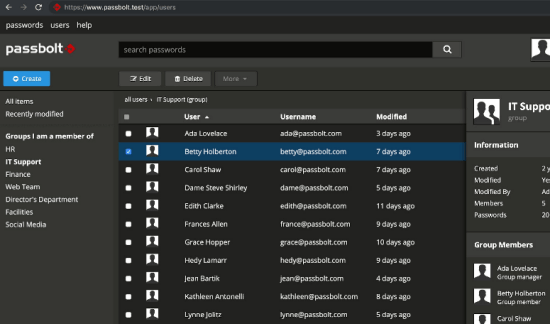
Now, you just log in to the Passbolt account and then start adding passwords there. The UI is very simple and you can create passwords there easily. In the “Passwords” section, you just create as many passwords you want. For every password, you can specify name, URL, username, and an actual password. It even comes with a password generator there that you can use to generate a strong password.

Next thing is users management. From the “Users” section, you create a new use by specifying their name and email address. Rest of the user setup will be done by the end user himself, An email will be sent to the user you create, and they use the link in that to proceed with the account creation. And if you allowed public registration in the configuration then users can sign up from the register link as well.

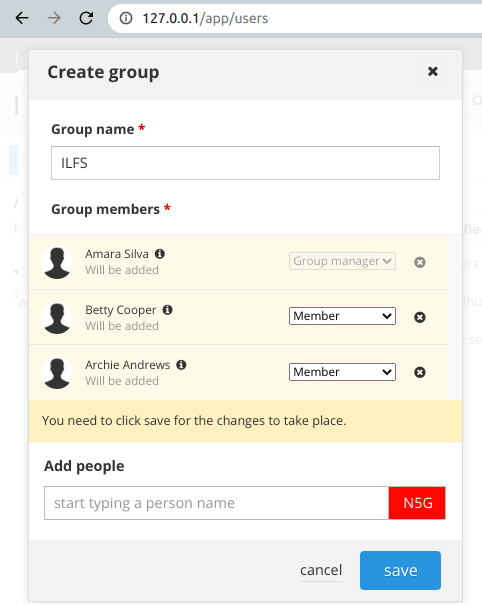
Just like users, you can create user groups. Just create a group by assigning a name and people you want in it. Only registered users can be added in groups. Also, you can assign group managers there as well.
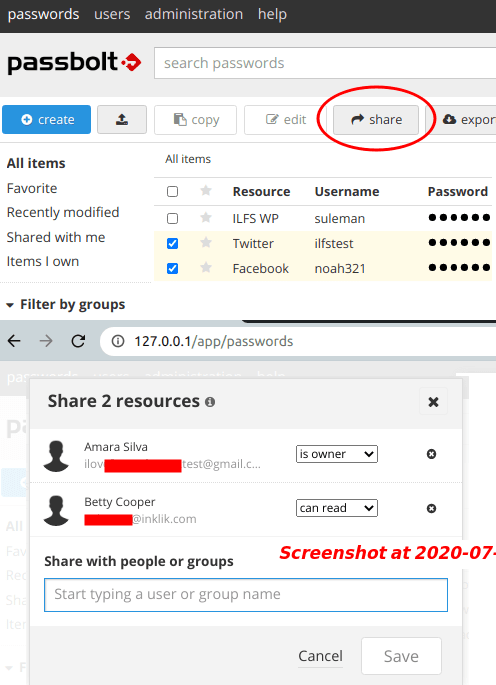
Passwords sharing is easy. From the main UI, you can select a password and then use the share option to share it anyone you want. You can even share passwords in a group as well. Also, there are filters on the main UI that you can use to filter the results.
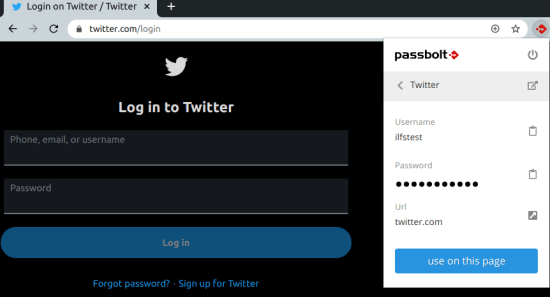
When everything is done, you can just get along and manage all your passwords like a pro. When you want to log in on a website, you use the browser extension. Just reach a website, and then click on the icon of extension. If URL matched with any password in database, it will load up the credentials. And then you can just enter them in one click automatically.
In this way, you can use this simple and powerful password manager. Best free password manager for teams. You can manage all the aspects and use it any way you like. You can add remove new users, passwords any time. And you can also use the import/export options given on the main UI.
Closing thoughts
To be honest, Passbolt is one of the best password managers I have ever used. The installation of the tool can take sometime but the performance is outstanding. I really liked the features that it offers and its functionality. You can safeguard your important passwords in it and share them securely in your team. So, if you are looking for open source self-hostable password manager then Passbolt is a very good option.