Weet is a great web application to make professional-quality videos easily and quickly for training and tutorials. You can subsequently Edit the videos, use AI-based trimming, noise suppression and background removal and share the videos with your team members and clients.
All the videos created by you are stored in designated workspaces in the Weet cloud so that your work stays organized and easily searchable and accessible.
Features:
- Record videos instantly: You can capture your screen, record your face with your webcam, mix with existing videos, upload videos from your local system, add a virtual background & filters and more.
- Remove background: You can remove your background and replace it with a personalized virtual background and use custom branding on your videos.
- AI based automatic trim: You can remove silence and filler words from the video such as ums & uhs in one click. Additionally, you can eliminate unwanted moments like loading screens, notifications, colleague interruptions and more.
- AI based noise suppression: You can automatically remove the background noise from the video with a single click.
- AI based Face Framing: The AI of Weet automatically detects your face even as you move so that it is always visible in the video.
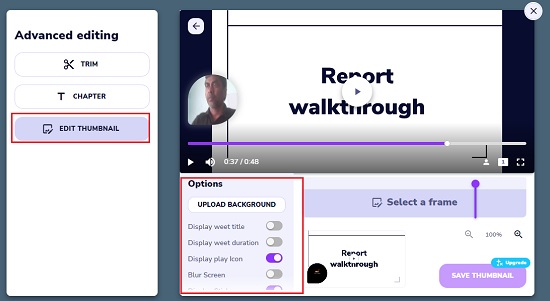
- Add chapter points: You can break up your videos into named chapters to organize them and enable the audience to easily understand the topic. Apart from this, you can upload your own image, choose any existing video frame, or display the Weet title, duration etc. as the thumbnail of the video
- Sharing: You can share your video with team members, friends etc in a secure and private workspace. Alternatively, you can download it to your local computer or use it as an embed in your website, knowledge base etc.
- Track & Interact: Once you share your video, you can track it to find out who is watching your video as well as invite the audience to interact with the video at any specific point.
Not all the features mentioned above are available in the free version. Weet also offers paid subscriptions to its Business and Enterprise plans that you can avail to unleash its full power and potential. Click here to read more about their pricing plans.
How it Works:
1. Navigate to Weet by clicking on the link that we have appended at the end of this article. Register for a free account using your Google or Microsoft credentials and sign in.
2. A designated Workspace will automatically be created and named for you which will store all the videos that you create using Weet.
3. Click on ‘New Weet’ to start recording your first video. You will have to grant permission to your browser to access your camera and microphone.
4. Depending on what you wish to capture / record, choose from one of the four choices at the top of the recorder – Webcam Only, Share Screen, Background or Upload. ‘Webcam only’ will record the video solely from your webcam without any background or screen sharing. ‘Background’ will add a background image to your video while ‘Share Screen’ will enable screen sharing and allow you to choose what to share such as Entire screen, a specific Window or a Chrome tab. ‘Upload’ will let you upload an existing video from your local system in OGM, WMV, WEBM, MPEG, MP4 and other formats.

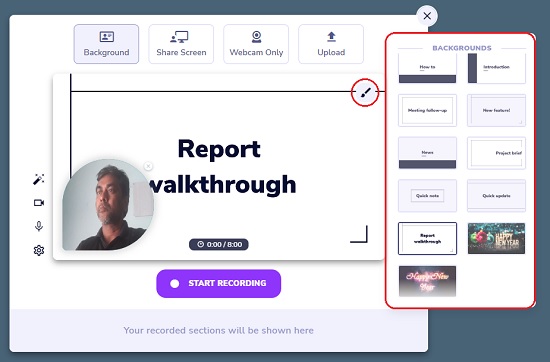
5. If you choose the ‘Background’ option, you can click on the ‘Brush’ icon at the top right to select from the available backgrounds.
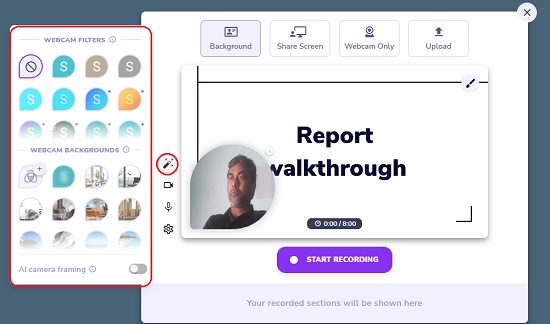
6. To apply Webcam Filters and Backgrounds to your recording, click on the Magic Wand tool in the toolbar at the bottom left of the recorder and apply your choices in the popup screen as desired. You can also enable AI Camera framing using the toggle switch on this popup so that the camera finds your face as you move around.
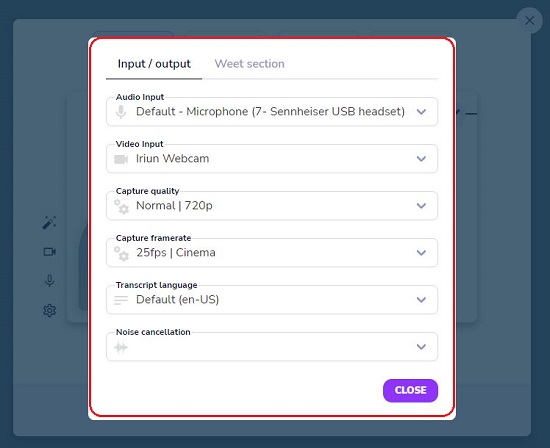
7. Use the Camera and Microphone icons in the toolbar to turn them On / Off. You can click on the ‘Settings’ icon to configure the settings related to Capture quality & frame rate, Noise cancellation, Transcript language and Audio / Video input.
8. When you have configured all the above options and settings, click on the ‘Start Recording’ button to begin the recording.
9. Anytime during the recording, you can click on ‘Pause Recording’ and then Continue recording once again to create separate Sections that are visible in the bottom panel of the recording. You can drag and rearrange the sections and assign a title for each of them.
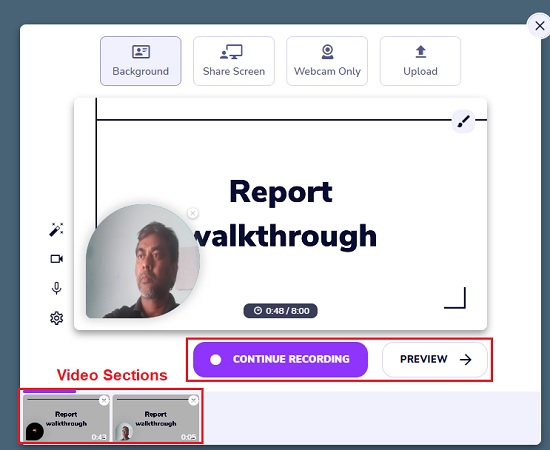
10. To preview the recording, click on the ‘Preview’ button. In this screen, you can add a Title for your video, add Chapter points to your Timeline or Trim the video.
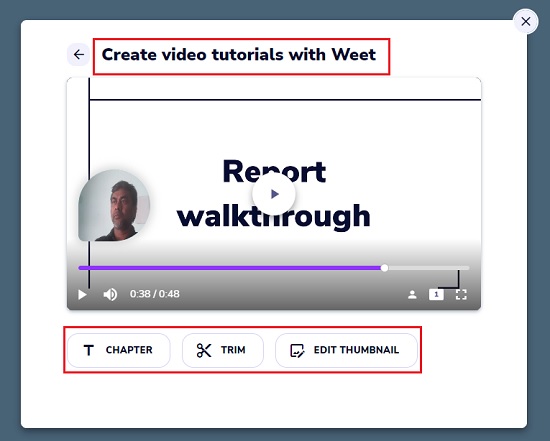
11. You can also Edit the thumbnail of the video by clicking on the corresponding button and configuring what you wish to display in the thumbnail.
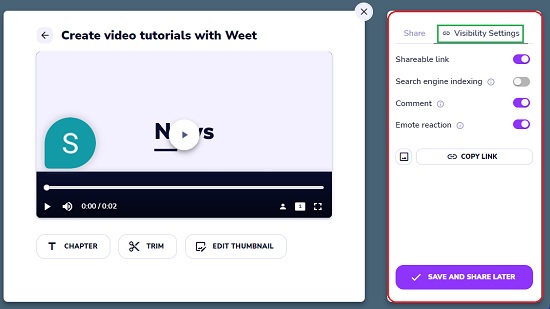
12. You can click on the ‘Visibility Settings’ tab to create a Shareable link as well as assign permissions to the audience to Comment on the video or react using an emoji.
13. Click on ‘Save and Share Later’ to save the video in your designated Workspace. To edit the recorded video, click on its thumbnail in the workspace and then click on the ‘Edit’ at the bottom right.
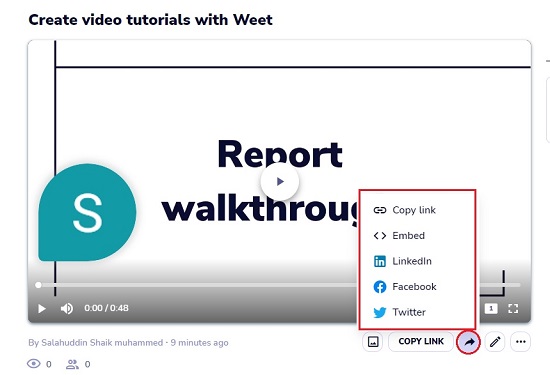
14. To share the video from this screen, click on the ‘Share’ icon and choose to copy the Web link, share in Social Media platforms or copy its Embed code.
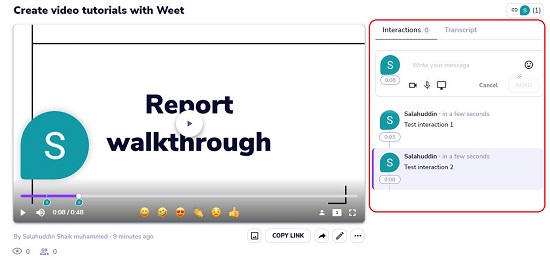
15. The panel towards the right of the video can be used to Interact with the video using messages, emojis, and more. This panel will be visible to users once you access the shared video using the web link.
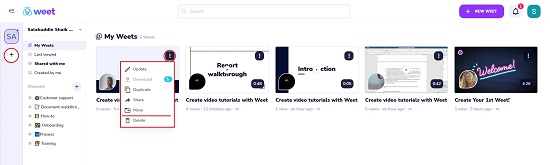
16. All your recorded and uploaded videos will be available in the default designated workspace. You can create a new workspace by clicking on the ‘+’ sign in the side bar towards the left. You can then organize and arrange all your videos by moving them to separate workspaces. Click on the 3-dots icon at the top right of any video and choose the ‘Move’ option to move it to another workspace.
Closing Comments:
Weet is a great web application that can be used to make professional-quality videos for training, tutorials, walkthroughs, demos, e-learning materials and more. Background removal and filtering works very well and the AI based trimming and noise filtering features are very handy in giving a highly professional approach to the video. The designated workspaces of Weet help you to stary organized and make your videos easily searchable for clients and team members.
Click here to navigate to Weet and start creating your first video.