CustomGForm is a tool that sits on top of Google Forms and enables you to develop customized UI for Google Forms that you can seamlessly embed in your website easily and quickly. The embed supports 3 platforms – WordPress, HTML Website and React app and the entire process takes only 3 easy steps to implement.
All that you are required to do is create your Google Form, paste its Link into CustomGForm and finally embed the code that you get from the tool into your website, that’s all. This tool is sure to help owners of website to save considerable time that they may usually take in building web forms for their websites.
Features:
Theme customizer: You can easily design the form by selecting any preset themes or creating your own with branded colors.
Integration: You need not be a coding expert to integrate (embed) the form in your website. You can just add a few lines to your website and your work is done, fast and easy.
Webhooks: You can add your own actions based on events like beforeSubmit, afterSubmit and more using webhooks.
Analytics: CustomGForm helps you to track how the users are interacting with your forms by sending the events to your Google Analytics.
How it Works:
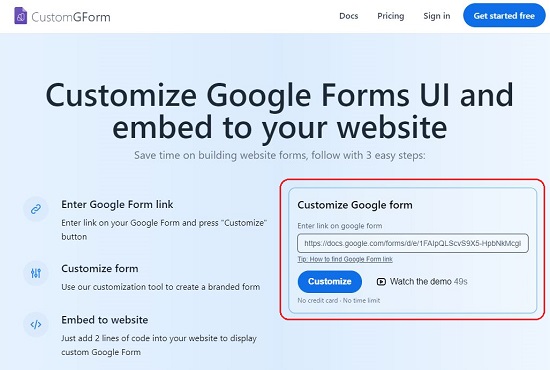
1. Click on this link to navigate to CustomGForm.
2. Paste your Google Form link in the space provided, click on ‘Customize’ and then sign in with your Google account.
3. This will navigate you to the Customize form main page. Next, under ‘Design’, choose the Theme that you desire such as Minimal, Forest green or Deep slate. Observe that you will be able to see a real time preview of your form towards the right when you apply any theme.

4. You can remove the CustomGForm branding at the bottom of the form using the ‘Form’ section but this option is only available for Pro users.
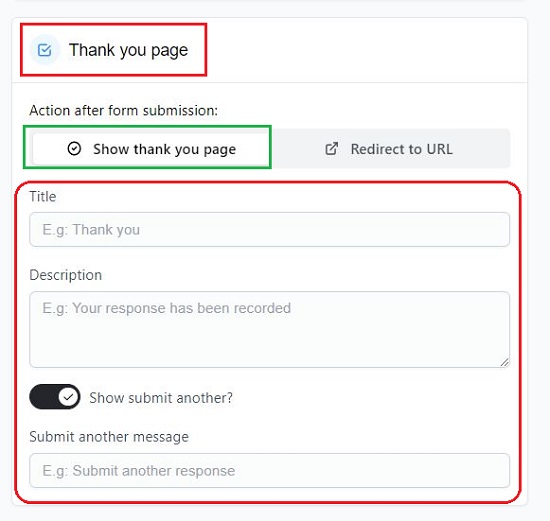
5. Next, click on ‘Thank you page’ to define the action to be taken after form submission. You can either choose ‘Show thank you page’ or ‘Redirect to URL’. In case you select the latter, you must paste the URL where the user should be redirected after the form is submitted.
6. In case you choose to display the Thank you page, you must specify the Title and Description. You can also enable the toggle button in case you wish to allow the user to submit another form.
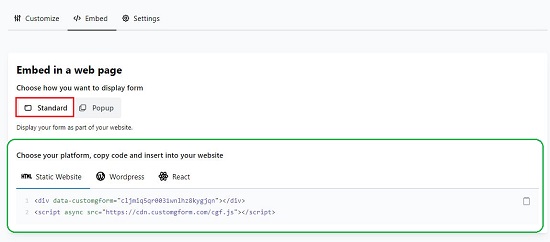
7. When you are through with all the above steps, click on ‘Save changes’ at the top of the page and then click on ‘Embed to website’ button to proceed to the next step.
8. At the outset, choose if you wish to display the Google Form as a part of the website (Standard) or as a Popup. In case, you choose, Standard, choose the platform such as Static website, WordPress or React, copy the code that has been provided and insert it in your website at the appropriate location.
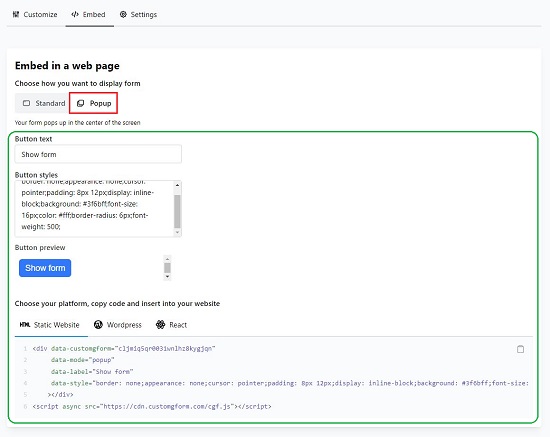
9. In case you choose Popup, you have the option to Button Text and Styles. You can see the appearance of the button in button preview section and then go ahead and copy and paste the code as earlier.
The Free version of CustomGForm allows you to create one form with unlimited submissions. You can subscribe to their Starter or Pro plans to overcome this limitation and for added features. Click here to read more about the plans.
Closing Comments:
CustomGForm is a good tool that you can use to create customized UI for Google Forms that can be integrated in your website easily. It is a lightweight tool, works fast and is quite reactive. The supported platforms for integrating the form are WordPress, React app and HTML Website.
Go ahead and try out the tool and let us know what you think about it. Click here to navigate to CustomGForm.