TreeSheets is a free data processing and organizing software which can be used as a text editor, spreadsheet, data organizer, etc. The reason why we are talking about this software is because the data we enter in it can be organized in a hierarchy.
You can enter a cell within a cell and have various shortcuts to enter new cells. This saves a lot of time because normally you would have to use your mouse for drag and drop operations. You can nest cells effectively and even create tables within them. This is the main feature of TreeSheets. These tables can have their rows and columns transposed to suit your needs. The hierarchically nested cells can be further formatted, swapped, flattened, etc. You can also change the layout and rendering style of the table/grids you have created to have a cleaner look.
So without wasting much time, let’s explore TreeSheets for a better perspective.
How to Use TreeSheets
First of all, make a new file on TreeSheets with a size of 1X1 cell(s). You can use the default size of 10X10 too but for the demonstration am taking it small. To insert text into the cell, select the cell and start writing. Alternatively, you can also double click the cell to start writing.
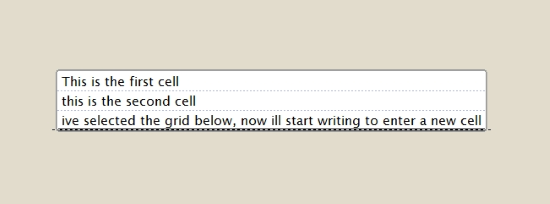
Use the arrow keys to select the grids on the top, bottom and sides. When you select these grids and start typing, a new cell will be formed. You can continue doing this to each new cell created to make a table, a column or a row.
To delete a cell, select the whole cell and press Backspace on your keyboard. You can also do the same by selecting the grid below the cell to be deleted and pressing Backspace. Akin to normal text processors, if you hit Delete on your keyboard on a grid then the cell below that grid will be deleted.
How to Nest Cells in TreeSheets
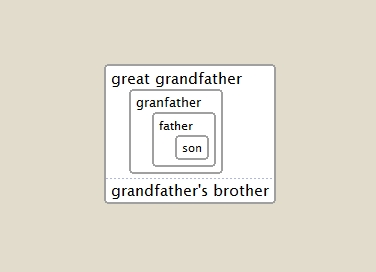
Once you have created a cell, you can insert more cells within the cells. This is called nesting of the cells and it happens to be the main feature that defines TreeSheets as a hierarchical data processor and organizer. To insert a 1X1 child cell within a parent cell, click the parent cell and tap Insert on your keyboard. You can do the same things with the child cell that you can do with parent cells. Select the grids and type to insert more columns and rows to the child cell. You can repeat the inserting process to go deeper and deeper.
You can arrange the column and rows by holding Ctrl and using the arrow buttons to shift rows and columns up, down, left and right in the table. Ctrl+c can be used to copy a selected cell and Ctrl+v can paste the cell when a cell or grid is selected.
How to Format Cells on TreeSheets
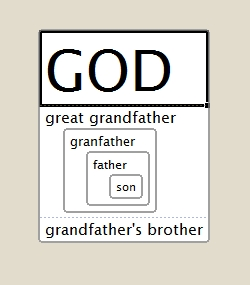
Cell formatting and organization are a really important part of TreeSheets. The whole software revolves around TreeSheets’s ability to organize data hierarchically. There are two ways you can change the size of a cell. Hold Shift and use Page Up/Down (you can use the mouse wheel too) to change the size of the text. You can use this to put more emphasis on a text by making it larger. Using this can also make a block of text really small that you would need to zoom in to read.
The zoom in function can help you read really small content in normal cells and nested cells. To zoom into a cell, hold Ctrl then use Page Up/Down to zoom in and out.

You can change the width of a cell by holding Alt then pressing Page Up or Down to increase or decrease the cell width. If you want to hide a child cell of a parent cell then select the parent cell and press F10. Unhide the child cell with F10 again.
How to Change the Layout and Style Cells on TreeSheets
There are lots of layouts that you can apply on a content laden cell with nested child cells. You can arrange the text and nested cell to be oriented horizontally or vertically. To do this, select the parent cell and press F7.
There are 3 rendering styles to arrange and present grids in TreeSheets. They are Grids (default), Bubbles, and Lines. Rendering a table as a bubble will turn the cells into smooth bubble boxes. These bubbles can be colored. Rendering a table with Lines will make the table turn it into a more tree based structure with lines connecting the parent and child cells.
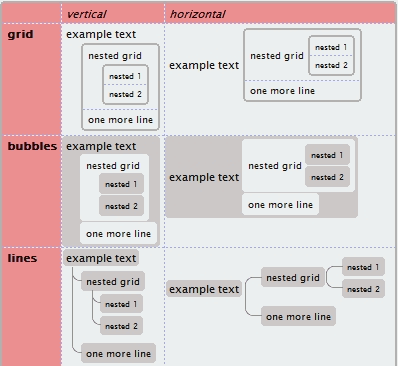
These layouts can also be oriented vertically and horizontally. So this makes a total of 6 styles you can choose from. These can be enabled by right-clicking a selected cell and hovering over Layout and Render Style, then selecting any of the 6 combinations.
How to Add Images and Format Text in Tree Sheets
Images can be added before a text block by selecting the cell and choosing an image from the Image drop-down option on the Menu ribbon. You can also add custom images by right-clicking the cell where you want to add the image. Select Add Image from the Images section of the right-click menu to add the image. Click Scale Image to change the size of the image by entering the scaling percentage.

Like normal text processors you can bold, italicize and strikethrough the text block using Ctrl+b, Ctrl+I and Ctrl+t commands respectively. You can change the color of grids, text and the cell with the drop-down option on the Menu ribbon at the top.
Adding Tags and Changing Hierarchy of Cells in TreeSheets
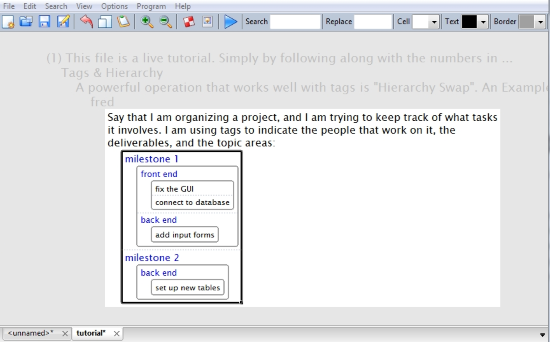
Many times you want to use some words repetitively in some context and typing them all the time becomes tiresome. A solution for this is Tags. To make a tag out of a cell’s content, you can select a cell and right-click to select Tag> Add Cell Text as Tag. The text will turn blue and you’ll be able to add tags by Ctrl+ right-click on a cell. The option to remove the text as a tag is provided in the same drop down menu.
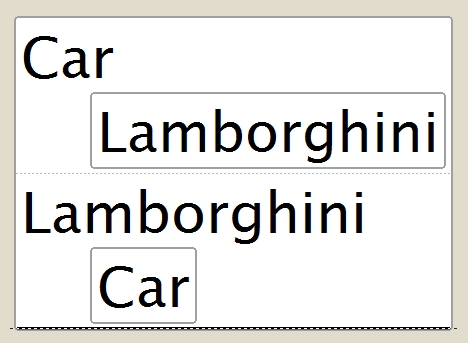
In some cases you’ll want to change the hierarchy of a nested cell. For example, you might insert cell ‘Lamborghini’ in the parent cell ‘Cars’ but then you decide to assign car companies as an attribute to a known Brand. Here you can select parent cell ‘Cars’ and press F8 to make ‘Cars’ a child attribute of ‘Lamborghini’.
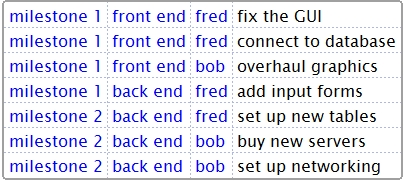
You might have a column of cells representing various attributes. Sometimes you need to swap them vertically or horizontally to form a row. Select the column and right-click to choose Grid Reorganization>Transpose. If you select Flatten from the same menu then the hierarchically organized cell will be reduced to a row. The innermost child cell will be at the rightmost end of the row, preceded by its parent cell and row goes on. You can reverse this flattening process by selecting Grid Reorganization> Hierarchify. This can be applied at normal rowed of cells too.
Final Words
I feel TreeSheet can be a really big opponent to Microsoft Excel because of its hierarchy based data processing that Excel does not provide. The only drawback is that it does not feature formulas that you can use to aggregate data in other cells. I enjoyed using TreeSheets. I award this software 5 stars for its uniqueness.
Get TreeSheets here.
Make sure you leave a feedback about TreeSheets if you’ve used it!