Lil’ GMail filter is a simple free online application which you can use to generate an XML file that can be imported into Gmail to create filter rules by Email addresses and Search terms. The application has been developed in Ruby which is a high-level, general-purpose programming language.
Many Email applications including Gmail, allow you to create Folders to store and categorize one’s emails. Additionally, in Gmail you can use Labels to categorize all your emails that work like Folders but there is a difference. Gmail allows you to apply multiple labels to an email and later find it by searching for the label or by clicking on any of its labels.
These labels behave like organized libraries that contain emails from specific people or have common keywords (search terms). Gmail filters can also be used to automatically apply customized labels to incoming emails so that they can be sorted and accessed easily. But this involves a lot of tedious work and massive amounts of mouse clicks making it cumbersome for you.
This is where Lil’ GMail filter comes in handy. You can input the required Gmail labels and all the email addresses or search terms that you want to be organized and get an output as an XML file. This file can be input into the Gmail filter in Settings and you are immediately good to go.
How it Works:
1. Navigate to Lil’ GMail filter by using the link that we have supplied at the end of this article.
2. Type the name of the Label, then a colon (:) followed by a list of emails (separated by commas) that you want to associate with the label then (optionally) a pipe symbol (|) followed by any search terms to be associated with the label. Each search string should be enclosed in double quotes separated by commas.
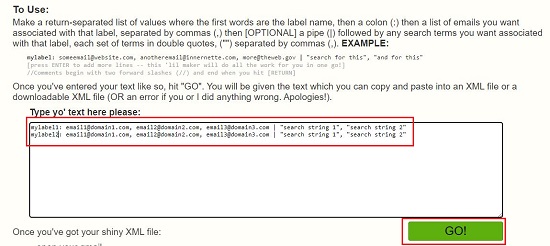
For example:
mylabel: [email protected], [email protected], [email protected] | "search string 1", "search string 2"
3. You can input a list of values in the box separated by Return (Enter).
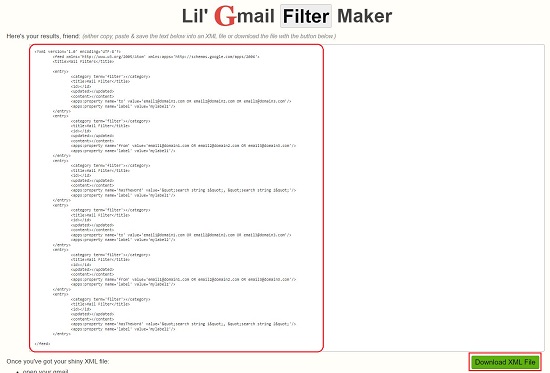
4. Once all the values have been input, click ‘Go’ and the XML text will be displayed on the screen which you can copy and paste into an XML file. Alternatively you can download the XML file directly from the website.
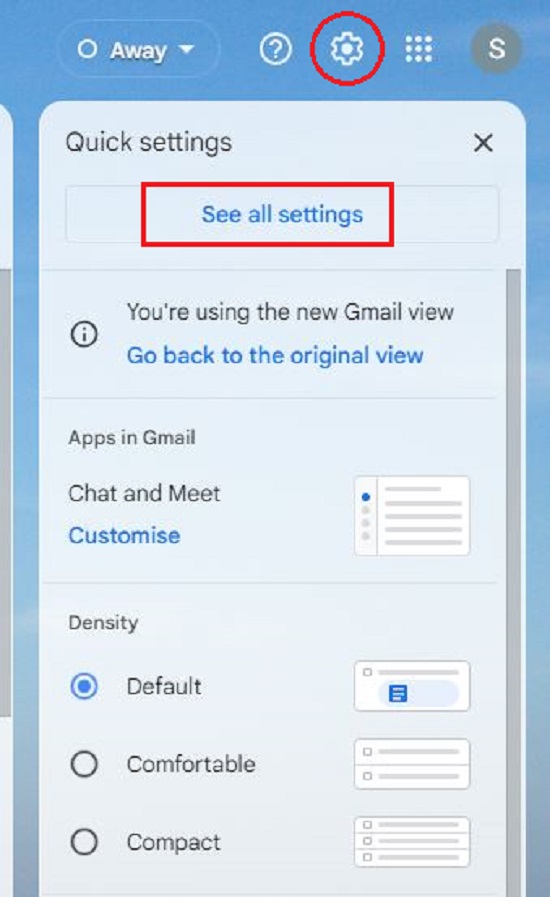
5. The next step is to input this XML file in GMail filter settings. Sign in to your GMail account, click on the ‘Settings’ icon at the top right and then click on ‘See all settings’.
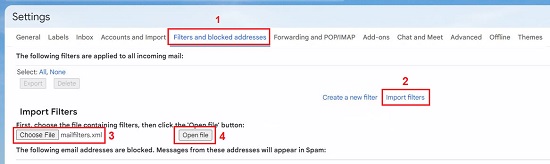
6. In the Settings window that comes up, click on the ‘Filters and Blocked Addresses’ tab and then choose ‘Import Filters’. Click on ‘Choose File’, upload the XML file that you generated above and then click on ‘Open File’. Finally select the checkbox ‘Apply new filters to existing email‘ (if required) and then click on ‘Create Filters’.

7. You are now good to go. All your emails that match the specified criteria will be filtered into separate labels so that you can easily and quickly access them.
Closing Comments:
Lil’ Gmail filter can be used to generate XML files that you can import into GMail filters to segregate incoming as well as outgoing mails into pre-defined labels. I tried to use it with my GMail account and found that it works successfully without any hiccups. It saved me a lot of time and effort that I would have to spend had I done the filter creation manually.
Click here to navigate to Lil’ GMail filter.