This article covers 2 tools to map multiple cloud storages in Windows. One of these software maps all your cloud storages as a network drive in file explorer. And, the second software brings all the cloud storage under its desktop clients where you can access them easily. Both these software supports all the popular cloud storage services (both personal and business) along with network protocols such as FTP and SFTP. The setup process is also simple which is also explained in this article.
The advantage of using such software is that you can access all your cloud storage at once place, whether is a personal cloud storage, business drive, FTP server, or local network storage. You no longer have to visit the services individually or install dedicated desktop clients for each service. It’s a neat and simple way to access cloud storages with ease.
Also read: Share Files with Any Device on Same Network with Just Drag and Drop
Map Multiple Cloud Storages as Network Drives in Windows
odrive
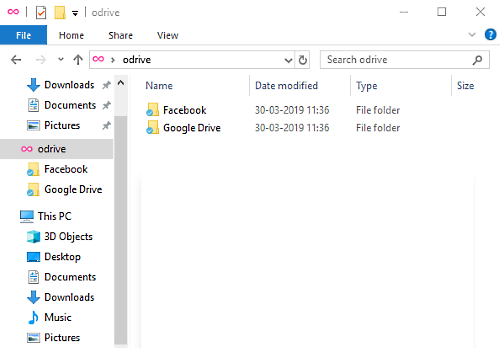
odrive is a versatile storage solution that brings all your cloud storages to your PC. It supports almost all popular cloud storage platform whether it’s for personal use or for office use. odrive maps all your cloud storages to File Explorer under an odrive folder. This is the same as OneDrive in Windows 10 but instead of having just one cloud storage, you can have multiple.
Set Up
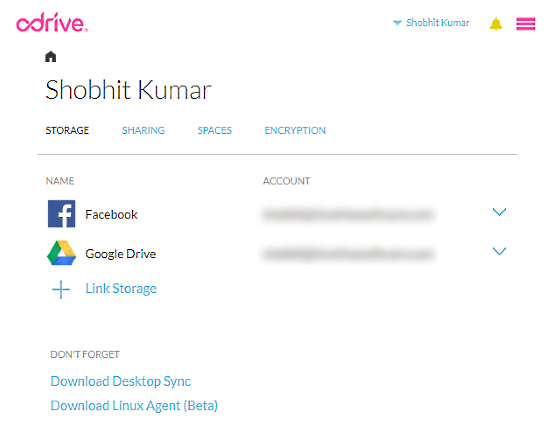
To set up odrive on your Windows PC, visit the odrive website and click sign in. It gives you 7 different services to sign-in with; just sign in with a service you where you already have an account. Upon sign in, odrive ask you to create a user for the odrive. Click that option and create a user by filling your info.

When you create a user, it takes you to the odrive page where you can connect cloud storages with your odrive account. Here is the Storage Catalog that odrive supports:
- Personal (Cloud) Storage (4shared, ADrive, Amazon Cloud Storage, Box, Dropbox, Google Drive, HiDrive, OneDrive, Yandex Disk)
- Company (Cloud) Storage (Dropbox Teams, odrive File Server, One Drive for Business, Oracle Documents, Oxygen Cloud)
- Utility Storage (Amazon S3, B2 Cloud Storage, Google Cloud Storage)
- Apps (Facebook, Gmail, HipChat, Instagram, Slack)
- Standard Protocols (FTP, SFTP, WebDAV)
After connecting all the cloud storage accounts you need, download the Desktop client using the link provided on that same page. Then, simply install the client on your PC and log in with the same account you used to log in on the web. Once done, it will add an odrive location in Windows File Explorer where you can access all your cloud storage accounts.
By default, odrive sync all your accounts but if you want to control the sync, you can join the paid tier which gives you options to not only enable/disable sync but set a data limit on the sync as well. You can check out the other premium features here.
Cyberduck
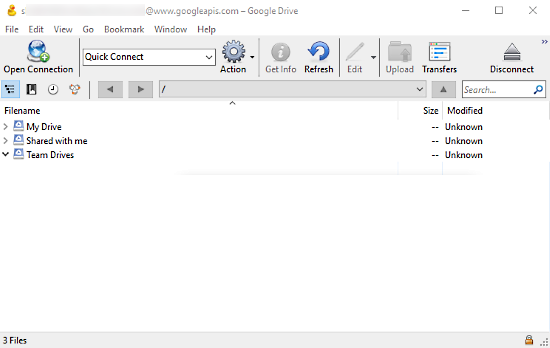
Cyberduck is a free cloud storage browser that brings all your cloud storage account at one place. Unlike odrive, it does not add any folder in the File Explorer. It brings all the cloud storages in its Desktop client where you can access them easily without the need of a web browser and visiting the website.
Here is the storage catalog that CyberDuck supports:
- FTP
- SFTP
- WebDAV
- OpenStack Swift
- Amazon S3
- Google Cloud Storage
- Azure
- Backblaze B2
- Google Drive
- Dropbox
- OneDrive
- Dracoon
You can download the Cyberduck desktop client and bring all your online storage together. The attachment below shows you a preview of the Cyberduck desktop client. With the Open Connection button, you can add new services to the client and manage them there. You can also disconnect it anytime to stop the sync.
Add Cloud Storage
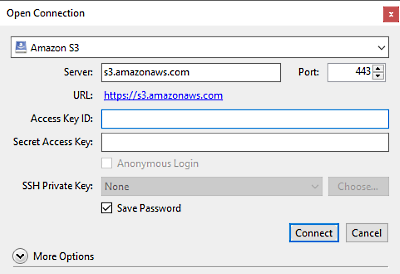
Adding a new cloud service is simple. First, click the Open Connection button. Doing that opens a dialog on the screen where you can select the online storage you want to add in the Server field. After selecting the server, enter your email address or username of that account and press Enter. This will takes you to that cloud service in the web browser. It asks you to sign in to your account and then provides you with a secret access key. Copy that key and paste it in the Open Connection dialog and click Connect. This will add that cloud storage to Cyberduck.
Cyberduck has a sibling known as MountainDuck which is a paid software. MountainDuck is similar to Cyberduck along with many advanced features like sync control, mount cloud storage to File Explorer, and more.
Closing Words:
These are the 2 free software to map multiple cloud storages in Windows. With these software you can access all your online cloud storage at one place. This way, you no longer have to visit a service to access your file; all your data would be a few clicks away from you. Both these software are available for macOS as well.