This tutorial explains how to turn Windows 10 PC to a wireless hotspot using command line.
Today, I will explain how to easily turn your PC running on Windows 10 into a wireless hotspot for sharing your Internet connection. You might have come across dozens of virtual router software which also lets you create wireless hotspots on PC, but I have found another simple and effective way to do the same without using any third-party software. Actually, Windows 10 comes with a built-in feature called “Hosted Network” which can be enabled using the command line “Network Shell” utility.
In this tutorial, I will use the command line utility and the “Hosted Network” feature to turn Windows 10 PC into a wireless hotspot.
How to Turn Windows 10 PC to a Wireless Hotspot using Command Line:
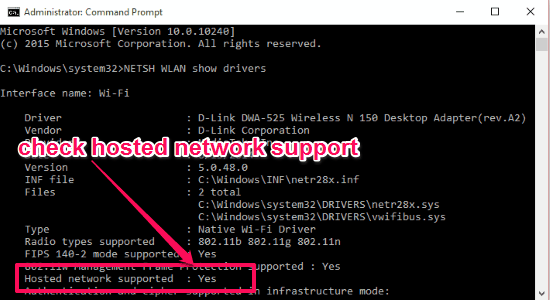
Step 1: Before you get started, you need to ensure whether your network adapter supports “Hosted Network” or not. To do this, simply launch Command Prompt with admin rights and then type the following command:
NETSH WLAN show drivers
After that, you can hit the Enter key to execute the command. Once the command is executed, scroll down and look for the option “Hosted network supported“. If the output associated with this option says “Yes”, then you can proceed to turn your PC into a wireless hotspot.
Step 2: Now, to start creating the wireless hotspot, you need to first enter the following command:
NETSH WLAN set hostednetwork mode=allow ssid=Your_WifiName key=Your_Passphrase
Here, the SSID will be the name of your Wifi hotspot and the KEY will be your connection password. For example, if you want to name your wireless hotspot as “ABC” and the password as “XYZ”, then you need type “ssid=ABC” and “key=XYZ” in the above command. Remember, the password must have 8 characters or more than that in length.

After entering the command, simply press Enter and you’ll see a message saying that “The hosted network mode has been set to allow”. This indicates that the “Hosted network” feature of Windows 10 has been enabled and can be used to start the wireless hotspot.
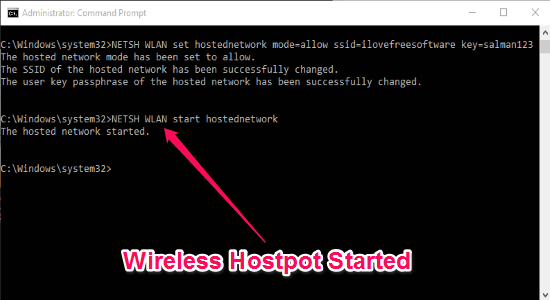
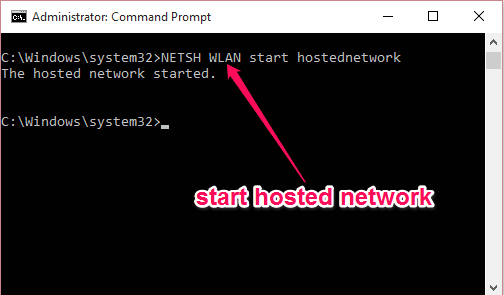
Step 3: Now, to start the wireless hotspot you need to enter another command i.e.
NETSH WLAN start hostednetwork
After entering this command, you can go ahead and press the Enter key and execute it. As soon as you do that, the hosted network will start and it will display a message saying “The hosted network started”, as shown below.
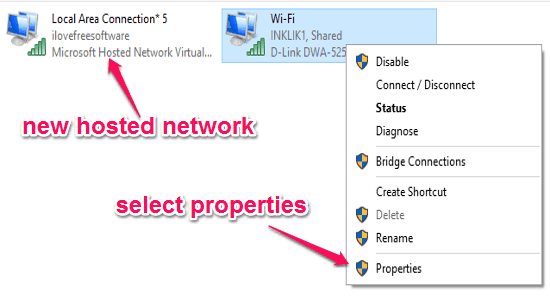
Step 4: Although the wireless hotspot is started, but you’ll not be able to use it yet. To start using the new hosted network, you need to first enable network sharing for this connection. In order to do this, simply press “Win + X” key and then select the option “Network Connections”. After that, right click on the connection which you’re using currently for accessing the Internet and select “Properties”. By the way, you’ll also be able to see the new hosted network in the “Network Connections” window. For example, on my PC it is showing as “Local Area Connection* 5”.
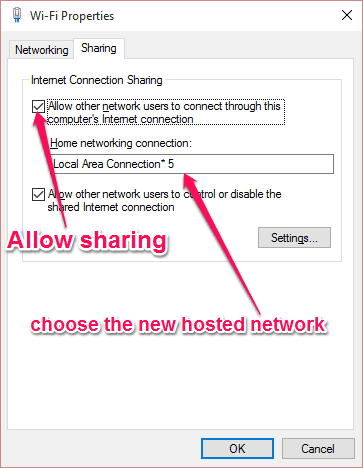
Step 5: After selecting “Properties” a popup window will appear with 2 different tabs named, Networking and Sharing. Go to the Sharing tab and then select the new hosted network from the drop down menu of “Home networking connection”. Now, enable the sharing option under “Internet Connection Sharing” section and click “OK”. That’s all, you can now see and connect to the newly created wireless hotspot on any device you want.
Step 6: Now, if you wish to stop the wireless hotspot, then open up the Command Prompt with admin access and type the following command:
NETSH WLAN stop hostednetwork
Then simply hit Enter and your wireless hotspot will stop instantly.

My Final Verdict:
If you’re looking for a way to turn your Windows 10 PC into a wireless hotspot without using third party software, then go through the steps I have explained in this tutorial to do the same with ease. With a few simple commands, you can easily create a hosted network and share your Internet connection. Using command line instead of complex virtual router software is much easier to create Wifi hotspot.