LiteManager Free is a remote control software that you can use in order to connect to Windows based computers from around the world, with the help of Internet of course, and that way offer technical support or another situation, you can conduct live remote lectures by controlling the PC in your students classroom. The software comes in two parts, server app, which has to be installed on every computer that you want to control and viewer app, that you can use in order to control PCs remotely.

Similar software: Ammyy Admin, Remote Access software
This is the default screen which waits for you upon running the LiteManager Free Viewer app. Technically speaking this is not the first thing that you see when dealing with LiteManager, before you’re allowed to enter the Server application you’ll have to create a password that people will use to access the computer where server app is installed. Server app is installed first, and after that you need install the Viewer app on computers that you want to use to connect to computer where the Server app is installed. Free version limitations:
- Works only on 30 computers
- No device manager option
- No screen recorder
- Limited registry editor
Setting up the Server app for remote access
Using this remote administration tool is very simple. Very little configuring is necessary on the Server side, apart from installation. Write down the password which you created during Server installation, so that you don’t forget it. After installation Server service will run right away in the system tray, and all that you have to do is right click on the LiteManager Free icon in the tray and select Connect by ID.
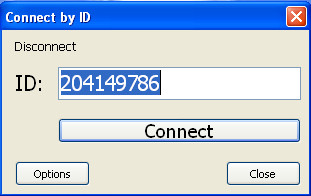
If no numbers appear in this window, which they probably won’t click on the Connect button so that the Server application assigns your computer with an ID which will be used by the Viewer app. And that’s basically it, write down that number and let’s see how the Viewer app looks like.
Setting up LiteManager Free Viewer app
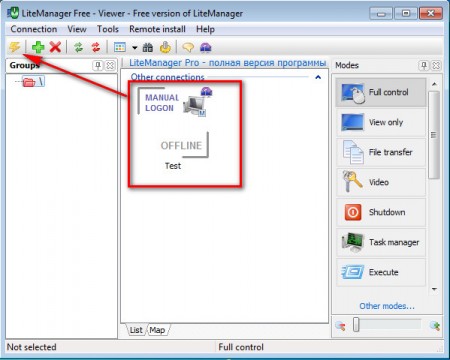
Installation of the LiteManager Free Viewer application went pretty much uneventful, and soon enough we found ourselves inside the Viewer, ready to start adding connections to our server.

Do that by clicking on the green plus sign, and then in the window that pops up, select the Use ID checkbox and copy the number from the Server application. Also don’t forget to enter in the password that you used in the LiteManager Free Server, otherwise you’ll get errors when connecting. Once that everything is finished and filled up, click OK and the connections should appear in the list:
After you click on the small lightning bolt icon that pointed out on the image above, the program should connect to the remote PC. On the right side you can choose what kind of connection mode you want, Full control, View only and so on, choose that before connection, according to the types of things that you need to do of course. Very useful and simple to use free remote administration tool, give LiteManager Free a spin if you need something like this for your work.