Tails is a Debian based live operating system. The main purpose of this OS is that it is very secure. This live OS has many security features to protect your privacy and anonymity. It facilitates secret live sessions with untraceable Internet connectivity through Tor and I2P networks. You can use live sessions for performing tasks that require more secured environment like business works, online payment, shopping, etc.
For creating live sessions, you just need to make a LiveCD or Flash drive of Tails and then plug it and boot on any PC. Best part of this feature is that it does not leave any traces on host PC. Tails does this by wiping out all information after you end your live session. But it lets you store your important app and personal data by providing Persistent storage feature on live USB. In persistent storage feature, you can save your important documents across multiple live sessions. I will demonstrate how to configure persistent storage later down this article.
All internet connections in Tails are bound to go through Tor network and any unknown connection is straight away blocked. Browsing through Tor network prevents you from any type of network monitoring done by websites. You can also choose to communicate through I2P (Invisible Internet Project) networks. Just like Tor network, this network also facilitates anonymous web surfing, chatting, and other communications over internet.
Till now I have been using Sandboxed Tor Browser to get a super safe browsing environment, but Tails now gives a whole new way for secure anonymous browsing.
Security features of Tails:
- Tails maintains anonymity and privacy of its users by allowing all internet connections through Tor network only. Basically Tor network relays connection from host to servers through multiple volunteers using Tor network. This feature makes difficult for any person or network service to track you down. This feature gets rid of almost all of annoying online advertisements and blocks any web site to learn your internet browsing habits.
- Tails also allows you to connect to I2P network through I2P browser. You need to enable I2P first as it is disabled by default. Steps to enable I2P:
- Boot your Tails OS.
- When boot menu appears, press tab button.
- Now boot options will appear on the screen. Specify i2p option separated with blank space and hit enter.
- Now you can connect to I2P network through I2P by accessing it through Applications>> Internet>> I2P Browser.
- Tails uses HTTPS protocol for encrypting your communications to most of websites.
- Tails also lets you encrypt your USB sticks and external hard drives. It uses Linux Unified Key Setup (LUKS) algorithm for encryption.
- Tails live session allows you to perform any business work, or online shopping without any fear that someone might be monitoring you on network.
- Tails also allows you to visit websites that do not permit connections through Tor network by Unsafe browser application.
- Tails is highly flexible as it can create secure live sessions on any PC.
- While browsing internet, Tor browser automatically notifies you about any website that tries to collect your personal data that can be used to identify your PC. You can straightaway block that script or even website.
Pre Installed Secure applications of Tails:
Just like other major Linux distributions, Tails is also customized for a particular functionality i.e. multiple secure live sessions and encrypted persistent storage to save application and personal data across multiple live sessions. Tails distribution comes with pre-installed applications for most of general tasks that you perform on your PC. But what is more exciting is that pre -nstalled applications are configured according to security aspects of its users.
Now lets take a look on pre-installed applications that comes with Tails:
- Accessories
- Calculator: Allows you to calculate in 4 modes:
- Basic mode.
- Advanced mode.
- Financial mode.
- Programming mode.
- Gedit: Simple text editor with syntax highlighting feature of various programming languages like C, C++, C#, F#, etc.
- Gtkhash: Allows you to check integrity of a file by calculating checksums.
- KeePassX: Simple tool to store and manage all your passwords.
- Search for Files.
- Calculator: Allows you to calculate in 4 modes:
- Graphics: This category include tools for image editing and manipulation.
- GNU Image Manipulation Program
- Inkspace
- LibreOffice Draw
- Scribus: Open source desktop publishing software.
- Simple Scan: Software to obtain images from connected Scanner.
- Internet
- Electrum Bitcoin Wallet: This software allows you to manage your digital wallet securely. It is recommended to run this software with persistence feature enabled as it will need to store encrypted key of digital wallet.
- Gobby: This tool can be used to edit your documents collaboratively, like Google Docs.
- Icedove: Provide a secure mailbox where you can digitally sign all the outgoing e-mails. You can connect to your email provider either through IMAP or POP.
- Liferea: Linux Feed Reader fetches news from your subscriptions. It also makes them available for offline reading.
- Onion Circuits: It shows whether you are connected to Tor network or not.
- Pidgin Internet Messenger: It is a cross platform instant messaging software which allows you to operate your multiple chatting accounts all at the same time like MSN, Google Talk, Yahoo, etc. It also allows you to connect to IRC or XMPP servers.
- Tor browser: This web browser bounds your every internet connection to go through Tor network. It also instantly notifies you about websites that are trying to uniquely identify you.
- Unsafe browser: It allows access to websites that do not permit connections through Tor network.
- Office
- bookletimposer: It allows you to perform 3 operations:
- Convert a booklet to linear document.
- Convert multiple linear documents to booklet.
- Put multiple input pages into one output page.
- LibreOfice: It is a open source office suite like MS Office in Windows. It allows you to create following documents:
- Text documents.
- Spreadsheets.
- Presentations.
- Drawing.
- HTML documents.
- XML Form document.
- Master Document
- Formula
- Labels
- Buisness Cards
- bookletimposer: It allows you to perform 3 operations:
- Programming
- Poedit: Allows you to write translations of various software, applications, and websites that uses gettext for localization.
- Science
- LibreOfice Math: It allows you to create mathematical formulae.
- Sound & Video
- Audacity: It is a open source software that allows you to edit music tracks.
- Brasero: It allows you to create following CD/DVD projects:
- Audio CD/DVD.
- Video CD/DVD.
- Data CD/DVD.
- Copy CD/DVD.
- Burn ISO image file to CD/DVD.
- Pitivi: It allows you to edit videos to create movies.
- Sound Juicer: It is a CD ripper software that allows you to extract music files from CD and convert them to file formats supported by computer.
- Traverso: It is free software that allows you to record audio and edit them.
- Videos: Free software to play local videos as well as streamed videos.
- Tails
- About Tails: Displays build information of Tails.
- Configure & Delete persistent storage: I will explain these tools in Installation section of this article.
- Tails Documentation: Opens up complete documentation of Tails in Tor browser.
- Tails Installer: Allows you to install Tails on another flash drive/CD or upgrade your existing Tails from USB.
- Universal Access
- Dasher: Free software that allows you to type words by pointing your mouse towards letters.
- Florence Virtual Keyboard: If you think that a Keylogger is installed on the host PC, then you can type words using this virtual keyboard software.
- Utilities
- Archive Manager: It allows you to create, modify, and view contents of a archive/compressed file. It supports following file formats DEB, bzip2, RPM, gzip, ARJ, ar, compress, exe, dll, , LZO, JAR, LHA, RAR, Stufflt, tar, zip, zoo, ISO images, lzip, bzip, and xz.
- Disks: It allows you to create new partitions and delete existing partitions on hard drive.
- Document Viewer: It allows you to view following file formats PDF, DjVuLibre, Postscripts, DVI, and DjVu.
- Help: Opens up help documention on GNOME desktops.
- Image Viewer: Supports following file formats: X Pixmap, PNM, TGA, PNG, GIF, WBMP, SVG, ICO, JPEG, ANI, RAS, PCX, X Bitmap, and BMP.
- Passwords and Keys: It can be used to create following keys:
- Password Keyring: To store application and network passwords.
- PGP Key: Used to encrypt emails.
- Private Key: To request a certificate.
- Secure Shell Key: Used to access other computers through Terminal.
- Stored Password: Safely store a password.
- Screenshot: Allows you to capture screenshot in 3 ways:
- Full screen.
- Current window.
- Part of screen.
- System Log.
- System Monitor: It is task manager of Tails. You can view processes, kill them, and even change their priorities. Also lets you monitor computer resources like Processor, RAM, and networking.
- Terminal: It is Command Line interface of Tails.
How to install Tails through Windows:
For installing Tails through Windows, you will need 2 flash drives (minimum 4 GB each). First flash drive for installing intermediary Tails on it. Then using intermediary tails to install final Tails on second flash drive. You can follow these steps:
Step 1: In first step install intermediary Tails on first flash drive by burning ISO image file of Tails on it. You can use any software these software to make bootable flash drive. After completion of this step, intermediary Tails will be installed in your flash drive. This intermediary tails lacks persistent storage feature. However, this version can be used for creating live sessions without any problems. I will recommend you to install final Tails as it is more secure than intermediary Tails and also provide you persistent storage feature.
Now boot with intermediary Tails. After successful boot, a dialog box will appear on your screen, as shown in below screenshot.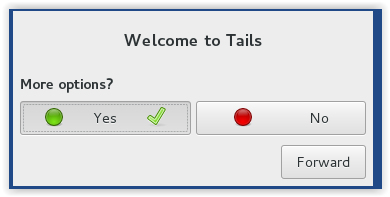
If you want to configure options like entering administrative password, hide your MAC address on network, and network settings, click on Yes button and then on Forward button. Clicking on Forward button will open up another dialog box in which you can further configure your settings.
Step 2: Now you are ready to install final tails. You can follow these steps:
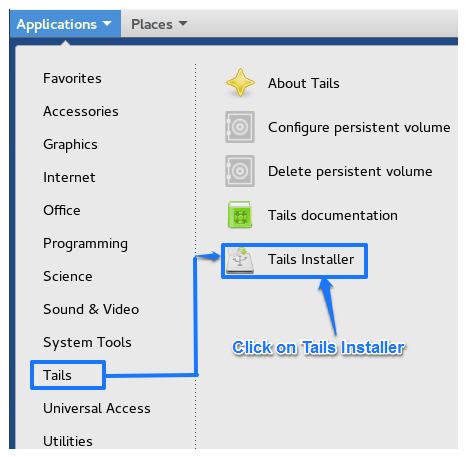
- Click on Applications button at top left portion of your screen. A dropdown list of Applications will appear. Switch to Tails and select Tails Installer.
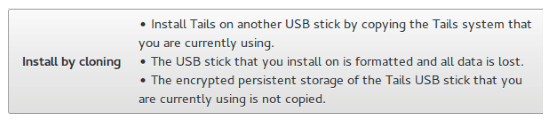
- Now, Tails Installer window will appear. Click on Install by Cloning button.
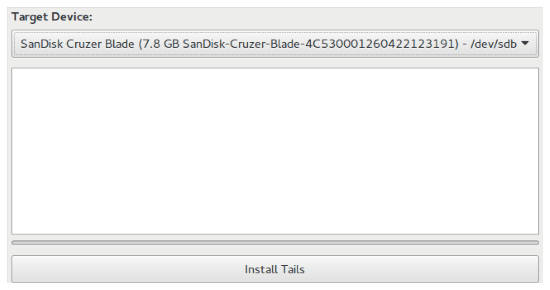
- Select target device i.e. second flash drive from the dropdown and click on Install Tails button.
Now your final Tails will be installed on your second flash drive. Final Tails is more secured than intermediary tails. Final tails also allows you to use persistent storage feature to save data across multiple live sessions.
NOTE : For skipping restarts and time required to install final Tails, you can load your Tails ISO file on Virtualbox. Virtualbox is a free software that can be used to create multiple virtual machines with different operating systems. Read more about Virtualbox here. But you won’t be able to use persistent storage feature through this method.
How to configure Persistent storage:
This feature is used to save your applications data and personal data across multiple live sessions. This feature uses free space of your flash drive to store data. Data stored on persistent storage can only be accessed through your final Tails live flash drive. Tails saves your persistent storage from any unauthorized access by encrypting it with password specified by you.
Now lets see how to configure persistent storage.
Step 1: Boot your PC with final Tails.
Step 2: Click on Application button and hover over Tails and click on Configure persistent volume button.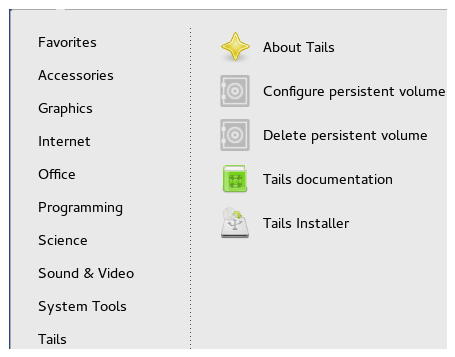
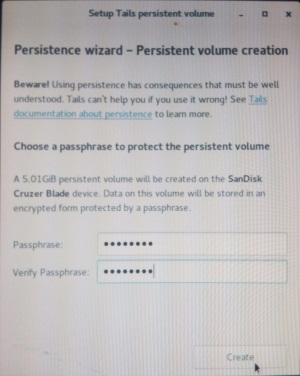
Step 3: Now Persistent storage configuration wizard will appear. Enter password to encrypt your persistent storage and click on create.
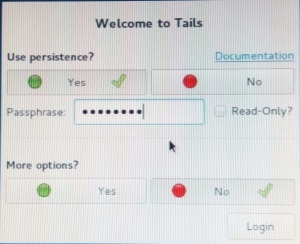
Now you need to reboot tails and you will see an option to use persistent storage. If you select read only, then data can’t be written on your persistent storage. In that case applications running on tails won’t be able to save their important data across multiple live sessions.
Now free space of your flash drive can be used to store important data. Make sure that your final Tails flash drive does not go in wrong hands, as it can be easily misused and also do not reveal your persistence storage password to anyone. You can also select Tails built in applications that can use your persistence storage or not.
How to delete your persistence storage:
- Run your final Tails without enabling persistent feature.
- Click on Applications and hover over Tails.
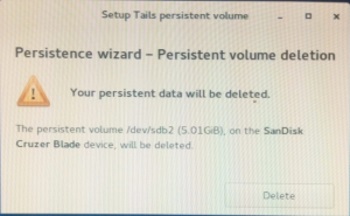
- Click on Delete persistence storage. Persistence wizard will show message and then click on OK button.
Verdict:
Tails OS is designed as a live operating system to create multiple live sessions on any PC. OS underlying host PC can’t track activities that you do on Tails. It automatically wipes out data after you end your live session. You should definitely try Tails as it lets you communicate securely over internet maintaining your anonymity and confidentiality, create live sessions with persistent storage feature to save your personal data across multiple live sessions. Relaying your internet connection through Tor network makes you untraceable. Just keep your flash drive safe from wrong hands and enjoy privacy with this exciting OS.