This tutorial explains how to create a network folder on Windows 8.
Creating a Network Folder on Windows 8 is a pretty straightforward task, and with the right mindset and the correct frame of mind, learning to do so is actually pretty easy, trust me. So with this tutorial, Sensei Pranjal is back with another dojo session, and today, I will teach you exactly how to Create a Network Folder in Windows 8, in as little time as is possible. The tutorial is very easy to follow, and let’s just say that if you know the basics of creating or joining a homegroup on your Windows 8 device, creating a Network Folder is going to be very easy.
What is a Network Folder?
A Network Folder is a folder which has been shared with all the users on a common network. Depending on the Sharing permissions, you can allow the users on the network Read only permission (i.e., they can read the file and copy it, but can’t edit it on your machine), or you can allow them Read-Write permission (i.e., they are allowed to modify the content of the shared folder, which means that they may even delete the files inside the folder). More on the permissions later.
How difficult is the tutorial?
Let’s just say that the tutorial has a difficulty rating of 3 out of 5. In other words, the tutorial is moderately difficult. But hey! Trust your Sensei, I will try to make it as easy as possible for the newbies in the land of Windows 8!
So let’s cut the long talk short, and get started…
Step 1. Create or join a Homegroup. This is required because first, you have to get on the network of computers before you can start sharing, right?
(Note: The link to create a homegroup is provided for Windows 7, but the steps remain the same for creating or joining a homegroup in Windows 8 as well.)
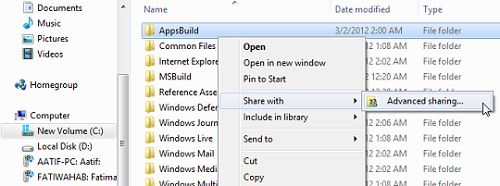
Step 2: Head over to the Windows explorer, and navigate to the folder that you wish to Share. Right click the folder, and select Advanced Sharing.
Step 3: Once you have clicked on the Advanced Sharing option, Sharing properties for the folder will be launched. In the box that opens, click on the Advanced Sharing button.
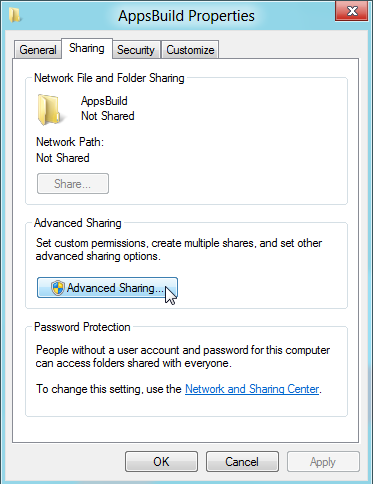
In the above Window, tick the Share this folder option. You can also set the limit for the maximum number of users who can simultaneously view the folder. The default limit for me was 20, and I let it stay as is, but if you want, you can adjust this setting (by increasing or decreasing it) to suit your needs. When you are done doing so, click on the Permissions button in the above window.
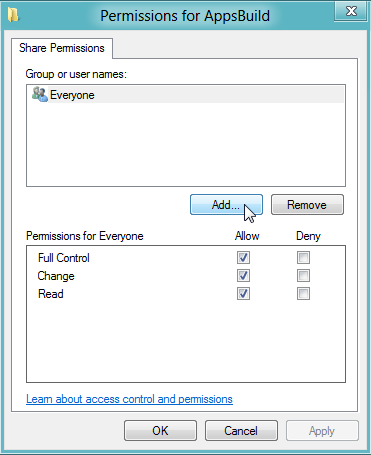
Step 5: When the Permissions box opens up, click on the Add button. (see below screenshot)
Once you have clicked on the Add button, you will be presented with a box which looks like the below screenshot.
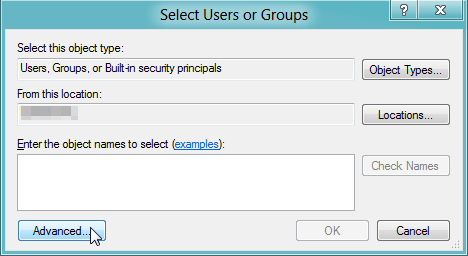 In the above window, click on the Advanced button.
Step 6: Upon clicking the Advanced button, you will be presented with an Advanced view of the users/groups. This window will look like the below screenshot. In this window, simply click on the Find Now button, if the users aren’t displayed in the box at the bottom.
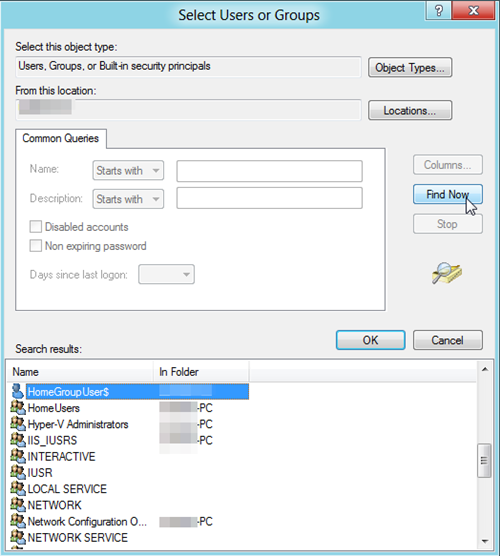 Once the system has found the results, click on HomeGroupUser$ from the bottom pane and click on the OK button.
Step 7: When you click on the OK button, the HomeGroupUser$ will be added to the Select Users or Groups Box. Once it has been added, click on the OK button. (see below screenshot)
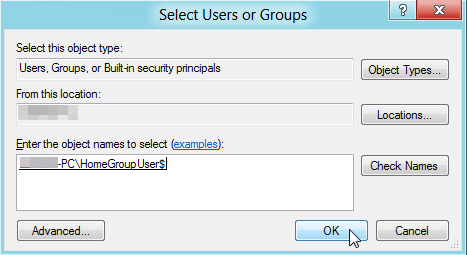 Upon clicking the OK button, you will be presented with the Permissions dialog box. This box would resemble the below screenshot.
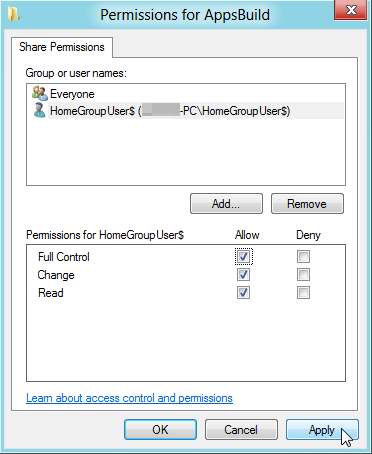 In the above box, simply select the permissions that you want to Allow or Deny, and click on the apply button. For example, if you want to grant only the permission to read the file, tick the Allow box in front of Read and tick Deny in front of Full Control and Change.
That’s all, your folder has been shared on the Network!
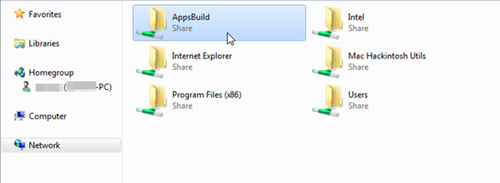
Just to make sure, head over to the Network section from a different machine, and you can see the folder as shared from your system! (see below screenshot)
In the above screenshot, you can see the folder as shared.
That winds up the dojo session for today! Sensei Pranjal hopes that you had fun learning this way to share your folders on a network.
See you next time, with another Dojo session, with a new tutorial!

