This tutorial explains how to create Panorama in GIMP. For this, I will use a free GIMP Plugin called Stitch Panorama. Stitch Panorama is a free GIMP panorama plugin, which you can use to stitch two images and create Panorama in GIMP. All you have to do is install this plugin on GIMP, open the images to stitch, define the Control Points, and you are all set. Detailed steps to create Panorama using this GIMP Panorama plugin are mentioned later.
GIMP is a widely known open source image manipulation software, with a wide range of image editing and drawing tools. It can do a lot with the stock tools it has and can do wonders with the external plugins and scripts available for it. One such plugin is Stitch Panorama which you can use to create Panorama in GIMP.
Things To Remember or Make Sure Before Making a Panorama:
- If you are yet to click photos to stitch, try to use camera with manual settings and click photos of same exposure. Also use tripod to click aligned pictures.
- Both the images should have overlapping fragment between them. This helps in better image stitching.
- If you already have pictures that you want to stitch, make sure they match in terms of exposure. If not, then you can try to adjust the exposure using GIMP and change exposure of one of the images to the level of another.
- It lets you stitch only 2 images at a time. If you want to stitch more images, you have to first stitch 2 images, then add another image to the stitched image, and so on. If you have lots of images to stitch, you might be better off using a free panorama software.
How To Install GIMP Panorama Plugin:
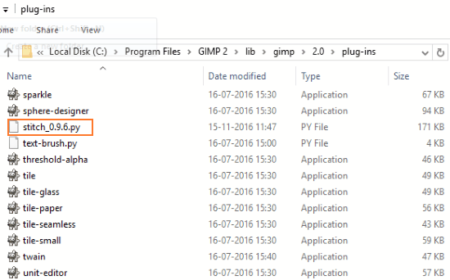
Go to the download page (link at end of this tutorial) and get Stitch Panorama on your PC. The downloaded plugin will be named as stitch_(version).py. Go to the download folder and copy the downloaded file. You have to paste the file in the GIMP plugin folder. The folder location is usually at: C:/Program Files/GIMP /lib/gimp/(GIMP version number, it is 2.0 for my PC)/plug-ins.
Restart GIMP and the Panorama plugin for GIMP will be installed and ready to use.
How To Create A Panorama In GIMP Using This GIMP Panorama Plugin:
Making a Panorama is an easy affair. It involves no complicated steps. Once you get a hold of the process, you will be making Panorama here in no time.
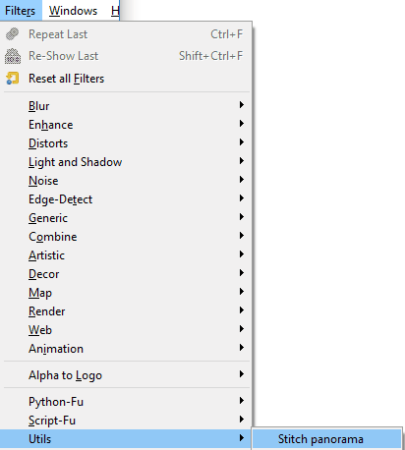
Open two images in GIMP that you want to stitch. Once you open the images, go to any of the image tab, and click Filters> Utils> Stitch Panorama.
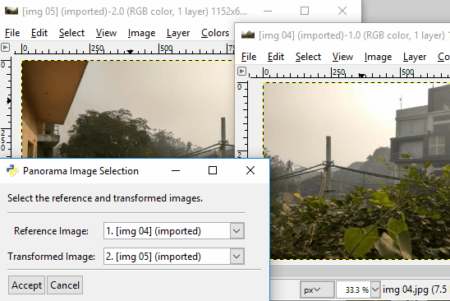
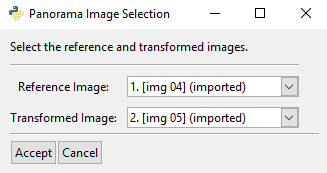
As soon as you click here, a small window appears, where you have to select both the images that you want to stitch. The images that are open in GIMP appear automatically here. Click Accept.
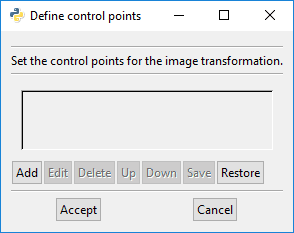
After selecting the images, the Stitch Panorama Control Panel appears. Here you need to set the Control Points on both the images to be stitched. Control points are the common points that overlap in both the images. Its preferred to set any structural point as Control Points. You can also change Interpolation Method, Blend Size, Color Radius, and select the options for Supersample, Color Balance, Blend Images, and Remove Distortion. You cannot proceed to Stitch Panorama on GIMP without selecting the Control Points. Click on Set/Edit/View Control Points to define Control Points.
Adding common control points in both the images is necessary. Now adding control points is a crucial step. You should keep the following things in mind while doing so:
- Control points are tiny points of reference.
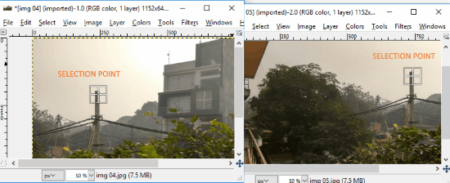
- Zoom the images, and use the selection tool to select control points of approx 4×4 pixels.
- Control points on both the images should be selected on a common structure/point between the images.
Here I am stitching two images with an overlapping part. As you can see below, both the images have a pillar in common, so I am selecting a point on pillar on both the images as the control point.
After selecting the Control points, go back to the Define Control Points window, and click Accept. After the points are added, click on the Stitch Panorama option on the Stitch Panorama Control Panel. A new window appears with the stitched image. Voila!

The steps to create Panorama in GIMP using this GIMP Panorama Plugin may seem lengthy, but it is easier being done than said.
Conclusion:
This GIMP Panorama Plugin is a boon for those who are familiar with GIMP and want to make a Panorama. Download it and give it a shot yourself! Although it lets you stitch only two images, the seamless photo stitching makes this plugin standout.