This tutorial explains how to setup a wifi hotspot with your PC, without using any software. In fact, we will automate it so that whenever PC starts, the wifi hotspot will be activated. Using this, you will be able to share internet connection of your PC with other devices.
Normally if you have wifi router, then you don’t need to setup a wifi hotspot. But if you have connected a dongle or ethernet cable to your PC, then you can share internet connection of them with other devices (PCs, smartphones, tablets etc.) by setting up wifi hotspot.
I will use built-in utility netsh and Task Scheduler to help you create an ad hoc wireless network connection. Since both of these aforementioned utilities are completely free and secure, so you would never need to worry about security and resources of your Windows device. And we will use Task Scheduler of Windows to automate creation of wifi hostspot whenever our PC starts.
Does Your PC Support Wifi Hotspot Creation?
Before I get on to explaining the steps involved, it will be a good idea to check if your wifi card supports it. Even though most of the cards support it, but some of the older ones don’t.
To check whether your device supports it, you need to run the following command. The command has to be run in command prompt. Do note that the command prompt should be opened as Administrator.
netsh wlan show drivers
Running this command in Command Prompt with administrative privileges will generate output similar to this:
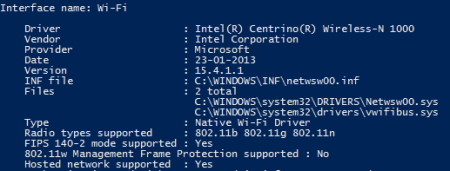
Look for support for “Hosted network supported”. If it says “Yes” in front of it, then this tutorial is for you. If not, then you may try out these third party utilities to create a wifi hotspot.
How to Setup Wifi Hotspot on PC without using any software:
Setting up wifi hotspot is a two step process:
- First we will create a script that will let us create an ad hoc network on your PC. Any external PC or device will be able to connect to PC using that network.
- In next step, we will allow that network to share our internet with other devices.
Script to Create a Wifi Hotspot on PC:
Now we need to write a batch script which we can use to setup wifi hotspot. For that, open notepad or any other text editor of your choice. Paste following commands in the text editor:
@ECHO OFF

ECHO Setting up name and password for hosted network

netsh wlan set hostednetwork mode=allow ssid=networkname key=mypwd

ECHO Starting hosted network

netsh wlan start hostednetwork

exit
You need to make these two changes in the third line of the above text.
- Replace networkname with a desired name for your wireless network. I have chosen DellNet to be my SSID because I am using a Dell laptop, but you can choose anything you want.
- Replace mypwd with a password of your choice.
Once you have entered these commands and made changes to the file, save this file. You can give any name to this file, but do note that the extension has to be .bat, like: “adhoc_wireless_network.bat”.
You would observe that thumbnail of this file is an image with two gears. Simply right click on this batch script and choose “Run as Administrator”. This will open a command prompt and you will see some commands being executed in it. Within a few seconds your ad hoc connection would be ready to be consumed by your other devices. As I mentioned earlier, this connection does not include Internet sharing yet, but you would be able to share files and printers by joining HomeGroup from your other PC.
Sharing the Internet connection

We need to perform one more step to share internet of this PC. For that, Open “Network Connections” using Control Panel, or you can just search for it in Start Menu. It will display many connections. You need to find the network connection that you created. That will be apparent by seeing the small text that comes below the network name. The network that shows your SSID is the one we are looking for. This name would be in the format of Local Area Connection*n, where n is any number. Your SSID would be displayed below this name, as shown in the above image.
After this, find the internet connection that you are connected to. In my case, I am connected to “Ethernet”. Now you need to open the properties of connection. Right click on Ethernet to open its properties window. Then go to sharing tab, as shown in the image below. Tick both check boxes to allow other network users to connect through this computer’s Internet connection and to let them control or disable the shared network connection. Select the name of ad hoc connection (which I had asked you to note down) from drop down list (see following image). Click Ok. Close the network connection window.

Enjoying the Internet
If you do not want to automatically start ad hoc wireless connection every time your Windows device starts then you may rest in peace with your mobile devices. Because you can manually start this script too and your internet will be prepared to serve you.
Stopping the wireless ad hoc network connection
If you no longer require the wireless ad hoc network connection, run the following command in the command prompt with administrative privileges.
netsh wlan stop hostednetwork.
How to Automatically Setup Wifi Hostpot when PC Starts:
Please bear with me for one more step to setup this task in Task scheduler. Press Windows key plus R to launch the Run dialog box. Enter “taskschd.msc” in the displayed text box. Press enter. Allow Task scheduler to launch by clicking yes on displayed UAC prompt. Once Task Scheduler has been launched, follow the following carefully.
Step 1: Create a Basic Task using Action menu of Task Scheduler as shown in the image.

Step 2: Write down the name and description of the task you are going to create. Click next when you are done.

Step 3: Choose the trigger “when the computer starts”, then click next.

Step 4: Select the option “run a program”, then click next.

Step 5: We will run the batch script which we had created earlier. Copy the full path of the batch script (with its name included too). If this full path contains any space then quote it within double quotes. You can also press shift plus F10 when this script is in selection to display a context menu which includes copy path name (in Windows 8). Enter this full path in the textbox shown in the following image.

Step 6: Review the details of the task, if you think anything is missing you can always go back and correct it. You also need to check the “display properties dialog box” option.

Step 7: This step requires you to allow the script to run with the highest privileges. You can use this dialog box to define multiple triggers and conditions etc.. You can choose to run your script only when the particular network is available or your device is connected to power source. You can even choose to run this script whether someone is logged in to your PC or not. You may tinker around with every option available here, but do not define any arbitrary action.

If you have followed above instructions carefully, your wireless ad hoc network connection with Internet would be up and running every time you will log in to your computer.
Conclusion
So finally we are done with creating a wifi hotspot on PC. You would be following these steps first and last time, so I think that it is worth giving a try. Even in the case when you do not have access to internet, you can set up such ad hoc connection to share file and printers with others. There are countless software available to do this job for you, but the issue of security and unnecessary resource consumption will always be there. This method is built within Windows. So, sit back and enjoy the Internet with everyone of your devices. If you have troubles setting things up, then do not hesitate to comment below.