This is a list of 6 free video editors with Zoom feature. Using this feature, you will be able to zoom any specific part of a video with ease. Apart from the Zoom feature, these video editors also offer many editing tools using which you can edit and create stunning videos like a professional. Some of them even come with advanced video editing options like 2D & 3D effects composite, lens correction, color grading, reframing, etc.
There are dozens of video editors available, but it is quite surprising that very few of them come with the Zoom feature. So, to ease up things for you, I have dug up some of the best free video editors like HitFilm Express, DaVinci Resolve, OpenShot, etc. which offer the “Zoom” feature and let you add zoom to any specific section of a video.

Let us get started with the video editors and see how to use them to zoom video sections.
HitFilm Express:
HitFilm Express is one of the best free and reliable video editors which can be used to edit & create high-quality videos, edit audio, composite visual effects with more than 180 predefined visual effects, and more. It bundles tons of useful editing tools like clip trimmer, quick transitions, audio & opacity keyframe, loop keyframes, 2D & 3D effects compositing, etc. Among all these features, there is one feature named “Scale” using which you can zoom any specific section of an existing video and export the resulting video as MP4, AVI, etc.

Now, let me explain how to use HitFilm Express for zooming a specific part of a video.
How to Zoom Any Specific Part of a Video Using HitFilm Express:
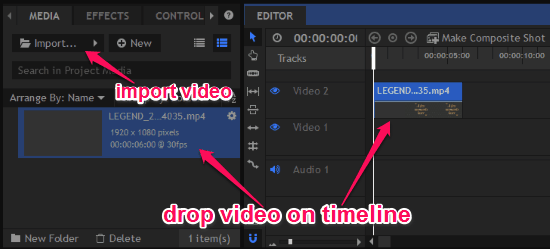
Step 1: To get started, simply open “HitFilm Express” and then go to the “Edit” tab at the top. After that, the editor will open up and you would need to import the video for editing. For this, click on the “Import” button under the “Media” option at the bottom left corner of the editor. Then drag and drop the imported video on the timeline and then hit the “Make Composite Shot” button at the top of the timeline.
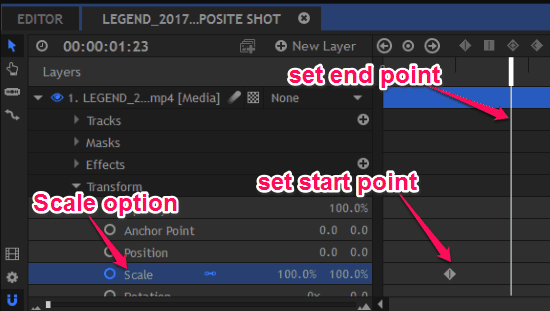
Step 2: Once you do that, simply double-click on the video in the composite shot window and then select the “Transform” feature. After that, you will see various options under “Transform” like Opacity, Anchor Point, Position, Scale, etc. The “Scale” option can be used to zoom any specific part of a video. On the right of these options, you will also see a line marker using which you can set the start and end point of the video section for zooming.
![]()
Step 3: Now, set the line marker at the starting point on the timeline from where you want to start the zoom and then select the “Scale” option. This will add a keyframe to that particular point of the video. Once done, move the marker to the end point of the video section which you want to zoom.
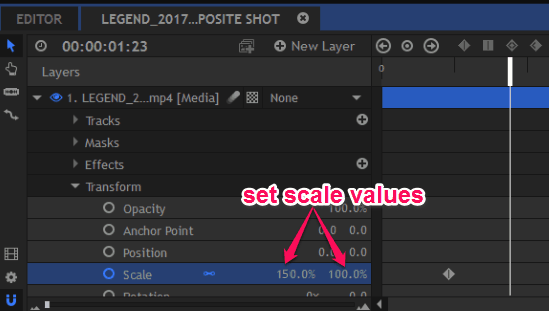
Step 4: When you do that, you can proceed and change the scale value to zoom the selected video section. For example, let’s say you want to zoom the video section from 100% to 150%, then set the first scale value as 150% and the second value as 100 %, as shown in the below image. You can also use the “Visual Graph” option to set the scale values by dragging the waveforms between the start and end keyframes.
After setting the scale values, you can click on the “Export” tab and save the resulting video with added zoom as MP4, AVI, etc. It supports smooth zooming which means the video section to which you have added the zoom will smoothly play during the video playback.
DaVinci Resolve:
DaVinci Resolve is also one of the advanced free video editors and color-grading software using which you can edit and create videos like a professional. It offers tons of comprehensive video editing tools that can be used to trim, insert objects, slip/slide multiple shots, superimpose, swap/shuffle edits, overwrite/append edits, and so on. Not only that, it also bundles dozens of other features including optical re-framing, optical flow retiming, lens correction, keyframe control, transitions, transforms, scaling, etc. One of the best things about this video editor is that it also provides the “Zoom” feature to help you zoom specific video parts with ease.

So, now let use see how to zoom videos parts using DaVinci Resolve.
How to Zoom with DaVinci Resolve:
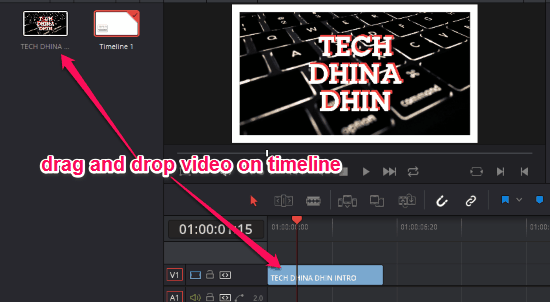
Step 1: After opening DaVinci Resolve, click on the “Media” tab and then browse your drives to import a video or simply drag & drop a video file. When you’re done importing a video file, simply select the “Edit” tab at the bottom to open up the editor. On the left of the editor, you will see the imported video which you would need to drag & drop on the timeline.
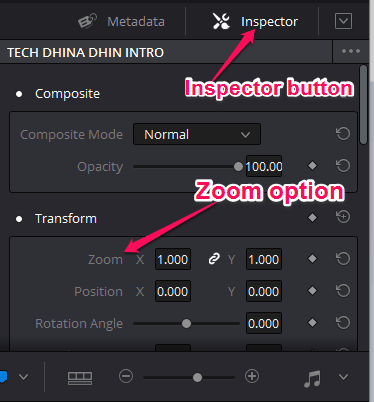
Step 2: After that, simply select the video on the timeline and then hit the “Inspector” button at the top of the editor. As soon as you do that, several editing sections will appear like Composite, Transform, Cropping, Retime & Scaling, etc. Under the “Transform” section, you will see an option named, “Zoom” associated with an X and Y field.
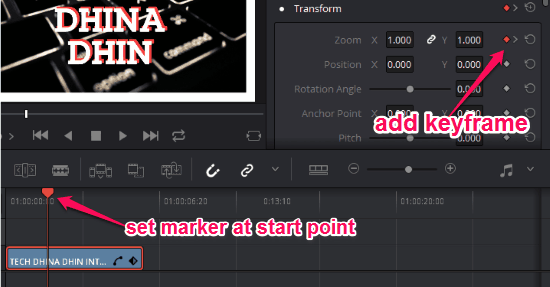
Step 3: Now, what you need to do is set the marker at the starting position of the video part on the timeline. After that, click on the “Keyframe” icon on the right of the “Zoom” option to add a keyframe to the starting position. Once you do that, drag the marker to the end position of the video part that you want to zoom.
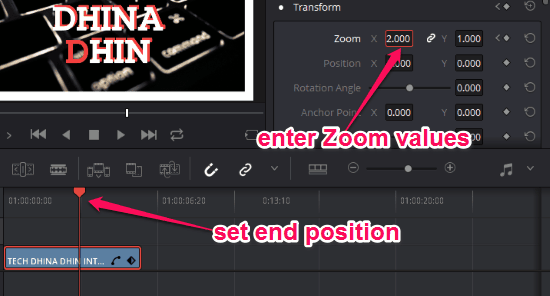
Step 4: After that, you can go ahead and change the value in the X and Y field associated with the “Zoom” option and hit the Enter key. As soon as you do that, the zoom effect will be added to the selected video part depending on the X and Y values assigned by you. When you’re done adding zoom to the video part, you would need to change the X and Y values to their default values such that the remaining video will play as normal. For this, simply place the marker anywhere after the end position and then only change the X and Y value.
After you’re all set, you can save the edited video which will contain the zoom effect added by you. To save the video, simply go to the “Deliver” tab and then choose any of the supported formats like MOV, AVI, QuickTime, Cineon, TIFF, and so on.
OpenShot:
OpenShot is another free and open source video editor using which you can create great videos by adding various transitions, video effects, subtitles, etc. You can also trim video clips, change video layout, separate audio, fade in/out, and more. This video editor also comes with the “Zoom” feature that can help you zoom any individual part of a video. Unlike HitFilm Express and DaVinci Resolve, you have to first split the video part from the entire video before zooming that part.

Now, let us see how to use the “Zoom” feature of OpenShot below.
How to Zoom Any Part of a Video with OpenShot:
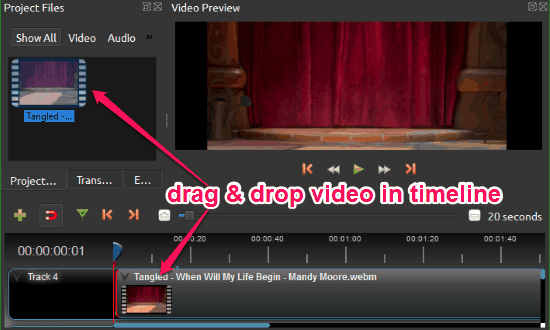
Step 1: To get started, the first thing you need to do is open OpenShot on your PC and then click “File → Import Files” to select the video which you want to edit. After that, simply drag & drop the video on the timeline at the bottom of the window, as shown below.
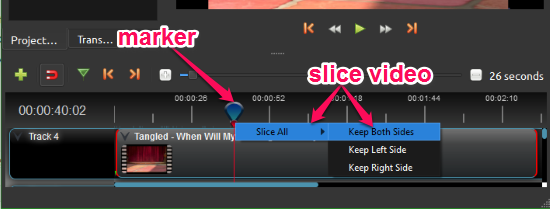
Step 2: When you do that, you would need to move the marker on the timeline to the start point of the video part which you want to zoom. Now, right-click on the marker and then select “Slice All → Keep Both Sides” option to split the video. After that, move the marker to the end point of the video part and then again slice it by select “Slice All → Keep Both Sides”. This will simply split the specific part of the video from the entire video.
Step 3: Once you’re done with that, simply right-click on the video part and select “Animate → Entire Clip”. After that, you will see an option named “Zoom” which you need to select and then choose the “Zoom In” level. You can choose the level either as “50% to 100%”, “75% to 100%”, or “100% to 150%” for zooming the specific part of the video. It also lets you choose “Zoom Out” level for the video part.

When you have selected the zoom level, you can go ahead and export the video as FLV, AVI, MOV, MP4, MPEG, etc. The resulting video will include the newly added part of the video with zoom. Similar to HitFilm Express and DaVinci Resolve, the zoomed part of the video will play smoothly.
Lightworks:
Similar to DaVinci resolve, Lightworks is another useful and non-linear video editor which offers numerous features including advanced multi-cam editing, second monitor output, real-time video effects, visual effects routing, multi-channel audio mixer, and so on. All these features are available in the free version of Lightworks, but there are many other paid features like timeline rendering, Boris Graffiti, stereoscopic output, etc. The best part is that the “Zoom” feature in this video editor is completely free to use.

You can follow the steps below to know how to use Lightworks to add zoom to video parts.
How to Add Zoom a Video using Lightworks:
Step 1: To get started, open up Lightworks and create a project by giving any name you want. After that, a popup window will appear on which you can browse your PC and import the video for editing. When you’re done importing a video, simply double-click on it to open up the viewer. At the bottom of the viewer, click on the option that says “Insert into the Target Edit” to launch the video editor.
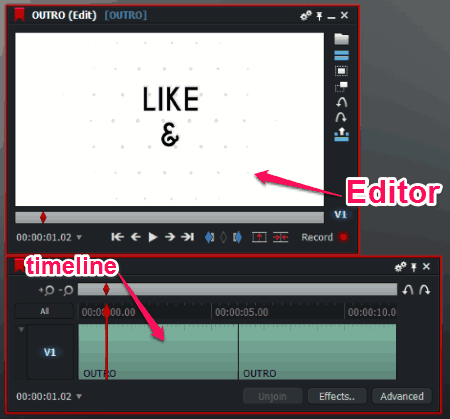
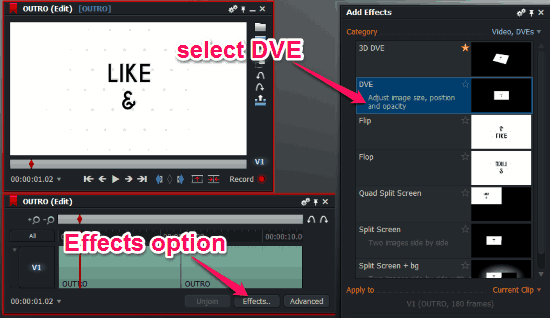
Step 2: Once the editor is launched, you will see that the selected video is already added to the timeline. Now, what you need to do is click on the “Effects” option at the bottom of the timeline and then select the “DVE” effect from the list, as shown below.
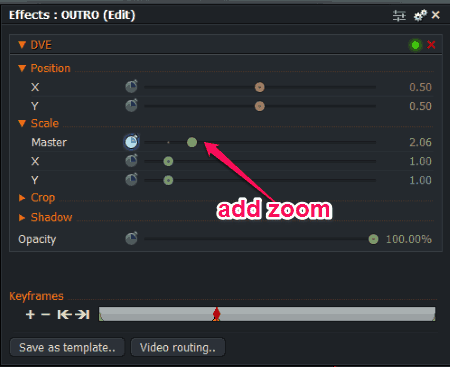
Step 3: As soon as you do that, the “DVE Effects” window will appear on which you will see the “Scale” option which can be used to add zoom to video parts. First, you would need to drag the marker to the starting point from where you want to zoom the video on the timeline. After that, click on the “Keyframe” button associated with the “Master” option under “Scale”. When you do that, it will add a keyframe at the starting point of the video part.
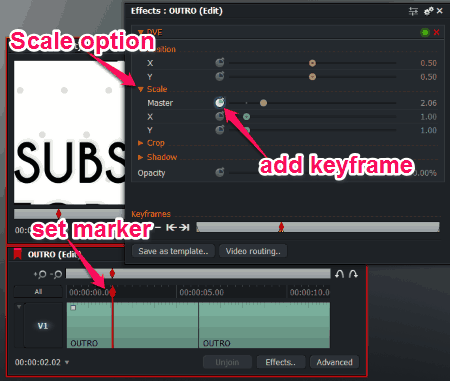
Step 4: After adding a keyframe to the starting point, simply move and set the marker at the end point where you want to stop zooming the video. Once you set the ending point, switch back to the “DVE Effects” window and drag the slider associated with the “Master” option to define the zoom intensity. Then hit Enter and the zoom effect will be added to the video part in between the start and end point.
You can then click on the “Export” icon on the left and then save the video as an MP4 file (in the free version of Lightworks).
If you would like to know more about Lightworks, then read the detailed review here.
VSDC Free Video Editor:
VSDC is another useful and feature-rich video editor that can help you create videos, edit videos, apply video effects, add audio effects, cut & split video clips, and so on. The “Video Effects” feature offers various options like Quick Styles, Filters, Adjustments, Transforms, Special FX, Transitions, etc. which can help you create stunning videos. The “Transforms” option comes with various components including “Zoom” which can be used to zoom any individual part of a video.

Simply, follow the steps below to zoom any individual part of a video.
How to Zoom Any Part of a Video using VSDC Free Video Editor:
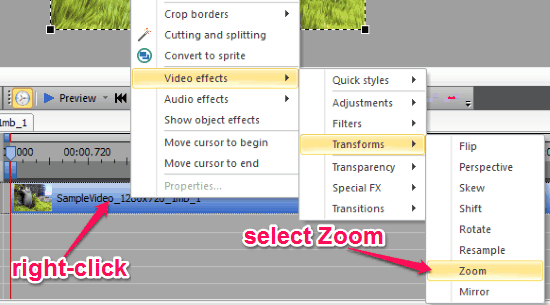
Step 1: Simply, open up “VSDC Free Video Editor” on your PC and then click on the “Editor” tab at the top. When you do that, you will see a button named “Import Content” using which you can import the video for editing. After importing a video, it will be added automatically to the timeline at the bottom of the editor. Now, you would need to simply right-click the video on the timeline and then select “Video Effects → Transforms → Zoom”.
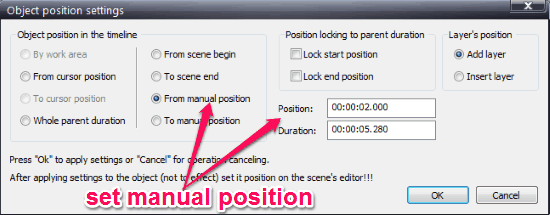
Step 2: As soon as you select the “Zoom” option, a popup window will open up where you can select the zoom position and duration. If you want to zoom any individual part of the video, then I would recommend you to select the “From Manual Position” option. This will allow you to choose the starting zoom position and the duration for zooming the video part.
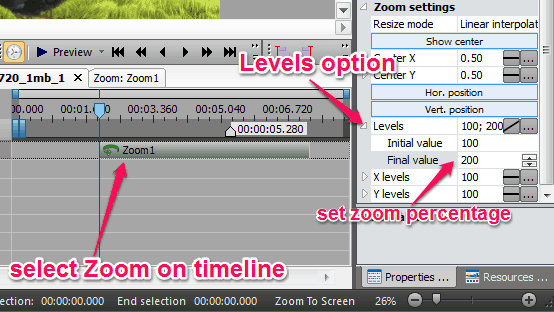
Step 3: After that, click “OK” to close the popup window and a new object named “Zoom” will be added to the timeline. Simply select this object and you will see a “Zoom Settings” section on the right of the editor. Now, what you need to do is expand the “Levels” option under “Zoom Settings”. When you do that, you will see two different input fields named “Initial Value” and “Final Value” in which you can fill the zoom percentage. Let’s say, you want to zoom the video part from 100% to 200% then you would need to enter “100%” in the “Initial Value” field and “200%” in the “Final Value” field.
That’s it, this will automatically add zoom to the selected video part. You can now click on the “Export Project” tab at the top and save the edited video either as AVI, MOV, MKV, WMV, etc. When you will play the resulting video you will notice a flawless zoom added to selected part of the video.
Read the full review of VSDC Free Video Editor here.
Windows Movie Maker:
Windows Movie Maker is a simple video editor which allows you to create nice movies from your photos and videos. Apart from letting you make movies, it also offers some basic editing tools using which you can add songs to movies, add animated transitions, add visual effects, etc. It even comes with some animated zoom transitions using which you can zoom any particular part of a video.

Simply, follow the steps below to see how to use Windows Movie Maker for zooming.
How to Zoom a Part of a Video Using Windows Movie Maker:
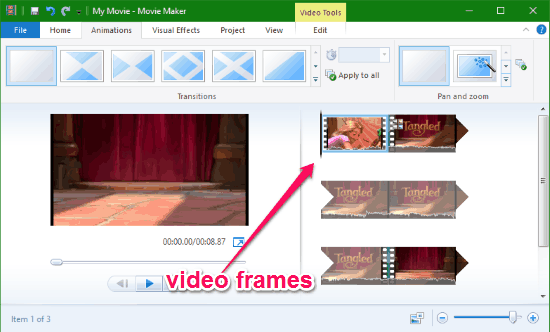
Step 1: After you open Windows Movie Maker, simply go to the “Home” tab and click on “Add Videos and Photos” option to import the source video which you want to edit. When you do that, the entire video will be visible as frames on the right of the window.
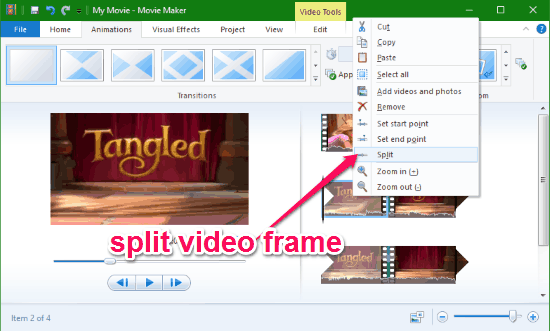
Step 2: Now, what you need to do is click on the start point of the video frame which you want to zoom to place the marker. After that, you can right-click on the frame and select the “Split” option which will automatically split the selected frame from the other frames which are at the beginning. In the same manner, you have to click on the end point of the specific video frame and then split it such that the entire video frame will be separated for zooming.
Step 3: When you’re done separating the target video frame, select the frame and go to the “Animations” tab at the top and then choose any of the “Zoom” options under “Pan and Zoom”. This will automatically add the zoom effect to the selected video frame. You can now save the resulting video to your PC which will contain the zoom effect added by you. Even though it is a simple movie maker the zoom effect will be smooth as in HitFilm Express, OpenShot, etc.

You can read more about Windows Movie Maker from here.
Closing Words:
These were some of the best video editors with Zoom feature. So, if you have been looking for a way to zoom any specific part of a video, then using any of these video editors would probably be the best option for you. Personally, I like HitFilm Express and DaVinci Resolve as they offer some advanced video editing tools to create mind-blowing videos.