MapMaker Interactive by National Geographic is a free online interactive map maker to create thematic maps and add interactive elements on the maps such as drop pins, placemarks, polygon, polylines, etc. These elements can be made interactive by linking them to videos and images via URLs. One of the best feature of this National Geographic’s map maker is that it lets you add different layers over the map from 12 different layer categories such as Food, Climate & Weather, Water, Earth Systems, Environment, Animal Ranges, and so on. You can also switch between 7 base map layers including NatGeo, Topo, Satellite, etc.
Similar to other interactive map makers such as Animaps, MapHub, etc., this one also provides a bunch of intuitive and simple tools in order to help you create interactive maps seamlessly. But, unlike these similar map makers, “MapMaker Interactive” comes with a unique feature called “Country Flags & Facts” using which you will be able to explore information about any country by simply selecting it on the map. Another useful feature of this application is that it lets you view the coordinates of any location on the map by enabling the “Latitude and Longitude” grid options.
How to Use the Interactive Map Maker by National Geographic to Create Interactive Maps:
To get started, simply go to the homepage of “MapMaker Interactive” and you can start creating your interactive map instantly, as no registration is required. On the main screen, you’ll see a large zoomable World Map canvas along with a toolbar on the left. On the right of the screen, there will also be a panel with 4 different tabs named, Legend, Layers, Base Maps, and Data.

Now, let us see how to use the tools and options to create interactive maps.
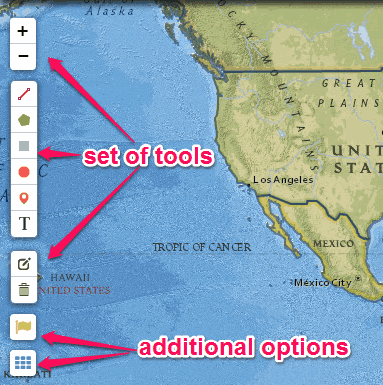
On the left of the screen, the toolbar will include three different sets of tools. The first set of tools contain a “+” and “-” button to zoom in and zoom out the map. The tools on the second set will allow you to draw polylines, polygon, rectangle, circle, insert drop pins, placemarks, and add text label on the map. Whereas, the third set will include the tools to edit each of the elements added to the map and remove elements. You’ll also be able to see two additional options for enabling the features “Country Flags & Facts” and “Latitude and Longitude” below the toolbar.
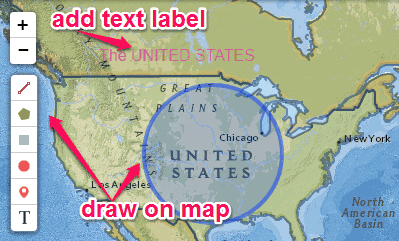
Step 1: To start drawing on the map, simply select any of the tools from the second set of tools. Let’s say, you want to draw a circle on the map, then simply click on the “Circle” tool and then click and drag the mouse cursor to draw the circle. In the same manner, you can also draw polylines, polygon, rectangle, and add text label.
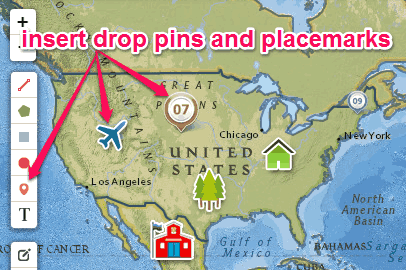
Step 2: The tool (with Drop Pin icon) just above the “Text Label” tool can be used for inserting drop pins and placemarks on the map. It offers more than 200 elements combining both drop pins and placemarks (like home, plantation, animals, flight, etc.) which you can insert on the map. To add a drop pin or placemark, simply select the element and then click on the area of the map where you want to place it.
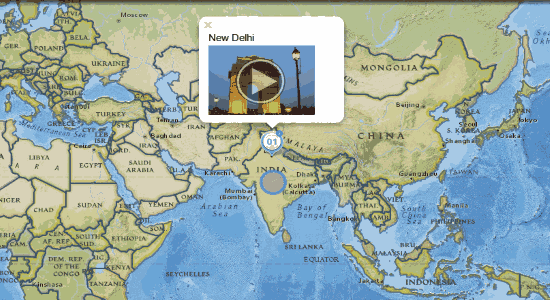
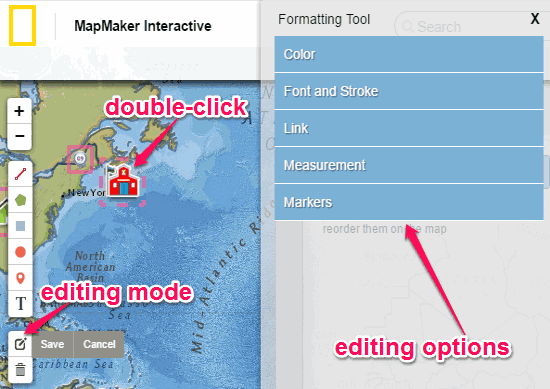
Step 3: After drawing and inserting elements on the map, you can make them interactive by adding external links to images, videos, etc. To make the elements interactive, the first thing you need to do is enable the editing mode by clicking the “Edit” button on the third set of tools. As soon as you do that, simply double-click on any of the elements which you want to make interactive and a “Formatting Tool” slider window will appear on the right. The window will include 5 different editing options named, Color, Font & Stroke, Link, Measurement, and Markers.
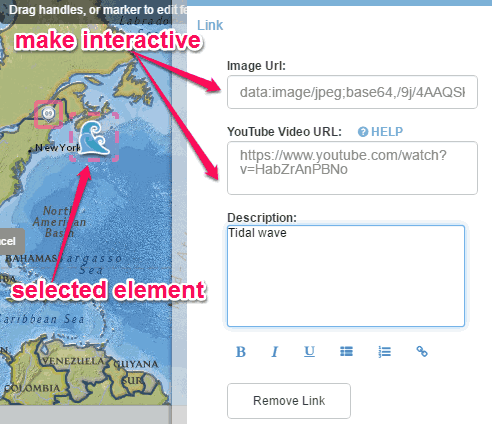
Step 4: Now, simply click on the “Link” option and you’ll be able to add a description, image URL, and YouTube video URL to make that particular element interactive. After that, each time you click on the element, a popup will appear with the image and video play button, as shown in the very first screenshot.
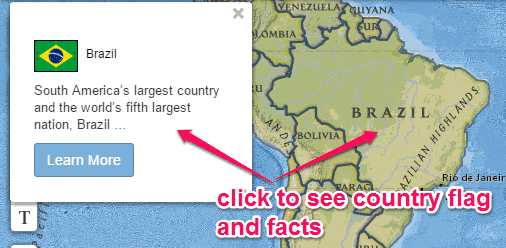
Step 5: Now, if you would like to enable the feature “Country Flags & Facts”, simply click on the “Flag” icon at the bottom of the toolbar. After that, slide the ON/OFF button to ON and you can start exploring facts about all the countries by simply clicking on them.
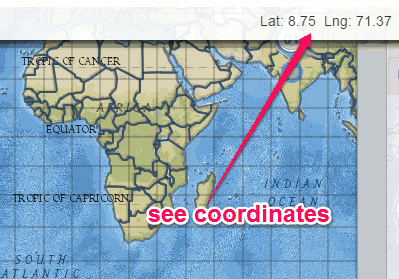
Step 6: Below the “Flag” icon, you’ll also see an option to enable the “Latitude and Longitude” feature to see the coordinates of any region on the map. For this simply click on the “Grid” icon and enable the ON/OFF button, after that the grid lines will appear on the map and you can simply hover the mouse cursor over any region to see the coordinates.
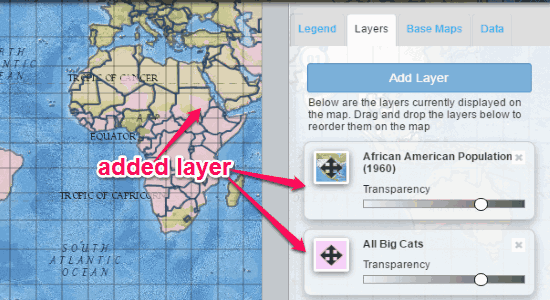
Step 7: Another useful feature of this map maker is that you can add layers from different categories on the map. To add a layer, simply click on the “Layers” tab on the right panel and hit the “Add Layer” button. After that, you can browse all the layer categories and add a single or multiple layers to the map. You can also change the transparency of each layer which will be visible on the map.
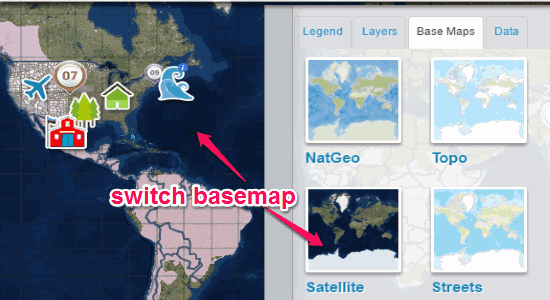
Step 8: It also allows you to switch between 7 different base maps named, NatGeo, Topo, Satellite, Streets, Terrain, Ocean, and Grey. To switch base map, simply click on the Base Mapstabab on the right panel and choose any one of the base maps to apply to the World Map canvas.
My Final Verdict:
MapMaker Interactive is an amazing interactive map maker powered by National Geographic which allows you to create customized maps with interactive elements. Personally, I like this map maker as apart from letting you add interactive elements on the map, it also lets you switch base maps, add layers, see country facts, etc.