This tutorial is all about how to use Dropbox as PC partition on Windows. After following the steps in this tutorial, you will learn the method which can be used to map a virtual drive for Dropbox and then Dropbox will appear throughout your PC as a separate drive.
After you install Dropbox on your PC, it doesn’t appear as a PC partition by default. But, you can use it quickly from the left pane in Windows File Explorer. Now, let’s say you want to take it to another level and use Dropbox as a normal PC partition, then the method explained in this tutorial can assist you to do that with ease.
Actually, I have come across a free software named, “Visual Subst” which lets you map Dropbox as a virtual PC partition and use it from the File Explorer. This software can also be used to access Google Drive as PC partition and OneDrive as PC partition on Windows.
Now, let me explain the steps which are required to map Dropbox as PC partition using Visual Subst.
How to Use Dropbox as PC Partition on Windows:
Step 1: First, you would need to install Dropbox and sign in to integrate it with your PC. After that, you can either use it from the left pane in File Explorer or directly from the access location: “C:\Users\[PC name]\Dropbox\“.
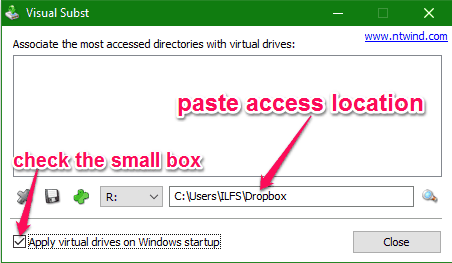
Step 2: Now, you can proceed and install Visual Subst. After that, simply open it up and select a drive letter from the drop-down list which you want to assign to Dropbox. It lets you select any drive letter from “A to Z”, except the ones which are already taken. To demonstrate how to use Dropbox as PC partition, I will assign the drive letter “R” to Dropbox on my PC.

Step 3: Once you’re done choosing a drive letter for Dropbox, you would need to copy the Dropbox access location. By default, the access location will be the same as mentioned in the first step i.e. “C:\Users\[PC name]\Dropbox\“. After that, you have to paste the copied access location in the input field at the bottom of the interface. Before proceeding, you should also check the small box visible on the right of the “Apply virtual drives on Windows startup” option.
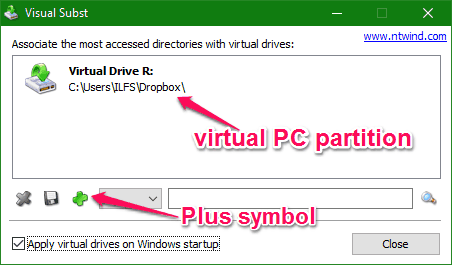
Step 4: After that, you would need to simply click on the “Plus” symbol and then it will create a virtual PC partition instantly. This will also map Dropbox to the virtual PC partition such that it can be used as a normal PC partition.
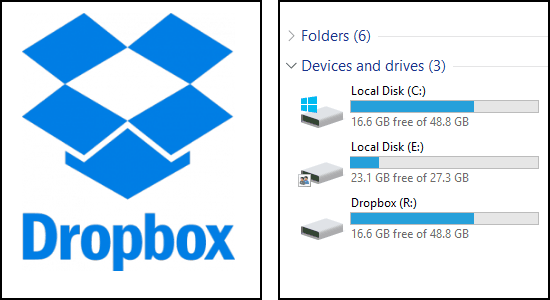
That means Dropbox will now appear as a hard disk partition in File Explorer and you can use it in the same manner as other partitions in Windows File Explorer. The below image shows that Dropbox is visible on my PC with the assigned drive letter “R”.

My Final Verdict:
Visual Subst is a pretty useful tool for Windows which helps you use Dropbox as PC partition by creating a virtual drive. You can go through this tutorial to learn how to use Visual Subst to create a virtual drive for Dropbox.