This tutorial is about how to perform automated tasks on your iPhone. Ever wonder how to make your iPhone perform certain actions by itself such that you can save your precious time. Well, guess what, you’re in luck as there are ways using which you can do the same.
In this tutorial, I am going to use 2 different apps and show you how to use them for performing automated tasks on your iPhone. Whether you want to remind yourself of anything at any specific time by sending an email, post a photo directly to Facebook after capturing, and so on, then these apps are definitely for you. If you own an Android device, then do not worry as we have also covered 5 free apps to perform automated tasks on Android.
How to Perform Automated Tasks Using “IF by IFTTT” on iPhone:
IF by IFTTT is an amazing app for iPhone which works with the concept of “If This Then That” recipes. You can use this app to automate various tasks on your iPhone by creating a recipe. There are tons of predefined recipes available which you can use for free or you can create your own custom recipes. For example, each time you capture a photo you want to send/receive an email automatically with the photo attached. Then simply create a recipe with an “IF” trigger (if a photo is captured) and “THEN” action (send an email). You can create as many recipes as you want by connecting different services.
Now, let me explain how to use IF by IFTTT to perform automated tasks.
Step 1: Simply open the app and sign in with your IFTTT credentials as this app is a iOS client of IFTTT. Once, you’re in you will see some recommended recipes on the main screen along with a “Recipe” icon at the top-right corner.

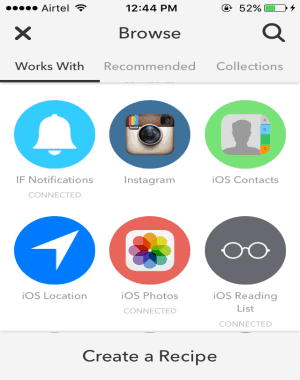
Step 2: Tap the “Recipe” icon to proceed. After that, hit the “+” button to use predefined recipes or create your own recipes. You will be able to see all the services that this app supports like date & time, email, email digest, Facebook, Gmail, iOS contacts, iOS photos, iOS location, Adobe, Amazon Alexa, Instagram, and more.
Step 3: When you select a service, it will show you all the popular recipes related to that particular service. However, if you want to create your own then tap the “Create a Recipe” button at the bottom. As soon as you do that the “IF and Then” option will appear with a big “+” icon. As an example, I am going to demonstrate how to send an email when you capture a photo using your iPhone camera.
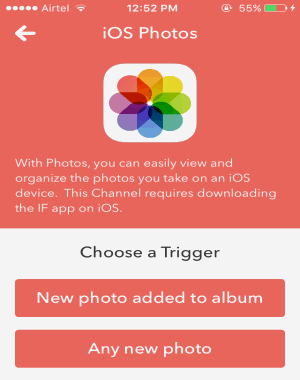
Step 4: At first, tap the “+” icon adjacent to “IF” to select a trigger for your recipe. Then select “iOS Photos” service and it will ask you to connect the service to IFTTT. After connecting the service, you will see various trigger options like New Photo Added to Album, Any New Photo, etc. Select “Any New Photo” trigger, then the “+” icon adjacent to “Then” action will get enabled.
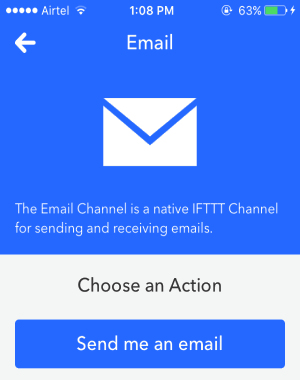
Step 5: Tap the icon to set an action in response to the trigger which you have created in Step 4 (Any New Photo). Select the “Email” service from the list and choose the action as “Send Me An Email”. After that, you will be able to see the default email subject along with the email body.
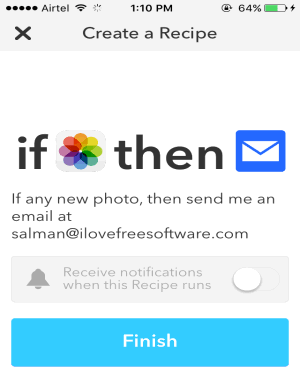
Step 6: The email body will include a public URL for the captured photo on your iPhone, which you can view directly from the email. If you want then you can customize the subject and body of the email or you can proceed with the default template. Then tap “Next” at the top and hit the “Finish” button to activate the recipe. So, each time you capture a photo on your iPhone, you will receive an email automatically along with the image URL.
How to Automate Certain Tasks on iPhone with Atooma:
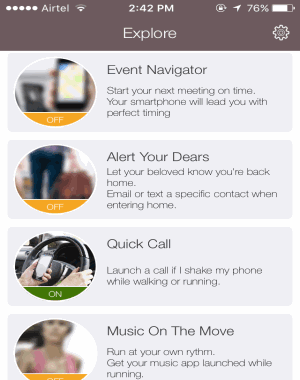
Atooma is another free device automation app for iPhone which performs some of the smart actions automatically for you such as be alerted if it’s going to rain, get emails read by voice while driving, know where you parked your car, and so on. Atooma for iPhone is still in Beta version and comes with a limited amount of automated task rules. The available rules are basically for tasks like driving, weather forecast, fitness, music, call, etc. It doesn’t have any option to add new rules, however, you can customize the available rules as required.
Let me tell you how to use Atooma on iPhone.
Step 1: When you launch the app, you will see all the available rules on the main screen such as smart weather forecast, calendar weather alert, umbrella reminder, TTS email reader, quick call, and more. I am going to explain an example of a rule which lets you call someone by shaking your iPhone when you walk, run, or drive.
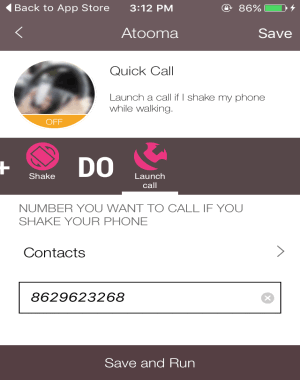
Step 2: On the main screen, scroll down and select the “Quick Call” rule. This rule allows you to make a call if you shake your phone while walking, driving, or running. When you select the rule, the customization screen will open up with “IF” and “Do” logic sections. The first thing you need to do is define the trigger in the “IF” section.

Step 3: There will be 3 different activities like Walking, Running, and Driving. You can either select a single activity or multiple activities at once. After selecting an activity, tap the “Next Step” button at the bottom to proceed.
Step 4: Now, you will be able to set up an action in the “Do” section. In this section, you can select the number you want to call if you shake your phone. You can either enter a number manually or use any of the iPhone contacts. Once you’ve entered or selected a contact, hit the “Save and Run” button, that’s all.
Step 5: Each time you shake your phone while doing the selected activity, the app will make a call to the assigned number automatically. In the same manner, you can customize all the available rules to email someone when you reach a location, get your music app launched while running, be alerted for rain, and so on.
My Final Verdict:
If you want to automate some of the commonly used tasks on your iPhone, then the apps explained in this tutorial are going to help you do that. These apps allow you to choose actions in response to certain triggers assigned by you. So that, whenever the triggers run the actions will also be executed automatically.
I hope this tutorial is useful for you.