This tutorial details how to selectively disable USB ports in Windows 10. Today’s computers are insanely capable, both in terms of hardware and software. A single standard PC can handle a lot of varied tasks, on its own. However, when you connect other device(s) to it, their capabilities increase manifold. From printers and webcams, to portable storage devices and smartphones, pretty much everything can interface with a computer. And though there are a variety of ways through which peripherals can connect to PCs, there’s one that’s fast becoming (if it’s not already) the universal standard for it, and that’s USB.
A handful of Universal Serial Bus (USB) ports is something that you’ll find on every computer these days. And not just computers, but pretty much any device has one (although most use the smaller variation of it). And while this ubiquity makes it incredibly easy to connect a near infinite number of peripherals to a computer via USB, it can also be a bit of a security issue, especially if a connected device is malware infested.
However, you can easily fix this, as Windows 10 lets you disable individual USB ports, so that the computer doesn’t detect a device even when it’s plugged into a USB port. And if that’s a little too much, you can also have the computer detect a USB connected device, but prevent any read/write access for it.
Sounds interesting? Let’s head over to the other side of the break, and find out how you can selectively disable USB ports in Windows 10.

How To Selectively Disable USB Ports In Windows 10?
Disabling individual USB ports in Windows 10 is a walk in the park. Read on the following illustrative walkthrough that explains how to do it, in clear concise steps:
Step 1: Go to the classic Windows Control Panel, and click on the Device Manager item.

Step 2: The Device Manager shows a nested listing of all the devices connected to the computer, segregated into categories. Go to the Universal Serial Bus Controllers category and expand it. You should now see a listing of all the USB Universal Host Controllers, as well as the USB Root Hubs on the computer. To disable a USB port, simply right click on its USB Root Hub, and select Disable from the context menu (You might need to plug in a USB device and see whether it’s detected or not, to make sure that you’ve disabled the correct USB Root Hub). Check out the screenshot below:

That’s all there’s to it. You can use the same method to disable any USB port you want. If you’d like to re-enable a disabled USB port, repeat the above procedure, and choose Enable in the second step. Easy, right?
How To Prevent Read/Write Access For Devices Connected Via USB?
Although the method described in the previous section works just perfect, it’s a little too extreme. That’s because it disables USB ports in their entirety. However, there might be times when you want the access to USB ports disabled partially. As an example, consider this scenario: You connect your smartphone to the computer via USB, but don’t want the data on it to be read/written to the computer. However, you do want it to get charged via the USB port’s power supply. So what do you do in this case?
That’s incredibly simple, as Windows 10 lets you prevent read/write access for any (supported) devices connected via USB. This way, the computer would still recognize the device, but the data transfer functionality would remain disabled. Here’s how to do it:
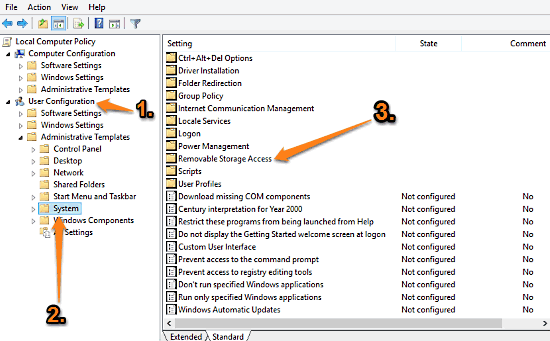
Step 1: Go to Run prompt, key in gpedit.msc, and click OK to launch the Windows Group Policy Editor. Now, use the left pane to navigate to User Configuration > Administrative Templates > System. Once there, double click on Removable Storage Access, from the options presented on the right.
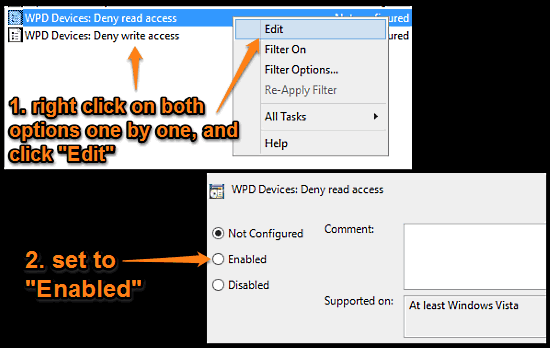
Step 2: You should now see a couple of options in the right pane. Move all the way down to the two options named WPD Devices: Deny read access & WPD Devices: Deny write access. Here, WPD stands for Windows Portable Devices. As you might’ve guessed by now, you need to enable both of these options. To do so, right click on each (of course, one by one), and select Edit. When the configuration pane pops up, change the setting from Not Configured to Enabled. Here’s a screenie:
That’s it. Windows will still recognize the USB device once it’s plugged in to the computer, but the read/write functionality to it would stay disabled. How cool is that?
See Also: Enable USB Selective Suspend In Windows 10
Conclusion
Thanks to the USB standard, it’s now easier than ever to interface a multitude of varied devices with our computers. However, it can also cause potential security issues down the line. Good thing is that Windows 10 allows you to easily disable one or more USB ports, all in a few seconds. Try it out, and let me know what you think in the comments.