This tutorial explains how to get Windows XP Start Menu for Windows 10. You will be able to replace Windows 10 Start Menu with old Windows XP style menu. The menu will work exactly in the same manner as it works in Windows XP. And all this will be done with a free software.
The software that I will use for this is Class Shell. It is a powerful Start Menu replacement software that lets you easily customize Start Menu of Windows 10. More importantly, we can use some of the options of the software together to get a Windows XP style start menu for Windows 10.
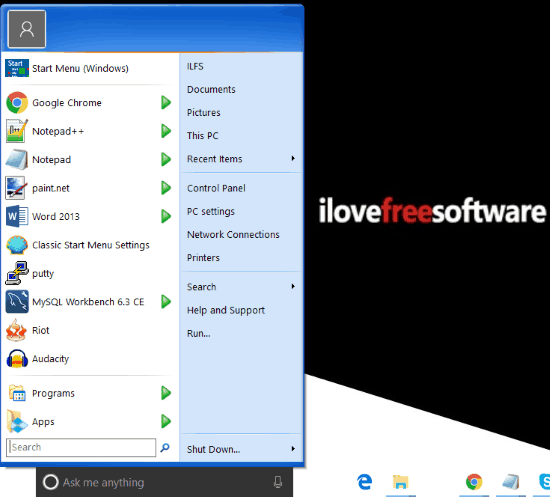
Here is how my Start Menu in Windows 10 looks after making the tweaks I will do in this tutorial:
Windows 10 has a pretty good Start Menu that is infinitely customizable. You can pin files to Start Menu, show time of multiple cities in Start Menu, and there are a lot of other features you can explore.
However, if for some reason you do not want the modern features of Windows 10 Start Menu, and would rather stick to the good old Start Menu of Windows XP, we got you covered. Just follow the steps in this tutorial to take your Start Menu a decade back.
How to Get Windows XP Start Menu for Windows 10:
It’s pretty easy to get Windows XP Start Menu for Windows 10. Just following the steps below.
- Download Classic Shell software. This is a completely free software. After that, install it.
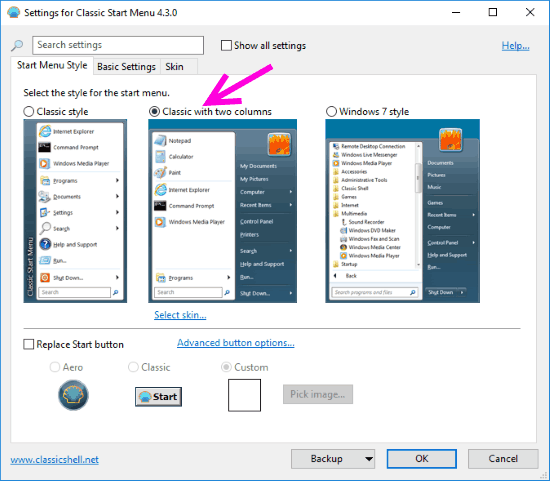
- Run the Classic Shell software. You will see interface like below. In the first tab “Start Menu Style”, select the option corresponding to “Classic with two columns”.
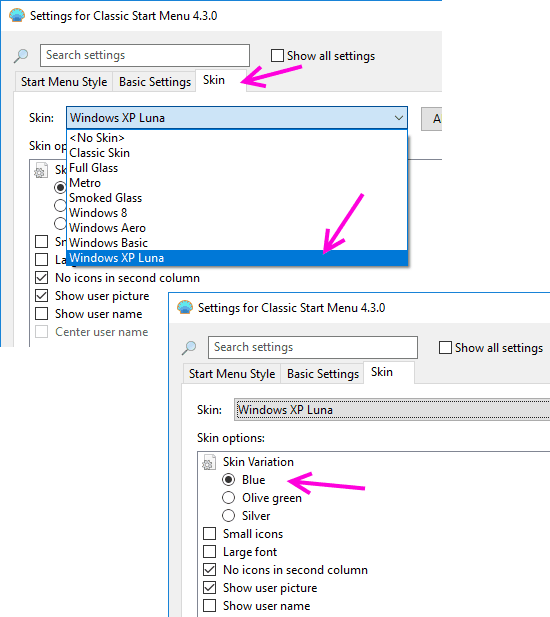
- Now move on to the “Skin” tab. In this, click on the Skin drop-down, and select the skin named “Windows XP Luna”. This is the skin that will actually give Windows XP look to Windows 10 Start menu. Once you select this skin, you will see that options below this will also change. You can choose the Skin Variations that were available in Windows XP: Blue, Olive Green, or Silver. There are a few more options that you can change, like, Show user name, Show user picture, etc.
- Now just click on OK button and go check your Start Menu. Voila! Your Windows 10 Start Menu has now changed to Windows XP.
- To get the original menu back, just undo the changes in Class Shell, or uninstall it completely. If you just want to get to Windows 10 Start Menu temporarily, click on “Start Menu (Windows)” option that appears on top of your Windows XP Start Menu. This will open Windows 10 Start Menu for you.
There are some more changes that you can do to make Windows XP Start Menu on Windows 10 look even better. You can change Start button of Windows 10 to make it look like XP. You can actually do that from within this software itself. In the “Start Menu Style” tab, you will see an option for “Replace Start Button”. Use that option and then add an image for Windows XP start button. You can easily find images on Google. Another thing you can do is Hide Search Box, or just replace it with Search Icon.
My Opinion:
When I started working on this tutorial, I wasn’t too sure how much I would like the XP menu for Windows 10. However, I frankly like it. I think I will keep this Start Menu on my Windows 10 PC for a while.
Do you think you will change Windows 10 Start Menu to Windows XP? Do let me know in comments below.