Watermark Magick is a free watermarking software that helps you to copyright your images by adding watermarks on them. It is a quick and easy medium for adding digital watermarks on images, in batches. You can choose from different set of options that’ll help you to quickly add watermarks over the desired images. Besides adding watermarks, it also converts the watermarked images to desired format and even create thumbnails of selected images.
You can download this free watermarking software by clicking the link given at the end of this article. Installation is pretty much easy and standard. When you launch the software you’ll be there with following window.

The Menus:
Watermark Magick has four main menus. Let’s have a quick look on them.
- File: Watermark Magick allows you to specify an input format and an output format (in advance) for the image files you process. The File menu contain options for the same. Here you can specify in which format you want to add files from the source folder (jpg, png, bmp, or all) and in which format you want to save the output files (jpg, png, bmp, or gif). Apart from that, you can also choose a resize parameter from the preset values (1280×1024, 1024×768, 800×600, 640×180, or original), if you want.
- Directories: This menu contain options to specify a source folder, a destination folder, and watermark file (text, image, or frame) to be added to the images. However, these can also be specified through the program interface.
- WebGalerie: This menu contains options to create a web gallery of the watermarked images.
- Options: This menu is used for changing language and debugging purposes.
Steps to Add Watermarks on the Images:
First browse the source directory and destination directory by clicking on the respective buttons given on the program interface. Watermark Magick will display a preview of all the images in a wide window on the right side. (There’s also a tab to view the preview of images after watermarking, but that works only after processing the images)
Now once you have specified the source and destination folders, you can pick the watermark file to be used by the software to watermark the chosen images. You can specify a text, an image, or a frame as a watermark.
If you want to watermark images by a picture, go to the “Picture” tab (mid left of the window). Set the picture’s folder path by clicking on the browser button (besides picture source directory). Then scroll down (if required) and choose the requisite image. Then set the alignment and size of the picture using size tag and x/y position options. You can also choose from the default pictures provided by Watermark Magick.
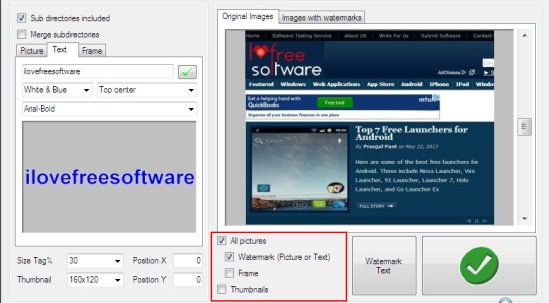
If you want some text to be displayed as watermark, then go to the text tab (besides picture tab). Type-in the desired text in the text box (just below the Text tab name). Set the color/style, font, and alignment.
And if you want a frame around your image, then go to frame tab, and browse for the desired frame by clicking on the frame source directory button and then set the size and alignment. You can also choose from the default frames provided by Watermark Magick.
Following is the screen shot of 3 tabs mentioned above .

When you are done with setting up the requisites, you can specify what actions you want this free watermarking software to perform on the images: watermark (picture/text/frame) or create thumbnails. You can choose to process all or just the first picture in the collection. Use respective check boxes to specify your preferences as shown in the sceenshot below.
Once you are done, just click on the Green checked button. That’s all you need to do and your images will start getting watermarked.
Following is a screenshot of same image before and after applying watermark.

Key Features of Watermark Magick:
- Free watermarking software for Windows.
- Add Watermarks on images in batches.
- Provide different watermarking options (text or image).
- Can add frames to images in batches.
- Provide sample watermarks to choose from.
- Can convert pictures from one format to another.
- Can create thumbnails of selected images.
- Displays image preview.
- Opens with the last settings that were on the window before closing.
- Quick and Easy to use.
- Simple UI.
Also check out these free watermarking software we reviewed earlier: TSR watermark image, Bytescout Watermarking, and Simple Image Editing Tool.
Issues with this Free Watermarking Software:
- Can’t undo.
- Can’t add picture and text as watermark at same time.
- Deletes whole folder if you’ll use the Delete all images option which is under Files>destination option. Because of this, you may loose other important files also present in the same folder.
Final Verdict:
Watermark Magick is a good tool to add watermark to multiple images together. It’s simple, easy, and quick. Your images get watermarked with few mouse clicks. Besides a few shortcomings, it works great and doesn’t crash or hangs in between. Get it free and try it out.