This tutorial explains how to remove specific colors from an image.
There are a lot of free applications and software available to retouch photos (including some photo editors with Instagram like effects). However, the beauty that comes by keeping an object in a photo colorful and leave the rest of the background gray or black n white is marvelous. There are some software which are built only for this special purpose. “Photo Black & Color” is one of those software.
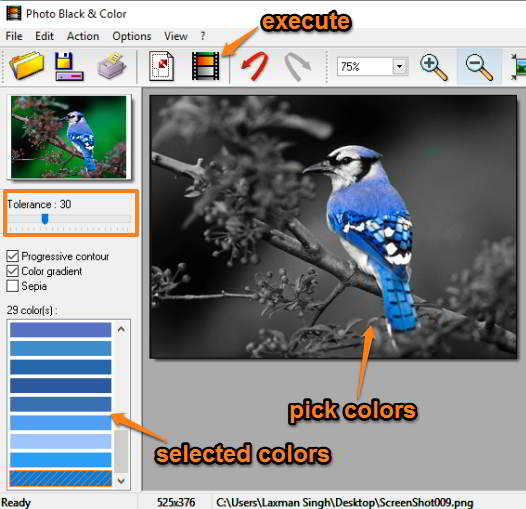
This software first lets you pick colors from an image that you want to keep and adds them to a palette. After that, with a single click, it processes the input image and removes rest of the colors (unpicked colors) from the image. The output will look like the screenshot visible below.

There are chances that you might not get the output as expected, but it can be fixed. You need to select more and more colors from the object and set the tolerance level. Then the output can come as per your expectations. Also, the software works best when there is a clear difference between the object and background color of an image.
How To Remove Specific Colors from an Image Using This Software?
Step 1: Grab the zip file of this software which contains its portable application file.
Step 2: Open the interface and add an image. It supports all the common or popular formats like JPEG, ICO, GIF, PNG, SGI, TIFF, BMP, etc.

Step 3: After adding the image, you can view it in original size or fit it to the interface. Now you need to pick a color from the photo that you want to keep in the output. Just move the mouse cursor and click on a particular color. You can also zoom in the image to pick the correct color. The selected color is added automatically in the color palette. Select more and more colors from the object. You can also set the tolerance level by moving the slider. Higher the tolerance level, more the chances that output won’t come as per your wish. Putting the tolerance level between 20 to 30 gave me a good result.

You can also enable Progressive contour and Color gradient options to have better output.
Step 4: Click Execute icon and it will process the image. If the output is good, save the image as PNG, BMP, GIF, or any other supported format. Or else, do some more changes to improve the output.
The Verdict:
I really like this software. Even if you are not a pro in photo editing, don’t know how to use Photoshop, this software will help you turn your normal photo into a beautiful art. You just need a bit of practice and then the output image will appear just like you have expected.