This tutorial will explain how to add watermark to GIF with some free online GIF editors. They allow you to add images as a watermark to GIFs with ease. You can simply open these GIF editors, choose the GIF file, and then select the watermark image. After that, they will automatically add it to the GIF to show your company logo, brand name, product hallmark, and so on. Adding watermark to GIFs can come in handy in case you want to copyright any GIF file or simply want to advertise your business, service, etc.
These are actually some of the best free online GIF editors which comes with an additional option to add watermark. As they are core GIF editors, they also offer other useful features like optimize GIF, cut, crop, resize, and more. Some of them even have the option to add a text watermark instead of an image.

Now, let us get started with the GIF editors and see how to use them for adding watermark to GIF.
Ezgif:
Ezgif is one of the best free online GIF editors which can help you add watermark to GIF. You can use it to easily add any image you want, with your company logo or brand name, to GIFs as a watermark. It is completely free to use and you can add watermark to as many GIF files as you want. Apart from that, this GIF editor also offers tons of other tools using which you can crop GIF, resize, rotate, convert, and do more.
How to Add Watermark to GIF using Ezgif:
Step 1: To get started, open up “Ezgif” homepage and head over to the “Effects” menu. After that, select the “Add Overlay” option from the menu.
Step 2: As soon as you do that, it will ask you to upload the GIF to which you want to add the watermark. You can upload the GIF either from your PC or enter any GIF URL. The maximum file size is limited to 35 MB only.
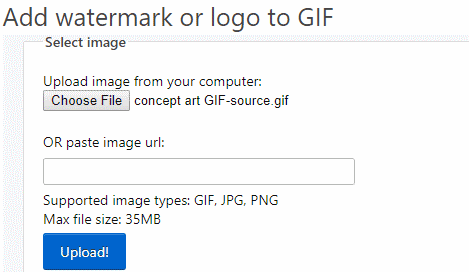
Step 3: After that, it will ask you to choose the watermark image from your PC. It supports PNG, GIF, and JPF files. When you do that, the watermark will be added to the GIF. Now, you can simply drag and place the image in any position you want on the GIF.
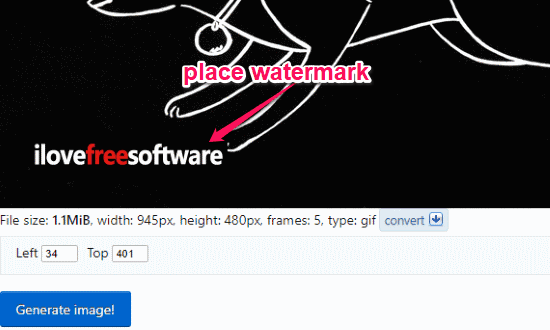
Step 4: Once done, hit the “Generate Image” button and then it will automatically generate a GIF file containing the watermark image. You can now download it to your PC for free.
Gifntext:
Gifntext is another free online GIF editor that you can use to add watermark to GIF with ease. Similar to “Ezgif”, this one also supports images which you can add to GIFs as a watermark. You can use it to add watermark to unlimited GIF files for free. This GIF editor also comes with other options like add text watermark, reverse GIF, trim, rotate, flip, and more.

How to Add Watermark to GIF with Gifntext:
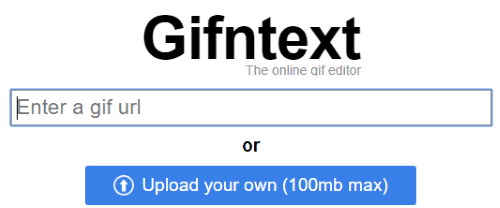
Step 1: After you open the homepage of this GIF editor, you will see the option to upload the GIF. It also lets you upload a GIF by pasting a URL or upload from PC. The file size limit is up to 100 MB.
Step 2: When you do that, the editor will open up and you can see the “Add Image” button on the left. Simply, click on this button and then upload the watermark image.
Step 3: After the watermark image is uploaded, it will be added on top of the GIF. Now, you can simply resize it and also position anywhere you want. One of the unique features of this GIF editor is that it lets you place the watermark image on any specific frame as well.

Step 4: When you’re all set, click on the “Create the GIF” button at the bottom. Now, it will generate the resulting GIF file that contains the watermark and you can download it to your PC or share with others.
Online Image Editor:
Online Image Editor is actually a free and simple image editor which you can use to GIF as well. You can choose any image you want that will be added as a watermark to the GIF. Similar to “Ezgif” and “Gifntext”, this one is also very easy to use and you can add a watermark to any GIF in no time. This editor also has some useful options like resize, crop, add text watermark, rotate/flip, and so on.

How to Use Online Image Editor to Add Watermark to GIF:
Step 1: First, open up this online image editor and then upload the GIF for adding a watermark. You can select the GIF from PC or use any GIF URL. The upload option is visible at the bottom of the homepage.

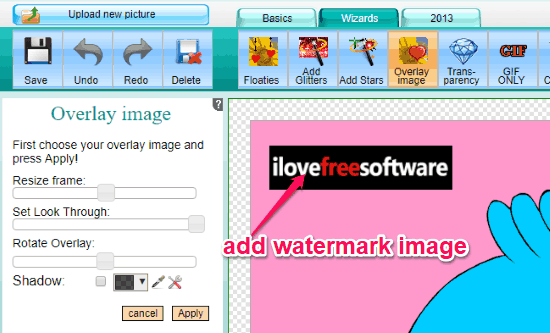
Step 2: After you do that, the editor will open up and you would need to click on the “Wizard” tab at the top. Then you can see an option named, “Overlay Image” on the toolbar. Simply, select this option and then you can choose the watermark image from your PC.
Step 3: Once you do that, the image will be added to the GIF and you can place it anywhere you want just by dragging it. You will also see the option to resize the watermark image, rotate overlay, etc.
Step 4: After you’re done with adding the watermark to the GIF, you can go ahead and save the resulting GIF to your PC for free. The GIF will have the watermark image you have added.
Closing Words:
So, this is how you can now add watermark to GIF for free. These online GIF editors make it quite simple for you to add watermark images to GIFs. The best thing about all these editors is that they are super simple to use and doesn’t require much manual effort to do the job.
Try them out for free and let men know were you able to add watermark to GIF in the comments below.