This is a quick tutorial that demonstrate how to mount ZIP archives like disc images in MAC. Here I will use a FUSE extension, called Fuse-ZIP to do that. Basically, it is a command line tool that lets you mount any ZIP file as a disc image in MAC. You just have to execute a few commands to install it and use it to mount ZIP file. After mounting a ZIP file as disc, you can access it from desktop and even opt to burn that to a disk if you want to. You can easily mount as many ZIP archives as you want images and then do whatever you want.
Mounting archives as disk images can be useful in many cases. For example, if you have a huge archive and you don’t want to waste time in extracting it to copy files from it then you can temporarily mount it. And the utility that I have mentioned in this post will help you to do that. You just have to execute a few commands to install Fuse-ZIP in on your MAC and then start using that to mount ZIP files.

How to Mount ZIP Archives Like Disk Images in MAC?
To make Fuse-ZIP work in macOS, you will have to install a FUSE file system as well to assist the mounting process. And then you can install Fuse-ZIP to start mounting any ZIP file as disk image.
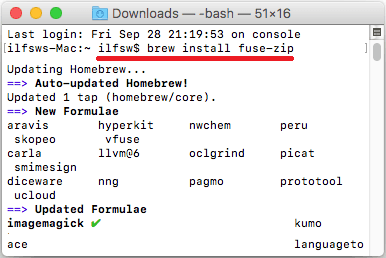
Now, to start using Fuse-ZIP, simply download the latest stable release of FUSE for MAC from here. After that, install it and then open a terminal window. Type the following command to install Fuse-ZIP. It will automatically setup all the dependencies and then you can start using it.
brew install fuse-zip
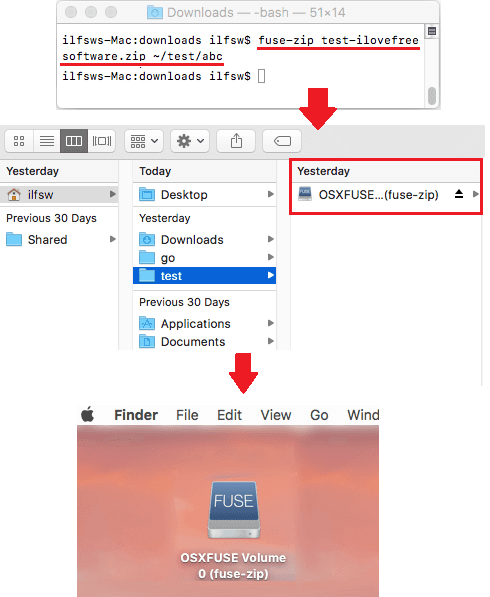
Now, to mount a ZIP file, run the following command. Make sure to change the directory in the terminal window where the ZIP file exists which you want to mount.
fuse-zip "TargetZIPFile" "LocationForTheMountedDisk"
After running the above command, it will create the mounted disk at the specified location. And the same will appear on your desktop. After mounting the ZIP as disk image, you can do whatever you like. And if you want to unmount that after your work is done, then simply right-click on it and then use the “Eject” option. Also, after ejecting a disk, you will have to remove a folder that will be created at the same place where the disk image was created.
Final words
If you’ve been looking for some handy methods to mount a ZIP archive as disk image in MAC then this post will be so helpful. You just have to run a couple of commands to install a simple utility that can painlessly mount ZIP archives in MAC. And if you know some other way to do the same then you can tell me.