This tutorial explains how to add annotation to video in HitFilm Express. After going through this tutorial, you will be able to use HitFilm Express to annotate videos and add arrows, circles, rectangles, dialog bubbles, lines, etc. HitFilm Express is no doubt one of the best free video editors which offer various advanced features (like Zoom Feature, etc.). But, when it comes to annotating a video, this video editor fails as there is no such native option or tool to do video annotation. However, I have found a simple trick to annotate videos in HitFilm Express.
This can actually be done by importing transparent images of annotation items such as shapes, bubbles, etc. that you want to add to your videos. For example, if you would like to add an arrow to video in HitFilm Express, then you can simply import a transparent PNG file of an arrow to HitFilm Express and then add it to your video. For adding text to your video, you can use the built-in “Add Text” feature of HitFilm Express.
How to Annotate Video in HitFilm Express:
Before getting started with this, first thing you need to do is have transparent shapes that you want to add to your videos. For example, if you want to add things like arrows, circles, ellipse, rectangle, etc., then you need to make transparent PNG for all of those shapes. You can either create them in an image editor like Paint.net, or just do a Google search to get the images. Do not worry about the size of the images; you can resize them while adding to your video.
Now, let’s see how to use them in HitFilm Express to annotate video.
Step 1: To get started, simply open up HitFilm Express on your PC and create a new project. For this, go to the “Home” tab and then click on the “New” button. Once you’re done with that, select the “Start Editing” option and it will open up the “Edit” tab where you will be able to import and add annotation to the video.
Step 2: On the “Edit” tab, you will see an “Import” option under the “Media” section on the bottom left corner. Simply, click on the “Import” option and then select the video on which you want to do annotation. After importing the video, simply drag and drop it on the timeline.
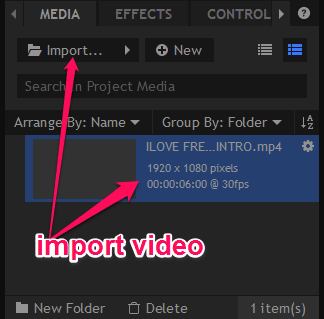
Step 3: When you’re done adding the video to the timeline, simply click on the “Import” option again and then import the annotation item which you want to add to the video. This would be the transparent PNG that we created earlier. After importing the transparent item, simply drag and drop it on the track above the video which you have added to the timeline. As an example, I will use an “Arrow” for demonstrating how this works.
![]()
Step 4: As soon as you do that, the item will be added to the video and you can see it in the editor preview. On the editor preview, you can simply click on the item and drag the edges to change the size and also move & place it anywhere you want on the video. Apart from that, you can also rotate the item by clicking the small “Blue” dot associated with the item.
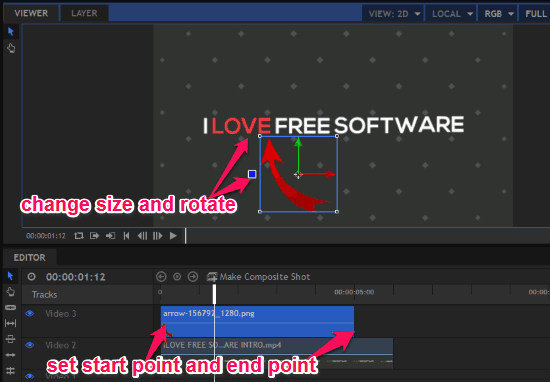
Step 5: Now, you can select the specific part of the video to which you want to add the annotation item. To do this, simply drag the start point and the end point of the added item on the timeline, as shown in the above image. In the same manner, you can import any annotation item (like a shape, bubble, etc.) you want and add it to any specific part of the video.
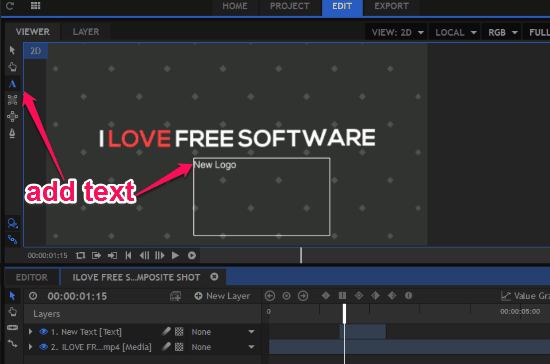
Step 6: Once you’re all set with adding the item, you can go ahead and add text for annotation. In order to add text on the video, the first thing you would need to do is click on the “Make Composite Shot” option at the top of the timeline. As soon as you do that, the “Composite” window will appear where you will see an “A” icon on the left of the “Viewer” tab. Clicking on this icon will allow you to add text on the video. When you’re done typing the text, you can use the “Razor” tool on the timeline to cut the text for the same video part which you have selected for the annotation item.
Closing Words:
This is how you can do video annotation in HitFilm Express. The method might look a bit tricky, but once you have made shapes of all the annotation items you want to use, you can just keep reusing them in all your videos. Its a lot simpler than it sounds. This is something that we do on our YouTube channel daily, and find it very convenient.
If you don’t have HitFlm Express installed on your PC, then you can get it from here.