This tutorial explains how to manually check disk for errors and to repair the errors in Windows 8. You can do this by either using Check tool of Windows, or can use CHKDSK command in the Command prompt.
Check Disk is a feature of Windows, which lets you check any specific drive for any error. It even lets you repair those errors, without doing much. Checking disk at a regular interval and time, and then repairing it instantly, helps to maintain the performance of your Drive.
Method 1: Check Disk For Errors In Windows 8 Using Drive Properties
Windows provides a utility tool “Check”, which checks your Drive for any error, and if any error found, then it repairs those errors as well. Follow the below steps for the same:
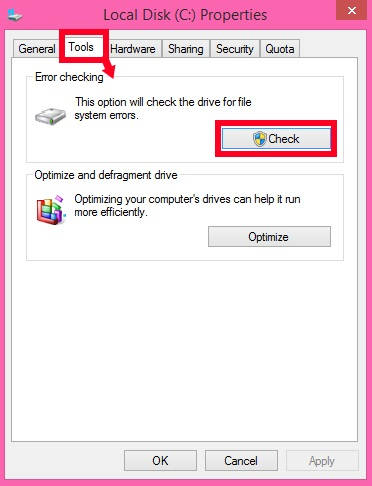
Step 1: Open This PC. In This PC, right click on the Drive for which you want to check for errors. From the popped list, click on Properties.
Step 2: In the Properties window, you will see various panels on the top. Click on the “Tools” tab. In tools tab, you will see error checking. Click on the Check button available in Error Checking box. It will display possibly two types of messages, depending upon the Drive.
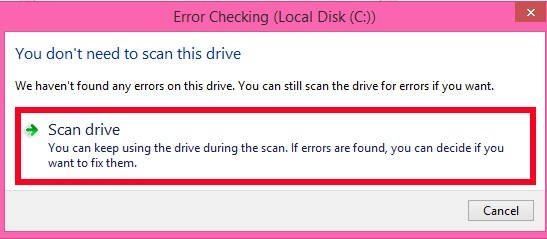
Case 1: No Errors Found
If No Errors are found in the Disk by Check Disk tool, then it will display a box, that says “We haven’t found any errors for this drive. You can still scan the drive for errors if you want”.
Below this message, you will see a link that says “Scan Drive“. Although, you don’t need to scan the Drive, but if you want, you can still scan the drive by clicking on Scan Drive.
It will Start Scanning the Drive. If any errors occur, it will display them. Else, it will show no errors found.

Case 2: Errors Found
If any error occurs, then it will display a message “We found errors on this drive”. To prevent data loss, repair the drive now.
Below this message, you will see a link that says “Repair Drive“. It will start repairing the drive instantly.
Note: While repairing, Windows blocks the use of that particular drive. After repairing, you need to restart your PC.
Method 2: Check Disk For Errors In Windows 8 Using CHKDSK
CHKDSK is a command for checking any drive for errors, or bad sectors. It even lets you repair the drive using the command only.
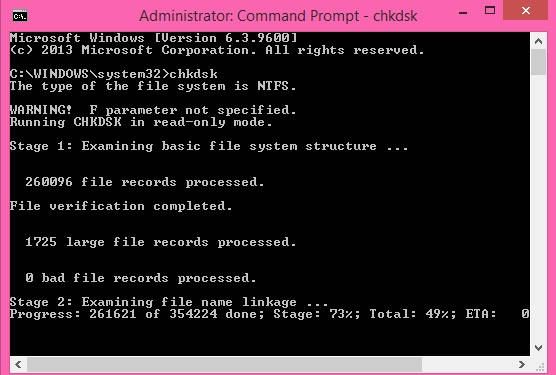
Open Administrator Command Prompt. To open, search for CMD in the Search bar, and then right click on the Command Prompt. Tap on Run as administrator option.
Now in the Command Prompt, type the below code to repair any specific drive:
chkdsk Drive_Name
Replace Drive_Name with the drive which you want to check. For example, to check C drive, use chkdsk C:
To fix the errors of the drive use /F in the command. For example, to fix the errors of the C drive use below code in the Command Prompt:
chkdsk C: /F
To learn more commands related to CHKDSK, click here.