Super is a free 3D video converter for Windows to convert 2D videos to 3D videos. It is a very powerful video converter as it can convert videos without installing external codecs. Apart from converting videos, you can also use it to play 3D videos. With it, you can also convert 2D images to 3D images, and apply 3D effects to audio as well.
You can also use it to create IFO & BUP files, join Format-Identical files, split into smaller files, mux video and audio streams, and demux extract streams.
Let’s see how you can perform all these tasks with this free 3D video converter & player.
You can use it to convert 3D videos in bulk in same output file format. It doesn’t provide an option to convert selected media files into different formats at once. If you want to convert videos in bulk to different videos at once then you can check out Video to Video converter, though it doesn’t support 2D to 3D conversion. For that, Super is your best bet.
It also gives an option to record 3D videos but this feature didn’t work for me.
How to use this free 3D video converter:
The user interface of Super is not so good and is cluttered with too many options, which make it look like a mess. The only thing I liked about its user interface is that it displays proper tooltips when a mouse pointer hovers over a particular option. However, it’s not a feature but it’s quite useful for users to understand how they can apply different customizations to optimally convert files.
Its interface is logically divided into 2 modes. In its first mode, you will see an interface to convert 2D videos to 3D videos and in second mode you will see an interface for other options like mux audio & video stream, split files, etc. You can switch between these 2 modes by selecting radio boxes that appear on the top-left part of the screen.
Let’s see how to convert videos using Super and its other options mentioned above.
How to convert 2D videos to 3D using this free 3D video converter:
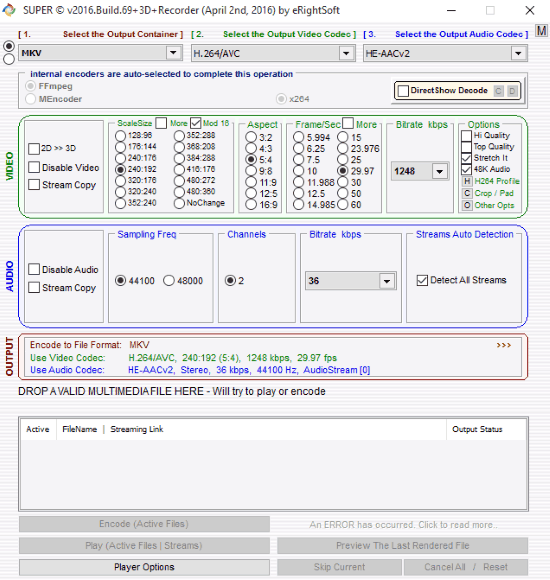
You can enable the interface for converting 2D videos to 3D by selecting upper radio button from its top-left part of its main screen. Its 3D video converter interface is divided into 5 sections: Selecting output parameters, Video settings, Audio settings and a section to import video files to convert. In these different sections, you need to specify certain parameters like output container, output video codec, etc and then click on Encode (active files) button to convert 2D videos to 3D videos.
Let’s see all the sections and converting options available.
Selecting output parameters: In this section, you will specify certain output formats like output video format, output video codec, output audio codec, etc. It automatically selects internal encoders required for converting video. When you select an output video format, or output audio & video codecs, it automatically selects optimized settings for conversion, which you can modify as per your requirements. You can select its DirectShow Decode option to re-encode video file formats that you can play with Windows media player.
Following are some of the supported Audio video formats, as well as Audio codecs:

- Output video formats
- 3GP (Nokia/NEC)
- 3GP/3G2 (Motorola, Sony)
- ASF
- AVI
- DV
- FLV/SWF (Flash)
- MKV
- MOV
- MP4, etc.
- Output audio formats
- AAC
- AMR
- ACF
- MP3
- M4A, etc.
- For specific devices
- Android (MP4)
- Apple (MP4)
- Blackberry (MP4)
- Nintendo- DS (DPG)
- Microsoft- Xbox (MP4), etc.
- Output video codecs
- Xvid
- Quicktime Animation (lossless)
- RAW Uncompressed (lossless)
- VP4
- Flash video
- MPEG-4
- H.264/AVC, etc.
- Output audio codecs
- HE-AACv2
- WAV-(A-law)
- AAC-LC
- IMA 4:1, etc.
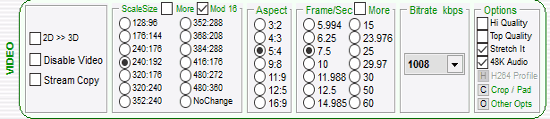
Video: This section includes options related to output video i.e customize its size, quality, aspect ratio, output video format, and output video codec. Its best part is that when you select an output video format or output video codec, it automatically selects optimized settings required for converting videos.
If you want to convert a 2D video to 3D then make sure 2D >> 3D check box is selected. If you select Disable video option then the converted file will just contain its audio and its video part will be removed from it. You can also change frame/sec and bit rate of output video through this section. It also lets you customize output video quality and its size.
Following options are available in this section:
- 2D>>3D: Enable this option to convert 2D video to 3D.
- Disable video: This option will disable video in the output file.
- Stream copy: If this option is enabled then it directly copies video stream from the input video file without re-encoding. This option might not work with some codecs.
- Scale Size: You can specify height and width of output video here. If you select an output video codec or format then it automatically selects recommended size of output video. You can also select a specific size of output video from the list of screen sizes displayed in Scale Size section.
- Aspect ratio: Select aspect ratio of the output video. You can select following aspect ratio:
- 3:2
- 4:3
- 5:4
- 9:8, etc.
- Frame/Sec: Select frame per second of the output video. You can select 23.976, 29.97, 25, or 30 fps (frame per second).
- Bitrate (kbps): Select the bit rate for the output video from the drop-down list in Bitrate section.
- Options: You can select the quality of output video from here. It lets you select following output videos:
- Hi quality
- Top quality
- Stretch it
- 48K Audio
- H264 profile
Audio: This section includes options related to the audio of output file. From this section, you can customize audio settings of the output file. It offers the options to set sampling frequency & bit rate of output audio. If you want to disable audio from the output video file, then you can select its Disable Audio option. As in Video section, this section also automatically selects optimized output audio settings when you select an Audio codec from “Select an output audio codec” drop down on its top-left part of the screen.
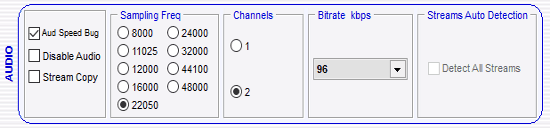
If you are facing some problems in encoding audio stream, then you can select its Aud Speed Bug option to let it automatically handle audio encoding issues.
Note: Options that you see in Audio & Video section depends on upon selected audio & output codecs.
Options available in this Audio section are:
- Disable Audio
- Aud Speed Bug
- Sampling Frequency
- Channels
- Bit rate
- Detect All Streams
Select output directory: You need to specify output directory, i.e where you want to keep converted videos from here. To select an output directory right click on Output sections that appear below the Audio section and “select Output file saving management” option and then click on “Browse” button to select the output directory.

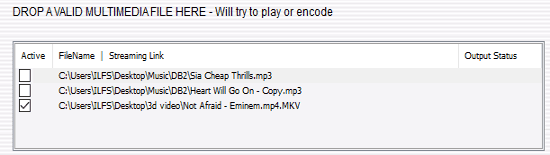
Importing video/audio files to convert: This section appears below Output section from where you selected output directory. You can drag and drop files in this section that you want to convert.
Now, that you are familiar with its converting options you can follow these steps to convert 2D videos to 3D:
Step 1: Select output parameters like output format, video and audio codec.
Step 2: Select output video settings from Videos section. Make sure 2D >> 3D option is selected if you want to convert 2D videos to 3D.
Step 3: Select output audio settings from Audio section.
Step 4: Right click on output section and select “File Saving Management option” to select the output directory.
Step 5: Drag & drop multiple file formats to add to converting list.
Step 6: Now click Encode button to convert video/audio files.
That’s it. Now you have a converted video file with exactly the settings that you specified. If you wanted 2D to 3D conversion, you will see 3D video file as the output.
As I have mentioned earlier, in addition to 2D to 3D video conversion, you can also use it to join format identical files, split files into smaller files, create IFO and BUP files, etc. To access these options select lower radio button that appears on the top-left part of the screen. After it, you can select any option that you want to perform from the Output process drop-down list and then the interface for that particular option will appear.
Let’s see these options one by one and in greater detail:
Join multiple audio video files:
If you want to join some multimedia files together then you can use this option to do so. But with it, you can only join multimedia files that strictly format identical i.e. they must have similar formats, video codec, video scale size, Aspect ratio, FPS, Audio code, Audio bit rate, etc.
Suppose you want to join A, B, and C files in this order {A, B, C}, then you need to import/drag & drop files in this order C>>B>>A, i.e. in reverse order. Well, who in the world has time to care about file orders to simply join them, you can check out FormatFactory that comes with a better interface and lets you join multimedia files together.
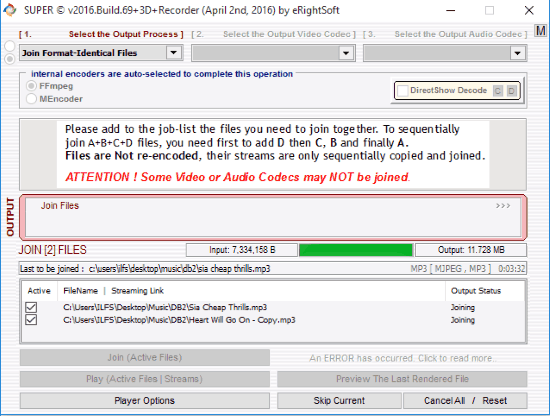
You can simply join multiple identical format files by following these steps:
Step 1: Select the output process as “Join identical format files”.
Step 2: Right click on Output section and select Output file saving management option to select an output directory.
Step 3: Drag & Drop files onto its interface that you want to join.
Step 4: Right click on output section and select “File Saving Management option” to select the output directory.
Step 5: Click on Join button to join different multimedia files that are of same formats.
Note: You can join multimedia files of following file formats: AAC, AMR, DTS, FLAC, M4A, MP2, MP3, WAV, WMA, 3GP, 3G2, ASF, AVI, F4V, FLV, M4V, MPG, OGG, TS, M2TS, VOB, WEBM, WTV, and WMV.
Split multimedia files into smaller chunks:
It also lets you split a large multimedia file into smaller files through its Split Into Smaller Files option. To perform this action, select Split files into smaller files as output process, import a media file of supported file format, and then click on Split button. After you click on Split button, it then prompts you to select the number of smaller files that you want to create. You can either select a number from the prompt list or specify customized split length by selecting last option of the prompt list, as you can see in screenshot included below.
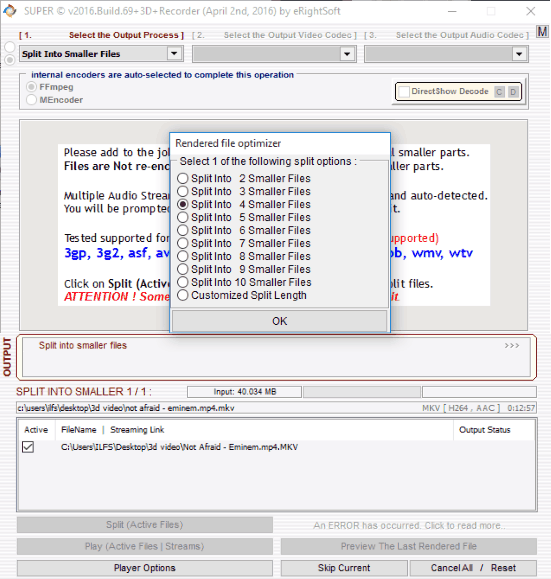
Note: You can split files of following formats: 3GP, 3G2, ASF, AVI, F4V, FLV, M4A, MOV, MP4, MPG, VOB, WMV, and WTV.
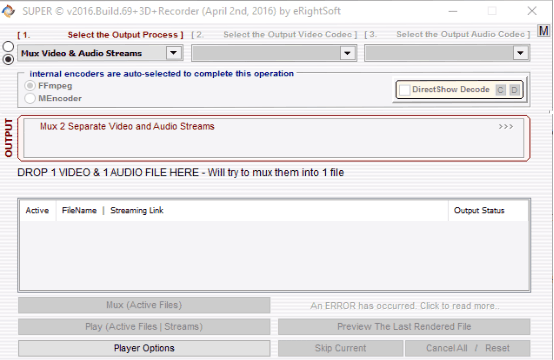
Mux video & audio of output streams:
You can use this feature to replace poor audio stream of a video file with a good quality audio file. You can mux maximum of 2 separate video and audio streams at the same time. In order to successfully mux audio and video file you need to first import an audio file and then import a video file. The order in which you import files for muxing is important and can’t be neglected. Follow these steps to replace audio file of a video file with another one:
Step 1: Select “Mux video & audio of output streams” as output process from Select output process section.
Step 2: Import an audio file that you want to mux with video output stream.
Step 3: Now, import a video file.
Step 4: Right click on output section and select “File Saving Management option” to select the output directory.
Step 5: Click on Mux button to replace audio stream of video file with imported audio file in Step 2.
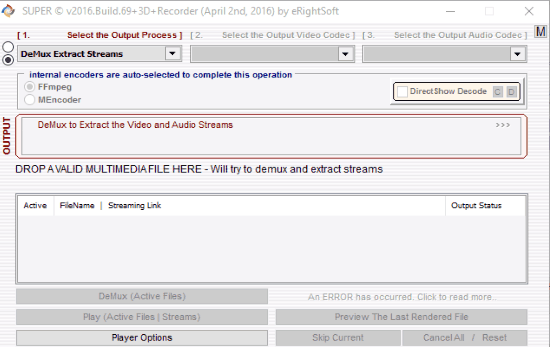
DeMux Extract Streams: Extract audio from video file
This feature of Super lets you extract audio from video file without re-encoding/converting. To use this feature, select DeMux Extract Streams as output process in Select the Output Process section. It also supports extracting multiple audio streams from a single input file and prompts you to select which audio file you want to extract.
To extract audio from video file, just select this option as output process, as mentioned above, and then import a video file. Now, click on DeMux button to extract audio from video.
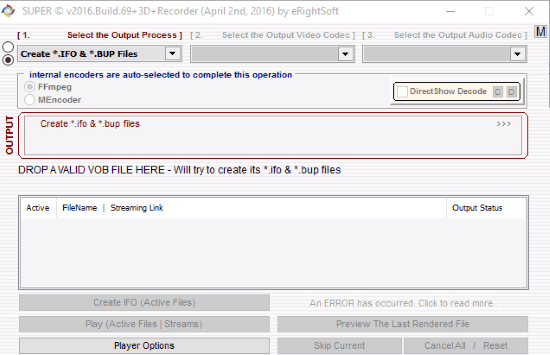
Create IFO & BUP files for VOB file:
You can use this feature of this free 3D video converter to create IFO & BUP files for VOB file. To create these files, select create .IFO & .BUP as output process and then import a video file of VOB extension and then click on Create IFO button. It then creates IFO and BUP files for imported VOB file and creates 2 folders. One folder is named as [Video_ts] that contains VOB, IFO, and BUP files and an empty second folder [Audio_ts].
Verdict:
Super is a free 3D video converter for Windows to convert 2D videos to 3D. The User interface of this freeware was not good as it was cluttered with options. But the options do make it pretty powerful, and let you control the conversion and output exactly the way you want.
Despite its poor UI, it surely provides other important features like mux audio and video output streams, extract audio from video, create IFO & BUP files, join format identical files, and split large multimedia files into smaller ones. It also gives you an option to record 3D videos but this option did not work for me.
Get Super from here.