Here are 5 free time tracker with screenshots feature. These software can be used to easily track how much time you have spent on PC applications, websites, or projects. Apart from that, they can also automatically take screenshots of the screen to let you monitor the activities. Some of them monitor your application usage and tracks their time, whereas, some lets you manually create projects and then track for how long you have worked on them. The application and time details are logged automatically to a dashboard (offline or online) which you can browse with ease.
You can use them for personal use or for remote users (like freelancers). Most of these software allows you to invite remote users to use the same dashboard and you can be the admin for that account. There are many other time tracker software and websites available, but almost none of them has the option to track time as well as take screenshots automatically. So, if you’re looking for something which exhibits both the features, then this list will help.
![]()
Let’s get started with the software.
Apps Tracker:
![]()
Apps Tracker is one of the best free time tracker with screenshots feature. This software allows you to easily find out which applications you have used on your PC and for how long. The best thing about this software is that the time tracking is done automatically. It simply runs in the background, monitors the applications, and logs the time. When you open the main window of this software, you can see the list of applications and their usage duration, the percentage among other applications, etc. It can show you the same for individual applications as well as their opened windows. There are other features available using which you can see the application usage graph, graph by login time, and most importantly take screenshots automatically. This software is completely free to use without any limitations.
How to Track Time and Take Screenshots using Apps Tracker:
Step 1: To get started, the first thing you need to do is download “Apps Tracker” and install it on your PC. After that, open it up and then it will automatically start tracking applications and their usage time. You can see all the time details on the “Apps” and “Day Summary” tabs.
Step 2: Now, to take screenshots of the screen automatically, you would need to first open the software “Settings” window. Then select the “Screenshots” tab on the left panel. After that, check the small box associated with the “Take Screenshots” option. There you will also see the options to choose the screenshot interval (as 10 sec, 30 sec, 1 min, 2 min, etc.) and define the storage location.
Step 3: As soon as you’re done with the settings, this software will start taking screenshots of the screen based on the time interval. You can see all the screenshots on the “Screenshots” tab on the main window or in the selected location.
TopTracker:
![]()
TopTracker is another free time tracker that comes with the option to take screenshots of the PC screen. Using this software, you can track the time that you have spent on your projects with ease. Unlike the “Apps Tracker”, this one doesn’t actually monitor applications that you use, but instead lets you create projects and track their usage time automatically. All the logged details can be seen in the online dashboard of TopTracker. It will show you all the projects that you have created along with the time duration, latest activity on the projects, work time per week, etc. There are other useful features available which can help you collaborate with team members or remote users, see detailed reports with graph, set idle timeout, and also automatically take screenshots of the screen. It is completely free to use without any limit on the features.
How to Use This Time Tracker to Log Time and Take Screenshots:
Step 1: First, you would need to open TopTracker on the web and sign up for a new account. After that, install the TopTracker application on your PC and login using your account details. When you’re done with that, you can go ahead and start creating projects on which you want to work on. Now, you can select any project you want and hit the “Start Tracking” button to start time tracking.
Step 2: It will automatically log the time which you spent on that project until you stop the tracker manually. All the tracked time details will be visible on the “Projects” tab of the TopTracker online dashboard. Now, to automatically take screenshots of the screen, you would need to open the “Preferences” window from the desktop client. After that, enable the “Take Screenshots” option under the “General” tab and set the “Tracking Interval” (as 5 min, 10 min, etc.).
Step 3: As soon as you do that, this software will automatically take screenshots based on the selected time interval. You can see the screenshots for the projects on the online dashboard. It also lets you choose the option to blur the screenshots before uploading to TopTracker to hide any confidential information.
ActivTrak:
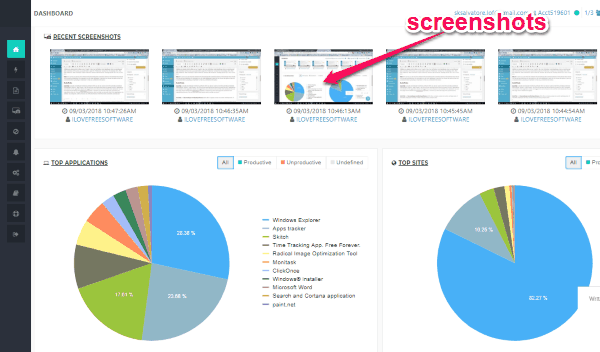
ActivTrak is actually an employee monitoring software which can also be used to track time and take screenshots. Similar to “Apps Tracker”, this one can track and log the time which you spend on the PC applications and websites automatically. All the application details and logged time can be viewed on the ActivTrak online dashboard. You can the usage time of websites and applications separately. It will show you the total usage time, productive and unproductive time, etc. This one comes with other features which can help you see a pie chart of top applications, top websites, top categories, and much more. One of the best features is that it can take screenshots automatically. This software has some limitations in the free version like 3 users, 1 screenshot per activity, 3 GB of data storage, etc.
How to Track Time on Applications and Take Screenshots using ActivTrak:
Step 1: To use ActivTrak, simply open the homepage and create a free account. After that, you would need to install the ActivTrak desktop client on your PC. As soon as you do that, it will start monitoring your applications usage and track their time automatically.
Step 2: The time will be logged to the online dashboard and you can see the details under the “Dashboard” or “Reports” tab. Now, to make this software automatically take screenshots, you would need to select the “Screenshots” tab on the left panel and click on “Configuration” option. After that, you can manually create conditions when to take screenshots for individual applications or choose “Any” for all applications.
Step 3: To create a condition for any specific program, you would need to enter the website or application title, choose user, set wait time between screenshots, and you can even enable the “Take Multiple Screenshots” option if you want. Once you’re done with that, the desktop client of ActivTrak will start taking screenshots and you can see them on the “Screenshots” or “Dashboard” tab.
Monitask:
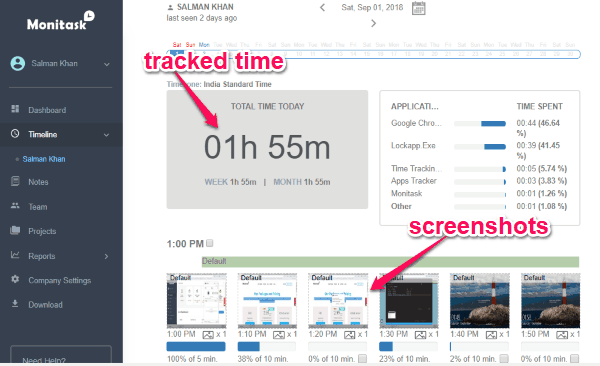
Monitask is another simple and free time tracker with screenshots feature. This one is quite unique as it can allow you to track time spent on both manual projects as well as pc applications. It can also track the time automatically for you and log to the online dashboard. You can see project-wise usage time, last worked time, member, etc. There are many other useful tools available using which you can set idle downtime, manually add time entries, collaborate with remote users, detailed reporting, along with taking screenshots automatically. Do note that the free version can take only 6 screenshots per hour. There are some other limitations to the free version like only 3 users, no custom reports, etc.
How to Use Monitask to Track Time and Take Screenshots Automatically:
Step 1: For using this software, the first thing you need to do is create a free account by opening the Monitask homepage and then install the desktop client. After you do that, open the software and then you can manually create projects for which you want to track the time. You can choose any project and then start the timer to automatically log your work time. The time details can be seen on the Projects and Timeline tab on the online dashboard.
Step 2: To take screenshots of the PC screen automatically, go to the “Company Settings” page on the online dashboard. After that, select the “Screenshots” tab and there you can see the option to choose the screenshots count per hour. By default, it will be “6” if you’re using the free version. Do note that the screenshots are taken at random intervals and there is no option to change that.
Step 3: Once you’re done with that, the Monitask time tracker can start taking screenshots of the screen and upload them automatically to your dashboard. You can see all the screenshots under the “Timeline” tab. Apart from that, it will also show you the percentage of the time you have spent on the screen captured in the screenshot.
Screenshot Monitor:
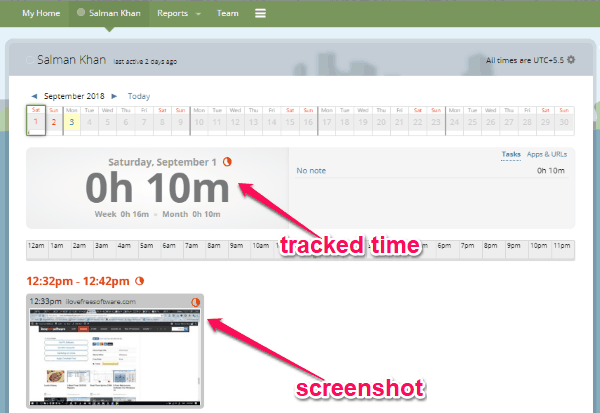
Screenshot Monitor can also be used to automatically track time and take screenshots for free. This one is similar to “TopTracker” and allows you to manually create tasks and then track the time spent on them. This one also has the option to track applications and websites usage, but this feature is available in the paid version only. It can log time automatically and you can see the details on the online Screenshot Monitor dashboard. It shows various details based on specific users like the total time spent on tasks, a calendar and 24-hour timeline, etc. There are other features including reporting, take screenshots, collaborate with remote users, and so on. The free version of this software has many limitations like 3 users for collaboration, 3 screenshots per hour, and more.
How to Automatically Track Time and Take Screenshots using Screenshot Monitor:
Step 1: To get started, you would need to first create a free account and then install the Screenshot Monitor desktop client. After that, open it up and then enter the name of the project on which you want to work and start the time tracker. Then it will keep tracking the time automatically before you stop the tracker.
Step 2: All the project and usage time details can be seen on the online dashboard. Now, to make this software take screenshots automatically, open the “Settings” page online and select the “Screenshots” tab. There you can choose the number of screenshots that you want to take per hour (only 3 in the free version) and allow blur to hide sensitive information. This one also takes screenshots at random intervals.
Step 3: As soon as you’re done with that, this time tracker will automatically take screenshots of the screen and upload to your dashboard. You can see the screenshots along with the other time tracking details on the home or user tab. The screenshot duration will also be visible to you.
Closing Words:
If you have been looking for some solutions to track time and also take screenshots automatically, then the software explained in this post can be helpful. All these software are free and useful time tracker with screenshots feature. They come with a simple and intuitive interface making it easier for you to track time on applications/projects and take relevant screenshots to monitor activities. So, try them out and leave your feedback below in the comments.