This tutorial explains how to shoot time-lapse videos on iOS 8 using iPad. It includes all the steps involved in shooting time-lapse videos.
Time Lapse feature was added in iOS 8 and is available under default Camera app of iPad / iPhone / iPod Touch.
After following this tutorial, you will be able to shoot time-lapse videos using your very own iPad and iPhone. The only requirement you need to fulfill is that make sure that your device is running on iOS 8 version.
Time Lapse photography is a technique in which video is captured at a very slow frame rate. So, when the video is played at the normal speed, it actually appears to be running at a faster speed. A normal use of this technique is to capture an event that proceeds at a very slow speed (like, water filling a big tank, sunset, aging, etc.), and then play at a normal speed to get the complete details of that event in a much shorter time.
How to Shoot Time-Lapse Videos on iOS 8 Using iPad?
Follow below mentioned to steps to get started with shooting your first time-lapse video on iPad and iPhone:
- Go to Camera app on your iOS 8 running iPad or iPhone and launch it.

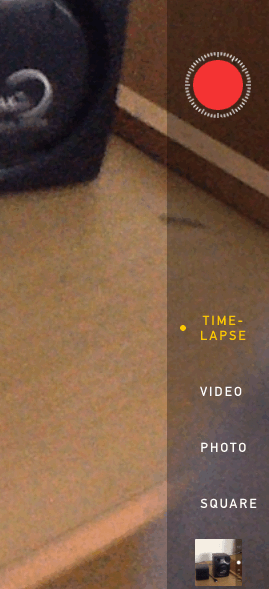
- On next screen, you will see following options: Time-Lapse, Video, Photo, and Square. Tap on the Time-Lapse option to select it. You can also slide upwards on the screen to select the mode.
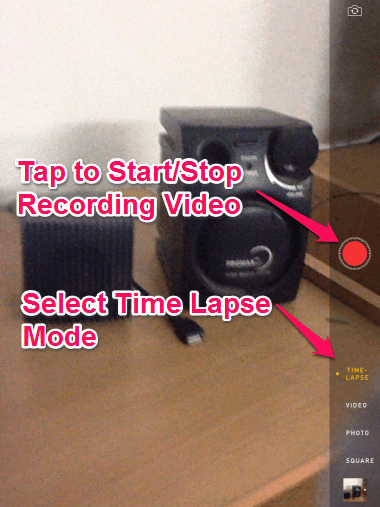
- Now, simply shoot video normally just like you do with your iPad or iPhone by tapping on the Red circle button.
- When you have finished shooting video, tap on the Red button again to stop recording.
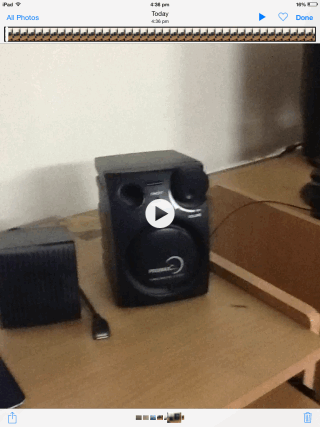
On finishing the video, your iPad will save it automatically. If you want to view the video, then tap on the box below the Square option to go to iPad photo album. You can surf all videos shoot by you from here as you do older iOS running devices.

To watch video, tap on Play icon and see it in time-lapse mode with much quicker rate as compared to original one.
You can also add any of the video recorded by you to Favorites section, by tapping on Heart icon at top right corner.
If you want to share video with your friends, then tap on the Share icon at bottom left corner. You can share it via iMessage, email, iCloud, YouTube, Facebook, and Vimeo. The time-lapse video recorded using iOS 8 running iPad is shared in .MOV format.
Only flaw with recording time-lapse videos on iOS 8 using iPad is that it doesn’t let you set the frequency rate for frames. The Camera app decides everything on its own.

This was the tutorial for How to shoot time-lapse videos in iOS 8 using iPad. I hope Apple adds an option to control frame rate of the video.
You may also like: 4 Free Email Tips for iPhone You Might Not Know.